Refacing a Fireplace With Stacked Stone: A Comprehensive Guide
Refacing a fireplace can dramatically alter the aesthetic of a living space, transforming it from dated and mundane to modern and sophisticated. One popular and effective method for achieving this transformation is through the application of stacked stone. This material offers a visually appealing texture and a sense of natural elegance that can complement a variety of interior design styles. This article provides a comprehensive guide to refacing a fireplace with stacked stone, outlining the necessary steps, considerations, and potential challenges.
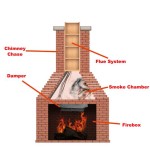
Before embarking on a fireplace refacing project, it is crucial to asses the existing structure. This includes evaluating the material of the existing fireplace surround, inspecting for any structural damage, and determining the overall dimensions of the area to be refaced. Proper assessment ensures the suitability of the project and allows for accurate material calculations. Considerations should include whether the existing surround is brick, drywall, or another material, as this will influence the preparation process. Furthermore, any signs of cracking, water damage, or instability should be addressed before proceeding with the stone application.
Once the assessment is complete, accurate measurements are essential for calculating the amount of stacked stone required. It is recommended to add approximately 10% to the total calculated area to account for cuts, waste, and potential errors. The selection of stacked stone is a critical decision. Stacked stone is available in a wide range of materials, including natural stone, manufactured stone veneer, and various colors, textures, and profiles. The choice should align with the desired aesthetic and the overall design of the room. It's also important to consider the weight of the stone, as heavier stones might require additional structural support.
Preparing the Fireplace Structure
Proper preparation is paramount to ensuring a successful and long-lasting stacked stone installation. The first step involves cleaning the existing fireplace surround thoroughly. This typically entails removing any dust, dirt, grease, or loose paint. A wire brush and a suitable cleaning solution are often necessary to achieve a clean and sound surface. If the existing surface is glossy or non-porous, it may be necessary to roughen it up with sandpaper or a grinder to improve adhesion.
For surfaces like drywall or painted brick, the application of a scratch coat is often recommended. A scratch coat is a thin layer of mortar that provides a textured surface for the stacked stone to adhere to. The scratch coat should be applied evenly and allowed to dry completely before proceeding further. Depending on the existing surface, furring strips may be necessary to create a level plane for the stone installation. Furring strips are typically made of wood or metal and are attached to the existing structure to provide a consistent mounting surface.
In some cases, depending on the weight of the stacked stone and the structural integrity of the existing surround, the installation of a metal lath may be required. Metal lath is a wire mesh that is attached to the existing surface to provide reinforcement for the mortar bed. It's particularly recommended when applying stone to drywall or other non-masonry substrates. Metal lath is typically fastened with nails or screws and should be overlapped at the seams to ensure continuous coverage.
Installing the Stacked Stone
The installation process begins with the application of mortar to the back of each stone. A high-quality mortar specifically designed for adhering stone is essential. Apply a generous layer of mortar, ensuring complete coverage, and then press the stone firmly onto the prepared surface. Start at the bottom of the fireplace surround and work upwards, maintaining a consistent joint spacing between the stones. Using spacers can help achieve uniform spacing and a professional appearance.
When working with stacked stone, it's essential to stagger the joints to create a more natural and visually appealing look. This involves cutting stones to different lengths to avoid vertical seams aligning directly above one another. A wet saw is the preferred tool for cutting stacked stone, as it provides clean and precise cuts while minimizing dust. Safety glasses and hearing protection should always be worn when operating a wet saw.
As the stones are installed, use a level to ensure that each row is straight and plumb. Any adjustments should be made while the mortar is still wet. Periodically check the overall alignment of the stone veneer. Remove any excess mortar from the face of the stones with a damp sponge or brush as you go. Allowing the mortar to dry on the stone can make it difficult to remove later and may stain the surface. Small wedges can be useful to hold stones in place while the mortar sets.
Finishing Touches and Considerations
Once the stacked stone is installed, allow the mortar to cure completely according to the manufacturer's instructions. This can typically take 24 to 72 hours. After the mortar has cured, inspect the installation for any gaps or imperfections. Fill any gaps with matching mortar using a grout bag or a pointing trowel. Smooth the mortar joints with a jointing tool to create a consistent and professional finish.
Sealing the stacked stone is often recommended to protect it from moisture and staining. A breathable stone sealer should be applied according to the manufacturer's instructions. This will help to prolong the life of the stacked stone and maintain its appearance. In some cases, especially with natural stone, sealing may enhance the stone's natural colors and textures. Prior to sealing, ensure the stone surface is clean and free from dust and debris.
Finally, consider the surrounding trim and design elements. Ensure that the stacked stone seamlessly integrates with the existing architectural features of the room. Adding a mantel or hearth can further enhance the fireplace's aesthetic appeal. Properly cleaning all tools and the work area is crucial for a professional finish. After cleaning, review the fireplace for any loose stones or imperfections and address them for long-term durability and beauty.

Stone Fireplace Design And Remodel

Stone Selex Show Special 970 Fireplace Refacing Selexstone

Refacing A Fireplace With Stone Veneer Horizon

Reface A Fireplace With The Look Of Stone Or Brick Barron Designs

Reface Fireplace Brick Makeover Home Remodel

Refaced Fireplace With Silver Travertine Stacked Stone And Add Rustic Reclaimed Wood Mantel So Happy Remodel Design

Stacked Stone Fireplace Reface Rustic New York By Ember Fireplaces Houzz Ie

Reface A Fireplace With The Look Of Stone Or Brick Barron Designs

Stacked Stone Fireplace Reface Rustic New York By Ember Fireplaces Houzz Ie

Faux Stone Panels For Fireplaces
Related Posts