DIY Fireplace Screen Door: A Comprehensive Guide
A fireplace, whether wood-burning or gas, is a focal point in many homes, offering warmth and ambiance. However, an open fireplace presents potential safety hazards, including sparks, embers, and the risk of unsupervised flames. A fireplace screen door provides a crucial barrier, containing these hazards while allowing for unobstructed views of the fire. While commercially available options are readily available, constructing a DIY fireplace screen door offers a cost-effective and customizable alternative, allowing homeowners to tailor the design to their specific fireplace dimensions and aesthetic preferences.
This article provides a detailed guide to designing, planning, and building a DIY fireplace screen door, covering essential materials, necessary tools, and step-by-step instructions. It aims to empower homeowners with the knowledge and skills to create a functional and visually appealing fireplace screen door that enhances both the safety and aesthetics of their living space.
Key Considerations Before Starting Your Project
Before embarking on the construction of a DIY fireplace screen door, several key factors must be carefully considered. These considerations will influence the design, material selection, and overall feasibility of the project. Neglecting these initial steps could lead to complications during the construction phase and potentially compromise the final product's safety and functionality.
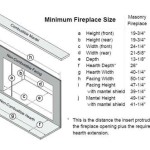
Accurate Measurements: The first and most crucial step is to obtain precise measurements of the fireplace opening. Measure the width and height of the firebox opening at multiple points, as fireplaces are often not perfectly square. Note any irregularities or obstructions within the opening that could affect the door's fit. It is recommended to create a detailed sketch of the fireplace opening with all measurements clearly labeled. These measurements will serve as the foundation for the entire project, ensuring the screen door fits properly and functions as intended. Consider providing a small amount of clearance (approximately 1/4 inch on each side) to allow for easy installation and operation.
Material Selection: The materials used for the fireplace screen door directly impact its durability, appearance, and fire resistance. The frame is typically constructed from metal, such as steel or wrought iron, due to its strength and heat resistance. Steel tubing or angle iron are common choices for the frame. The screen itself should be made from a durable, fire-resistant material, such as woven steel mesh. This type of mesh provides a strong barrier against sparks and embers while allowing for adequate airflow. Consider the finish of the metal frame. Options include high-temperature paint designed for use on fireplaces or powder coating. The finish should be chosen based on aesthetic preferences and its ability to withstand the extreme temperatures generated by the fireplace.
Design Considerations: The design of the fireplace screen door should complement the overall aesthetic of the room. Consider the style of the fireplace itself, as well as the existing décor. Simple, minimalist designs are often a good choice for modern interiors, while more ornate designs may be appropriate for traditional settings. The door can be designed as a single panel or as two bi-folding doors. Bi-folding doors offer greater flexibility, allowing one or both doors to be opened as needed. The design should also take into account the ease of operation. Hinges should be robust and allow for smooth opening and closing. Consider adding handles or pulls for ease of use. Ensure the design allows for adequate ventilation to maintain proper combustion in the fireplace.
Materials and Tools Required
Having the right materials and tools on hand is essential for a successful DIY fireplace screen door project. The following list provides a comprehensive overview of the necessary items. The specific quantities of materials will depend on the size of the fireplace opening and the chosen design.
Materials:
- Steel tubing or angle iron (for the frame)
- Woven steel mesh (for the screen)
- Hinges (heavy-duty, designed for metal)
- Handles or pulls (optional)
- High-temperature paint or powder coating
- Welding wire or rods (if welding is required)
- Fasteners (screws, bolts, or rivets)
- Metal cutting discs
- Grinding discs
- Safety glasses
- Welding gloves (if welding)
- Welding helmet (if welding)
Tools:
- Measuring tape
- Square
- Marker or pencil
- Angle grinder
- Welding machine (if welding)
- Drill
- Screwdriver or wrench
- Clamps
- Metal file
- Wire brush
- Paintbrushes or spray gun (if painting)
It is crucial to prioritize safety when working with power tools and welding equipment. Always wear appropriate safety gear, including safety glasses, gloves, and a welding helmet. Ensure the work area is well-ventilated and free of flammable materials. If you are not experienced with welding, consider seeking assistance from a qualified welder or exploring alternative methods, such as using fasteners or adhesives designed for metal bonding.
Step-by-Step Construction Guide
The following steps outline the process of constructing a DIY fireplace screen door. The specific steps may vary slightly depending on the chosen design and materials.
Step 1: Frame Construction: Cut the steel tubing or angle iron to the required lengths based on the measurements of the fireplace opening. Use an angle grinder with a metal cutting disc to make clean, precise cuts. Ensure all cuts are square and accurate to maintain the integrity of the frame. Once the pieces are cut, assemble them to form the frame. If using welding, tack weld the corners together to hold the frame in place. Check the frame for squareness using a square. Make any necessary adjustments before fully welding the seams. If not welding, use fasteners or adhesives designed for metal bonding to secure the frame pieces together. Ensure the frame is strong and rigid.
Step 2: Screen Installation: Cut the woven steel mesh to a size slightly larger than the frame opening. This will allow for overlapping the mesh onto the frame and securing it in place. Position the mesh over the frame and secure it using clamps. Use a metal file to remove any sharp edges from the cut mesh. Attach the mesh to the frame using welding, fasteners, or specialized clips designed for attaching mesh to metal frames. If welding, use tack welds to secure the mesh to the frame at regular intervals. If using fasteners, drill small holes through the mesh and frame and secure them with screws or rivets. Ensure the mesh is taut and securely attached to the frame. Trim any excess mesh from around the edges of the frame.
Step 3: Hinge Installation: Determine the desired location for the hinges on the frame. Position the hinges according to the chosen design, ensuring they are properly aligned and spaced. Weld or bolt the hinges to the frame. Ensure the hinges are securely attached and allow for smooth opening and closing of the door. Test the movement of the door to ensure it swings freely and does not bind. Make any necessary adjustments to the hinge placement to optimize the door's operation.
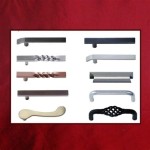
Step 4: Handle Installation: If desired, install handles or pulls on the door. Position the handles or pulls at a comfortable height and location for ease of use. Drill holes through the door frame and attach the handles or pulls using screws or bolts. Ensure the handles or pulls are securely attached and do not wobble. The design and style of the handles or pulls should complement the overall aesthetic of the fireplace screen door.
Step 5: Finishing: Prepare the metal surface for finishing by cleaning it with a wire brush to remove any rust, scale, or debris. Apply a coat of metal primer to the frame to improve adhesion of the finish coat. Allow the primer to dry completely before applying the final finish. Apply the chosen finish, such as high-temperature paint or powder coating, according to the manufacturer's instructions. Ensure the finish is applied evenly and smoothly. Allow the finish to dry completely before installing the fireplace screen door. Several coats of finish may be required to achieve the desired appearance and durability.
Step 6: Installation: Carefully position the fireplace screen door in the fireplace opening. Ensure the door fits snugly and securely within the opening. If necessary, shim the door to ensure it is level and plumb. Secure the door to the fireplace opening using appropriate fasteners, such as screws or bolts. Ensure the fasteners are securely tightened to hold the door in place. Test the operation of the door one last time to ensure it opens and closes smoothly. Make any final adjustments as needed.
By following these steps and taking the necessary precautions, homeowners can create a functional and aesthetically pleasing fireplace screen door that enhances both the safety and appearance of their living space. Remember to consult with local building codes and regulations to ensure compliance with all applicable requirements.

How To Make A Barn Door Style Fireplace Screen Designertrapped Com

How To Make A Barn Door Style Fireplace Screen Designertrapped Com

Fireplace Door Update With Spray Paint Roots Wings Furniture Llc

Reveal Day Fireplace Makeover Doors Farmhouse Screens

9 Creative And Chic Diy Fireplace Screens Shelterness

How To Make A Barn Door Style Fireplace Screen Home Makeover Remodel

How To Make A Barn Door Style Fireplace Screen Designertrapped Com

20 Ideas To Diy Your Own Fireplace Screen

20 Ideas To Diy Your Own Fireplace Screen

20 Ideas To Diy Your Own Fireplace Screen
Related Posts