Removing a Gas Fireplace Insert: A Comprehensive Guide
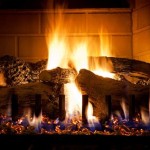
Gas fireplace inserts represent a popular heating solution for many homeowners, offering efficient and aesthetically pleasing warmth. However, circumstances may arise that necessitate the removal of a gas fireplace insert. This could be due to a desire to upgrade to a newer model, switch to a different heating system, perform extensive repairs on the fireplace or insert, or address safety concerns. The process of removing a gas fireplace insert requires careful planning, adherence to safety protocols, and a thorough understanding of the associated gas and electrical connections. This article provides a detailed guide to safely and effectively removing a gas fireplace insert.
Prioritizing Safety: Essential Preparations Before Removal
Safety is paramount when working with gas and electrical appliances. Before undertaking any steps to remove a gas fireplace insert, several crucial safety measures must be implemented. Neglecting these precautions can lead to serious injury, property damage, or even fatal consequences.
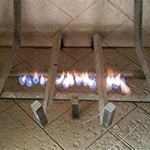
1. Gas Supply Shutoff: The first and foremost step is to completely shut off the gas supply to the fireplace insert. Locating the gas shut-off valve is critical. This valve is typically situated near the fireplace, either on the gas supply line itself or in an adjacent utility area. In some cases, the shut-off valve might be located outside the house near the gas meter. Once located, turn the valve clockwise until it is fully closed. This will interrupt the flow of gas to the insert. Confirm the gas is off by attempting to ignite the fireplace insert; if it fails to light, the gas supply is likely shut off. However, it is still advisable to use a gas leak detector to ensure the line is completely devoid of gas.
2. Electrical Disconnection: Most gas fireplace inserts utilize electricity for the ignition system, blower motor, and other control functionalities. Disconnecting the electrical power is essential to prevent electric shock during the removal process. The insert may be plugged into a standard electrical outlet or hardwired directly into the home's electrical system. If plugged in, simply unplug the insert from the outlet. If it is hardwired, locate the appropriate circuit breaker in the electrical panel that controls the fireplace insert. Turn off this circuit breaker to cut off the power supply. Once the breaker is switched off, use a non-contact voltage tester to verify that no electricity is flowing to the insert's wiring.
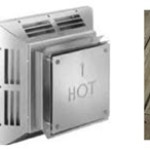
3. Cooling Period: If the fireplace insert has been in operation recently, allow ample time for it to cool down completely before commencing the removal process. The metal surfaces of the insert can retain significant heat, posing a burn risk if touched prematurely. Depending on the insert, this cooling period may range from several hours to overnight. Ensure the insert is cool to the touch before proceeding.
4. Personal Protective Equipment (PPE): Wearing appropriate personal protective equipment is crucial to protect against potential hazards. This includes:
- Gloves: Wear heavy-duty work gloves to protect hands from sharp edges, heat, and grime.
- Eye Protection: Safety glasses or goggles are essential to shield your eyes from dust, debris, and potential projectiles.
- Dust Mask: A dust mask or respirator prevents inhalation of dust and other airborne particles dislodged during the removal process.
- Closed-toe Shoes: Wear sturdy, closed-toe shoes to protect your feet from falling objects.
5. Ventilation: Ensure adequate ventilation in the work area. Open windows and doors to allow fresh air to circulate. This is particularly important if residual gas fumes are present, even after the gas supply has been shut off.
Step-by-Step Removal Procedure: A Practical Guide
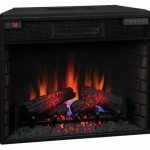
Once the safety preparations have been completed, the actual removal of the gas fireplace insert can commence. The specific steps may vary slightly depending on the make and model of the insert, but the following provides a general outline of the process.
1. Disconnecting Gas Line: Even after shutting off the gas supply, a small amount of residual gas may remain in the line. Before physically disconnecting the gas line, it is prudent to bleed any remaining gas. This is typically accomplished by carefully loosening the gas line connection at the insert. Have a wrench ready to tighten the connection quickly if a significant amount of gas is released. Once the residual gas has been bled, completely disconnect the gas line using appropriate wrenches. Ensure the disconnected gas line is capped off securely to prevent any potential leakage of gas from the main supply line. This can be done with a gas line cap available at most hardware stores. Use pipe joint compound (pipe dope) on the threads of the cap to ensure a gas-tight seal.
2. Disconnecting Electrical Wiring: If the insert is hardwired, carefully disconnect the electrical wiring. Identify the wires (typically black [hot], white [neutral], and green or bare copper [ground]). Use wire strippers to carefully remove the wire caps and separate the wires. Cap each individual wire with a new wire cap to prevent accidental electrical contact. Tuck the capped wires back into the junction box and secure it with a cover plate.
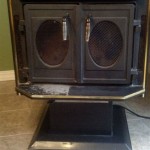
3. Removing Surround and Decorative Elements: Many gas fireplace inserts are surrounded by decorative elements such as a surround, facing, or decorative logs. Carefully remove these elements to gain access to the insert itself. The surround is often attached with screws or clips. Locate these fasteners and remove them to detach the surround panels. The decorative logs are typically arranged on a grate within the firebox and can be lifted out and set aside.
4. Loosening and Removing Insert: The gas fireplace insert is usually secured within the fireplace opening by screws, brackets, or simply by its own weight. Inspect the insert for any visible fasteners and remove them. Once the fasteners are removed, carefully try to slide the insert out of the fireplace opening. It may be necessary to use a pry bar or a helper to gently coax the insert out, as it can be heavy. Ensure the floor is protected with a drop cloth or cardboard to prevent scratches or damage during the removal process.
5. Inspecting and Cleaning the Fireplace: Once the insert has been removed, take the opportunity to inspect the fireplace chimney and firebox. Look for any signs of damage, such as cracks, crumbling mortar, or soot buildup. Clean the firebox to remove any accumulated dust, debris, or soot. Consider having the chimney professionally inspected and cleaned to ensure it is in good working order.
Post-Removal Considerations: Disposal and Future Use
After successfully removing the gas fireplace insert, several important considerations remain regarding its disposal and the future use of the fireplace or space.
1. Proper Disposal of the Insert: A gas fireplace insert cannot simply be discarded with regular household waste. It contains metal and electronic components that may require specialized recycling. Contact the local waste management authority or a metal recycling center to inquire about proper disposal methods. Alternatively, consider donating the insert to a charitable organization or selling it online if it is still in working condition.
2. Sealing the Gas Line: If the gas line is not going to be used for a replacement insert or another gas appliance, it is essential to have it professionally capped and sealed by a qualified gas technician. This ensures that no gas leaks occur in the future. Simply capping the line yourself may not be sufficient to meet safety standards.
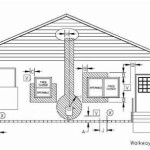
3. Closing off the Chimney: Depending on the intended use of the fireplace opening, it may be necessary to close off the chimney flue. This prevents drafts and the entry of insects and other pests. This can be achieved by installing a chimney cap or a damper.
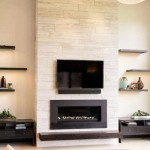
4. Planning for Future Use: Consider the future use of the fireplace opening. Will it be used for another fireplace insert (gas or wood-burning), an electric fireplace, or simply closed off? Plan accordingly and make any necessary modifications or renovations to the fireplace opening to accommodate the intended use. This may involve repairing any damage to the firebox, installing a new hearth, or refinishing the surrounding area.
5. Professional Assistance: While this guide provides a comprehensive overview of the gas fireplace insert removal process, it is important to remember that working with gas and electrical systems can be complex and potentially dangerous. If there is any doubt or uncertainty about any aspect of the removal process, it is always advisable to seek professional assistance from a qualified gas technician or electrician. They have the expertise and equipment to safely and efficiently remove the insert and ensure that all gas and electrical connections are properly handled.

How To Remove A Fireplace Insert With S Wikihow

Removing A Gas Fireplace Concord Carpenter

How To Remove A Fireplace Insert With S Wikihow

How To Remove A Fireplace Insert With S Wikihow

Remove A Gas Fireplace Merrypad

How To Remove An Old Fireplace Surround Merrypad

Removing A Gas Fireplace How To What Consider

Removing A Gas Fireplace How To What Consider

Removing An Old Woodstove Fireplace Insert Young House Love

Removing A Gas Fireplace How To What Consider