Covering a Brick Fireplace With Tile: A Step-by-Step Guide
A brick fireplace can be a charming focal point in any room, but over time, the bricks may become chipped, stained, or simply outdated. Covering a brick fireplace with tile offers a stylish and functional solution, transforming the fireplace into a more modern and elegant feature. This process involves several steps, from preparing the surface to applying the tile and grout, each requiring careful attention to detail for optimal results.
1. Preparation is Key: Ensuring a Smooth Surface for Tile
The success of any tile project hinges on proper preparation. Before applying tile to a brick fireplace, ensuring a smooth and stable surface is paramount. This process involves removing any loose mortar or debris, cleaning the surface thoroughly, and applying a layer of mortar board or cement board for a solid base.
Here's a detailed guide to preparing the brick fireplace surface:
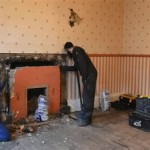
- Remove Loose Mortar: Use a hammer and chisel to remove any loose mortar or crumbling bricks. If any areas are severely damaged, consider replacing them with new bricks.
- Clean the Surface: Thoroughly clean the brick fireplace surface with a wire brush or a pressure washer to remove dirt, dust, and debris. Allow the surface to dry completely.
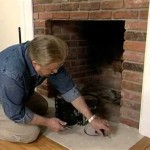
- Apply Mortar Board or Cement Board: Depending on the condition of the brick, you may need to apply a layer of mortar board or cement board. This creates a smooth and level surface for the tile. Use a trowel to spread the mortar evenly and secure the board to the brick with screws or nails.
- Tape and Seal the Joints: Use self-adhesive drywall tape and joint compound to seal the seams between the mortar board, cement board, and brick surface. This ensures a smooth transition and prevents moisture from seeping into the brick.
These steps lay the foundation for a successful tile installation, ensuring a stable and smooth surface that will prevent the tiles from cracking or becoming dislodged over time.
2. Choosing the Right Tile: A Design Decision for Your Fireplace
The choice of tile for your fireplace is a significant design decision, impacting the overall aesthetic of the room. Tile materials vary in style, color, and durability, offering a wide range of options to complement different decor styles.
Here are some factors to consider when selecting the right tile for your fireplace:
- Size and Shape: Large-format tiles create a minimalist and modern look, while smaller tiles offer more intricate patterns and detail. Consider the size and shape of the fireplace when selecting tiles to avoid excessive cutting.
- Material: Ceramic tiles are affordable and versatile, while porcelain tiles offer higher durability and water resistance. Natural stone tiles like slate or travertine add a rustic and elegant touch.
- Color and Style: Choose tile colors and patterns that complement the existing room decor. Neutral colors offer a timeless appeal, while bold colors and patterns create a statement.
- Heat Resistance: Since fireplaces generate heat, select tiles specifically designed for high-heat applications. These tiles are engineered to withstand extreme temperatures without cracking or warping.
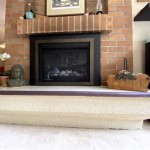
Choosing the right tile ensures a beautiful and long-lasting finish for your fireplace.
3. Installation Process: Applying Tile and Grout
The installation process involves applying the chosen tile to the prepared surface using mortar. This requires precise measurements and proper application techniques to ensure a smooth and even finish.
Here's a step-by-step guide to installing tile on your fireplace:
- Apply Mortar: Spread a thin layer of mortar onto the prepared surface with a notched trowel. The notches create grooves for the tile to sit in, ensuring proper adhesion.
- Place the Tiles: Start from the bottom center of the fireplace and work your way out. Press each tile firmly into the mortar, ensuring it is level with neighboring tiles. Use spacers to maintain consistent grout lines.
- Cut Tile: Use a wet saw to cut the tiles to size as needed for corners, curves, or to fit around existing fixtures.
- Apply Grout: After the mortar has set, apply grout to the spaces between the tiles. Use a rubber trowel to spread the grout evenly and remove excess.
- Clean the Grout Lines: Once the grout has set slightly, use a damp sponge to clean the grout lines and remove any excess grout.
- Seal the Grout: Apply a sealant to the grout to protect it from stains and moisture.
These steps ensure a professional-looking tile installation, transforming the fireplace into a beautiful and functional focal point in your home.

How To Tile A Fireplace Even If It S Brick The Handyman Daughter

How To Tile A Brick Fireplace Jenna Kate At Home

A Step By Guide To Fireplace Refacing Diy Family Handyman

How To Tile Over A Brick Hearth Shine Your Light

Renovating With A Tile Over Brick Fireplace Design

How To Tile A Fireplace Even If It S Brick The Handyman Daughter

Renovating With A Tile Over Brick Fireplace Design

How To Tile A Fireplace Even If It S Brick The Handyman Daughter
:max_bytes(150000):strip_icc()/MadetobeaMommaBefore-5bb2476446e0fb002607ad4f.jpg?strip=all "Before And After Fireplace Makeovers")
Before And After Fireplace Makeovers

Modern Fireplace Makeover Remodel Home
Related Posts