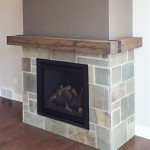
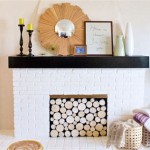
How to Install a Fireplace Mantel on Brick
A fireplace mantel is a decorative and functional addition to any fireplace. It provides a surface for displaying items, storing firewood, and adding visual appeal. Installing a fireplace mantel on brick can be a rewarding DIY project, but it requires careful planning and execution. This article will provide a step-by-step guide on how to install a fireplace mantel on brick, ensuring a successful outcome.
1. Planning and Preparation
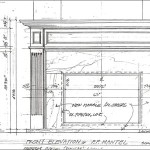
Before beginning the installation process, meticulous planning and preparation are essential. This stage will lay the foundation for a smooth and efficient installation. First, carefully measure the width and height of your fireplace opening to determine the appropriate size of the mantel you wish to install. Next, consider the style and design of the mantel to ensure it complements the existing décor of your room. Finally, gather all the necessary tools and materials. This includes a level, measuring tape, pencil, drill, screwdriver, stud finder, wood screws, anchors, construction adhesive, and safety equipment like gloves and goggles.
Once you have gathered all the materials, it's crucial to prepare the brick surface. This involves cleaning the area thoroughly to remove any dust, dirt, or debris that might interfere with the installation. If there are any loose bricks, it's recommended to secure them before proceeding. Finally, check the stability of the existing brickwork, ensuring it can adequately support the weight of the fireplace mantel.
2. Marking and Installing the Support Brackets
With the brick surface prepared, the next step is to install the support brackets that will secure the mantel. These brackets provide structural support for the mantel, ensuring its stability and preventing it from sagging over time. The installation process begins by using a level and a pencil to mark the locations of the brackets on the brick wall. The brackets should be positioned at a height that aligns with the desired placement of the mantel. The distance between the brackets should be determined based on the length and weight of the mantel.
After marking the bracket locations, use a drill and appropriate masonry drill bit to create pilot holes in the brick. These pilot holes will aid in the installation of the screws that will secure the brackets to the brick wall. Once the pilot holes are drilled, attach the brackets to the wall using screws designed for masonry. Ensure the brackets are level and secure before proceeding to the next stage.
3. Installing the Mantel Shelf
With the support brackets securely attached, the next crucial step is to install the mantel shelf. The mantel shelf is the primary component of the fireplace mantel, providing a dedicated space for displaying items or storing firewood. Start the installation process by applying a bead of construction adhesive along the top edge of the support brackets. This adhesive will enhance the bond between the shelf and the brackets, providing additional support and stability.
Once the adhesive is applied, carefully position the mantel shelf on the support brackets, ensuring it is centered and level. Gently press down on the shelf to ensure it adheres firmly to the adhesive. Allow the adhesive to cure completely, as indicated by the manufacturer's instructions. This drying time ensures a strong and lasting bond between the shelf and the brackets.
4. Securing the Mantel Shelf
Although the adhesive provides a strong bond, it's recommended to further secure the mantel shelf using screws for added stability and peace of mind. Begin by pre-drilling pilot holes through the shelf and into the support brackets. These pilot holes prevent the wood from splitting when driving the screws. Ensure the screws are long enough to penetrate the brackets fully and provide a secure attachment.
After the pilot holes are drilled, carefully insert the screws into the holes and drive them into the brackets using a screwdriver. Make sure the screws are tightened securely but avoid overtightening, which could damage the wood or compromise the integrity of the bracket. Once the shelf is securely fastened, take a moment to inspect the installation, ensuring the shelf is level, centered, and securely attached to the brackets.
5. Finishing Touches
After the mantel shelf is installed, the final step is to add the finishing touches. This may involve attaching any decorative elements, such as corbels, moldings, or other decorative accents that complement the style and design of the mantel. These decorative elements can enhance the visual appeal and add character to the fireplace mantel.
Finally, consider painting or staining the mantel to match the existing décor or to create a desired aesthetic. The finish of the mantel should complement the surrounding furnishings and create a cohesive look for your room. With the final touches completed, your fireplace mantel is ready to be enjoyed and enhance the beauty and functionality of your fireplace.

How To Install A Floating Mantle The Easy Way In Just One Afternoon

How To Install A Mantel On Brick Fireplace 1905 Farmhouse

How To Install A Floating Mantle The Easy Way In Just One Afternoon

How To Install A Mantel On Brick Fireplace 1905 Farmhouse

How To Install A Floating Mantle The Easy Way In Just One Afternoon

How To Install A Mantel On Brick Fireplace 1905 Farmhouse

How To Install A Mantel On Brick Fireplace 1905 Farmhouse

How To Install A Floating Mantle The Easy Way In Just One Afternoon

How To Install A Mantel Over Brick Fireplace Federal Brace

Build A Mantel Over Brick Fireplace
Related Posts