Direct Vent Gas Fireplace Pipe Installation: A Comprehensive Guide
Direct vent gas fireplaces offer a convenient and efficient way to add supplemental heat and ambiance to a home. Unlike traditional wood-burning fireplaces or vent-free gas fireplaces, direct vent fireplaces draw combustion air from outside and exhaust combustion byproducts directly to the exterior, creating a sealed system that enhances safety and efficiency. Crucial to the performance and safety of a direct vent fireplace is the proper installation of the direct vent pipe. This article provides a comprehensive guide to understanding and executing a safe and compliant direct vent gas fireplace pipe installation.
The direct vent system relies on a specialized double-walled venting pipe specifically designed for gas appliances. The inner pipe carries exhaust gases away from the fireplace, while the outer pipe draws fresh air from the outside for combustion. This concentric design minimizes the risk of carbon monoxide poisoning and improves the overall efficiency of the fireplace by preheating the incoming air. The installation process has several key stages that demand careful attention to detail and adherence to manufacturer specifications and local building codes.
Understanding Key Components and Safety Precautions
Before commencing any installation, it's essential to familiarize oneself with the components of a direct vent system and the crucial safety considerations involved. The direct vent pipe itself comes in various lengths and diameters, and selecting the correct size is paramount for optimal performance. Factors such as the fireplace's BTU rating, the length of the vent run, and the number of elbows used will all influence the required pipe diameter. Consult the fireplace manufacturer's instructions to determine the appropriate pipe specifications.
Other essential components include: a starting collar (connects the pipe to the fireplace), vent sections (straight lengths of pipe), elbows (used to change the direction of the vent run), a termination cap (installed at the exterior of the building to expel exhaust and draw in fresh air), firestops (used to maintain fire-resistance where the pipe passes through walls or ceilings), and support brackets (used to secure the pipe and prevent sagging). Acquiring all necessary materials before starting the installation will streamline the process and minimize potential delays.
Safety should be the foremost concern throughout the installation. Carbon monoxide, a colorless and odorless gas, is a byproduct of combustion, and improper venting can lead to its buildup inside the home. A functional carbon monoxide detector should be installed in the vicinity of the fireplace. It is also imperative to turn off the gas supply to the fireplace before commencing any work on the venting system. Always wear appropriate safety gear, including gloves and eye protection, during the installation process. If unfamiliar with gas line connections, it is highly recommended to consult a licensed gas fitter or plumber. Furthermore, ensure the fireplace is installed on a non-combustible surface, as specified by the manufacturer.
Prior to installation, a thorough inspection must be performed on the venting components to ensure there are no signs of damage, such as dents, cracks, or corrosion. Damaged components compromise the structural integrity of the venting system and pose a safety hazard. All pipe sections and fittings should be properly sealed to prevent leaks of exhaust gas. Familiarize yourself with the local building codes regarding fireplace installations and venting requirements. Adhering to these codes is not only a legal obligation but also a crucial step in ensuring the safety and longevity of the fireplace system.
Different direct vent systems may use different locking mechanisms to connect pipe sections. Some systems use a twist-lock design, while others utilize clamps or screws. Understanding the specific connection method for the chosen system is essential for creating a secure and gas-tight seal. Incorrectly connected pipe sections can lead to exhaust leaks and compromise the overall performance of the fireplace.
Step-by-Step Installation Procedure
The installation process begins with carefully planning the vent run. The manufacturer's instructions will dictate the maximum allowable vent length, the maximum number of elbows, and any specific requirements for vertical and horizontal runs. Minimizing the number of elbows and keeping the vent run as straight as possible will optimize the draft and ensure efficient combustion. Consider any obstructions, such as joists, wiring, or plumbing, that may impede the vent run.
The first step in the physical installation is attaching the starting collar to the fireplace. Ensure the collar is securely fastened to the fireplace using the hardware provided by the manufacturer. Then, connect the first section of vent pipe to the starting collar, ensuring a tight and secure connection using the appropriate locking mechanism. Continue adding vent sections, connecting each section securely to the previous one. When using elbows, ensure they are properly oriented to maintain a smooth and continuous airflow.
As the vent run progresses, install support brackets at intervals specified by the manufacturer. Support brackets prevent the pipe from sagging and ensure it remains properly aligned. When the vent pipe passes through walls or ceilings, install firestops to maintain the fire-resistance rating of the structure. Firestops are designed to prevent the spread of fire through penetrations in walls or ceilings. The firestop should fit snugly around the vent pipe and be securely fastened to the surrounding framing.
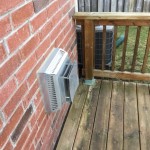
The final step is installing the termination cap on the exterior of the building. The location of the termination cap must comply with local building codes and manufacturer's instructions. The cap should be positioned away from windows, doors, air intakes, and other potential sources of contamination. The cap should also be protected from snow accumulation and prevailing winds. Securely fasten the termination cap to the exterior wall and seal any gaps with weather-resistant sealant.
Once the entire venting system is installed, a thorough inspection is crucial. Inspect all pipe connections to ensure they are properly sealed and that there are no visible gaps or leaks. Verify that all support brackets are securely fastened and that the vent pipe is properly aligned. Inspect the firestops to ensure they are correctly installed and that they provide adequate fire protection. Finally, inspect the termination cap to ensure it is securely fastened and that it is positioned in a safe and appropriate location.
Troubleshooting Common Issues and Ensuring Proper Functionality
After the installation is complete, it's essential to test the fireplace to ensure it is functioning correctly. Turn on the gas supply and ignite the pilot light, following the manufacturer's instructions. Observe the flame pattern to ensure it is stable and consistent. A flickering or unstable flame may indicate a problem with the gas supply or the venting system. Listen for any unusual noises, such as whistling or rattling, which may indicate a leak in the venting system.
One common issue encountered during direct vent fireplace installations is poor draft. Poor draft can result in incomplete combustion, leading to the production of carbon monoxide. Possible causes of poor draft include an excessively long vent run, too many elbows, obstructions in the vent pipe, or an improperly sized vent pipe. Consult the manufacturer's instructions to determine the maximum allowable vent length and the maximum number of elbows. Inspect the vent pipe for any obstructions, such as debris or bird nests. Verify that the vent pipe is the correct diameter for the fireplace's BTU rating.
Another potential issue is condensation forming inside the vent pipe. Condensation can occur when the exhaust gases cool too quickly, particularly during cold weather. Excessive condensation can lead to corrosion of the vent pipe and potentially damage the fireplace. Insulating the vent pipe can help to prevent condensation. Using a vent pipe with a higher insulation value can also reduce the risk of condensation.
If the fireplace is producing a strong odor, it may indicate a leak in the gas line or a problem with the combustion process. Turn off the gas supply immediately and consult a licensed gas fitter or plumber to inspect the gas line and the fireplace for any leaks or malfunctions. Never attempt to repair a gas leak yourself. Regular maintenance, including cleaning the burner and inspecting the venting system, can help to prevent odors and other performance issues.
Regular maintenance of the direct vent system is crucial for ensuring its continued safety and efficiency. At least once a year, the venting system should be inspected for any signs of damage or corrosion. The termination cap should be cleared of any debris, such as leaves or snow, that may obstruct the airflow. The burner and the vent pipe should be cleaned to remove any soot or deposits that may have accumulated. Consult the fireplace manufacturer's instructions for specific maintenance recommendations. If any issues are detected, it is recommended to consult a qualified service technician.

How To Install A Direct Vent Pipe

Gas Fireplace Venting Explained Heat Glo

Gas Fireplace Venting Explained Heat Glo

What Are The Best Ways To Vent A Gas Fireplace Zoroast

What Is A Direct Vent Fireplace Fireplaces Learning Center

Vented Vs B Vent Direct Free Dixie S

Icc Direct Vent Gas Venting Horizontal Termination Starter Kits

Venting A Gas Fireplace Through Existing Chimney Design Inserts

What Is A Direct Vent Fireplace Fireplaces Learning Center

Direct Vent B Gas Free S Mazzeo Stoves Fireplaces