Here is an article focusing on laying a slate fireplace hearth, incorporating the given requirements:
Laying a Slate Fireplace Hearth: A Comprehensive Guide
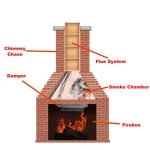
A fireplace hearth serves as a critical safety component and a focal point in a room. It protects the surrounding floor from embers and heat while also providing a visual anchor for the fireplace itself. Slate, a durable and aesthetically pleasing natural stone, is a popular choice for fireplace hearths. This article details the process of laying a slate fireplace hearth, covering essential preparation, installation techniques, and necessary considerations for a successful and lasting result.
Before commencing the installation, a thorough assessment of the existing fireplace and floor is paramount. This includes determining the size and shape of the desired hearth, the structural integrity of the subfloor, and adherence to local building codes and regulations. Ignoring these preliminary steps can lead to structural issues, safety hazards, and costly rework later on.
The choice of slate tiles or a single slab is a significant decision that impacts both the aesthetic and structural aspects of the hearth. Slate tiles offer greater flexibility in design and easier handling, especially for larger hearths. A single slate slab, while visually striking, requires specialized equipment and expertise for transportation and installation due to its weight and potential fragility.
Preparing the Subfloor and Hearth Area
The foundation upon which the slate hearth is laid is crucial for its stability and longevity. A properly prepared subfloor will ensure that the slate remains level and free from cracks or movement over time. The existing floor, whether wood, concrete, or another material, must be thoroughly cleaned and inspected. Any loose or damaged areas should be repaired before proceeding. For wooden subfloors, reinforcement may be necessary to bear the weight of the slate.
Concrete subfloors should be checked for cracks and unevenness. Self-leveling concrete compounds can be used to create a perfectly flat surface. It is essential to allow the self-leveling compound to fully cure according to the manufacturer's instructions before proceeding with the slate installation.
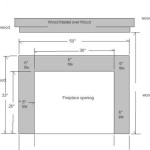
The dimensions of the hearth area must be precisely measured and marked. This ensures that the slate is properly positioned and fits seamlessly with the surrounding floor. It is advisable to create a template of the hearth using cardboard or plywood to visualize the final result and make any necessary adjustments before cutting the slate.
For safety, always wear appropriate personal protective equipment (PPE), including safety glasses, gloves, and a dust mask, during the preparation and installation phases. Cutting slate can produce fine dust particles that are harmful if inhaled.
Installing the Slate Hearth: Mortar, Layout, and Leveling
The selection and application of the appropriate mortar are critical for bonding the slate to the subfloor. Modified thin-set mortar, specifically designed for natural stone, is generally recommended. This type of mortar provides a strong, durable bond and can accommodate slight variations in the thickness of the slate.
Before applying the mortar, it is beneficial to dry-lay the slate tiles or slab to determine the optimal layout and identify any areas that require further adjustment. This step allows for fine-tuning of the design and ensures that the slate pieces fit together properly. Spacers can be used to maintain consistent grout lines between the tiles.
The mortar should be mixed according to the manufacturer's instructions, achieving a consistency similar to peanut butter. Using a notched trowel, apply the mortar evenly to the subfloor, covering a small area at a time. The size of the notch on the trowel will depend on the size and thickness of the slate. Carefully place the slate tiles or slab onto the mortar bed, pressing firmly to ensure good contact. Use a level to check the surface of the slate and make any necessary adjustments by gently tapping with a rubber mallet.
Maintaining a consistent level across the entire hearth is paramount. Variations in level can create tripping hazards and detract from the overall appearance. Use shims as needed to achieve a perfectly level surface. Allow the mortar to cure completely according to the manufacturer's instructions before proceeding with the grouting process.
Grouting and Sealing the Slate Hearth
Once the mortar has fully cured, the grout can be applied to fill the spaces between the slate tiles. Choose a grout color that complements the slate and the surrounding décor. Epoxy grout is a durable and stain-resistant option, particularly suitable for high-traffic areas like fireplace hearths.
Apply the grout liberally to the grout lines, using a grout float to work it into the spaces. Remove any excess grout from the surface of the slate with a damp sponge. Rinse the sponge frequently to avoid leaving a haze on the slate. After the grout has dried slightly, polish the surface with a clean, dry cloth to remove any remaining residue.
Sealing the slate is essential to protect it from stains, water damage, and wear. A penetrating sealer, designed for natural stone, will help to prevent liquids from being absorbed into the slate. Apply the sealer according to the manufacturer's instructions, ensuring that the entire surface of the hearth is evenly coated. Allow the sealer to dry completely before using the fireplace. Regular cleaning and maintenance will help to preserve the beauty and longevity of the slate hearth.
Proper ventilation during the grouting and sealing process is important to minimize exposure to fumes. Open windows and doors or use a fan to ensure adequate airflow.
The installation of a slate fireplace hearth is a project that demands precision and attention to detail. By meticulously following these steps and adhering to safety guidelines, a durable and aesthetically pleasing hearth that enhances the fireplace and room can be achieved.

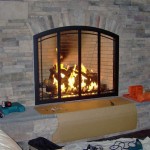
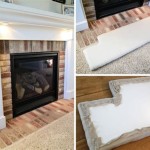
Diy Hearth Pad Farmhouse On Boone

Diy Hearth Pad Farmhouse On Boone

Diy Hearth Pad Farmhouse On Boone

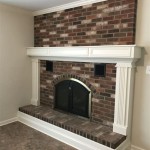
Slate Fireplace Installation Guide Tile Tiling

Chapter 2 Installing The Hearth Solus Concrete Fireplace Surround

Diy Hearth Pad Farmhouse On Boone

Installing Slate Split Face Tile For A Stunning Fireplace

Diy Hearth Pad Farmhouse On Boone

Tiling Over Brick And Slate Fireplace Ceramic Tile Advice Forums John Bridge

Building Our Fireplace Installing The Slate Split Face Tile Diy House Mommy
Related Posts