Here is an article about connecting gas fireplace logs.
How To Connect Gas Fireplace Logs: A Comprehensive Guide
Connecting gas fireplace logs is a process that requires precision and adherence to safety protocols. Understanding the different types of gas fireplaces, the purpose of each component, and the correct installation procedures is crucial for ensuring efficient and safe operation. This article provides a detailed guide on how to connect gas fireplace logs, focusing on safety, proper connections, and troubleshooting common issues.
Before embarking on any installation or repair, it is imperative to understand the inherent risks associated with working with gas appliances. Natural gas and propane are both flammable and potentially explosive. Incorrect connections can lead to gas leaks, carbon monoxide poisoning, and fires. It is always recommended to consult with a qualified professional if there is any uncertainty about any stage of the installation process. Furthermore, familiarity with local building codes and regulations regarding gas appliances is crucial.
Key Point 1: Preparation and Safety Precautions
Prior to handling any tools or components, a comprehensive preparation phase is essential. This involves gathering the necessary materials, ensuring proper ventilation, and, most importantly, disconnecting the gas supply. Failure to properly prepare can lead to hazardous situations. The following steps outline the critical elements of this preparatory phase.
Gathering Required Materials: A comprehensive toolkit should include pipe wrenches, adjustable wrenches, Teflon tape (specifically designed for gas lines), a leak detector solution (soap solution), a level, a screwdriver set, and possibly a pipe cutter. The specific tools required may vary depending on the type of gas connection and the specific fireplace model. Having all necessary tools readily available minimizes downtime and potential disruptions during the installation process.
Ensuring Proper Ventilation: Before working on any gas appliance, it is paramount to ensure adequate ventilation. Open windows and doors to allow fresh air to circulate. This helps to dissipate any stray gas that may be released during the connection process. Adequate ventilation minimizes the risk of gas accumulating and creating a potentially explosive environment.
Disconnecting the Gas Supply: This is arguably the most critical safety precaution. Locate the gas shut-off valve, typically located near the fireplace or outside the house near the gas meter. Using a wrench, carefully turn the valve to the "off" position. To verify that the gas supply is indeed shut off, attempt to light the pilot light. If the pilot light does not ignite, it confirms that the gas supply has been successfully disconnected. Always err on the side of caution and double-check the gas shut-off.
Reading the Manufacturer’s Instructions: Every gas fireplace and log set comes with specific instructions from the manufacturer. These instructions are tailored to the particular model and should be followed meticulously. Neglecting the manufacturer’s instructions can lead to improper installation and potentially dangerous operating conditions.
Personal Protective Equipment (PPE): Although often overlooked, appropriate PPE is recommended. Safety glasses protect the eyes from debris, and work gloves protect hands from sharp edges and potential contaminants.
Key Point 2: Connecting the Gas Line and Logs
Connecting the gas line and logs involves several crucial steps, including preparing the gas line fitting, connecting the gas line to the fireplace, arranging the logs according to the manufacturer’s instructions, and connecting the logs to the burner assembly. Each step requires attention to detail and careful execution.
Preparing the Gas Line Fitting: The gas line fitting, typically a threaded pipe, must be prepared to ensure a leak-proof seal. Clean the threads thoroughly to remove any dirt or debris. Apply Teflon tape specifically designed for gas lines to the threads, wrapping the tape in the direction of the threads. Applying Teflon tape correctly is crucial for preventing gas leaks. Over-tightening can damage the threads, while under-tightening can result in a weak seal.
Connecting the Gas Line to the Fireplace: Carefully align the gas line fitting with the corresponding fitting on the fireplace. Hand-tighten the connection as much as possible. Then, use two wrenches – one to hold the fireplace fitting in place and the other to tighten the gas line fitting. Ensure that the connection is snug but not excessively tight, as over-tightening can damage the threads and compromise the seal. After tightening, use a level to ensure the gas line is properly aligned. A misaligned gas line can strain the connection and potentially lead to leaks.
Arranging the Logs: Gas fireplace logs are typically designed to be arranged in a specific configuration to ensure proper flame distribution and aesthetics. Consult the manufacturer’s instructions for the correct log placement. Many logs have specific markings or notches that indicate their position relative to the burner assembly. Proper log placement is not only for aesthetic purposes, but also crucial for safety, as it ensures that the flames are directed away from the fireplace walls and surrounding materials.
Connecting Logs to the Burner Assembly: Some gas log sets require connections directly to the burner assembly. This usually involves carefully positioning the logs over the burner ports, ensuring that the logs sit securely and do not obstruct the gas flow. Follow the manufacturer's instructions precisely, as incorrect placement can lead to uneven flame distribution, soot buildup, or even carbon monoxide production. Some logs might have small connectors or clips that attach them to the burner assembly, providing added stability.
Checking for Gas Leaks: After connecting the gas line and logs, it is imperative to check for gas leaks. Mix a solution of soap and water in a spray bottle. Spray the solution onto all gas connections, including the gas line fitting and any connections on the burner assembly. If bubbles appear, it indicates a gas leak. If a leak is detected, immediately shut off the gas supply and tighten the connection further. Reapply the soap solution and check again. If the leak persists, consult with a qualified gas technician.
Key Point 3: Testing and Troubleshooting
Once the logs are connected and the gas line is verified to be leak-free, the next step is to test the fireplace and troubleshoot any potential issues. This involves turning on the gas supply, lighting the pilot light, observing the burner flame, and addressing any problems that may arise.
Turning on the Gas Supply: Slowly and carefully turn the gas shut-off valve back to the "on" position. Listen for any hissing sounds that might indicate a gas leak. If you hear a hissing sound, immediately shut off the gas supply and recheck all connections.
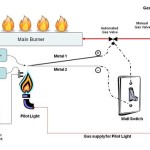
Lighting the Pilot Light: Follow the manufacturer’s instructions for lighting the pilot light. Typically, this involves pressing and holding a button while simultaneously igniting the pilot light with a lighter or spark igniter. Once the pilot light is lit, continue holding the button for a specified period (usually 20-30 seconds) to allow the thermocouple to heat up. Release the button, and the pilot light should remain lit. If the pilot light goes out after releasing the button, it may indicate a faulty thermocouple or a blocked pilot light orifice.
Observing the Burner Flame: Once the pilot light is lit, turn on the main burner. Observe the flame pattern and color. A healthy flame should be blue with yellow tips. A yellow or orange flame may indicate incomplete combustion, which can lead to carbon monoxide production. An uneven flame pattern may indicate a blockage in the burner ports. If the flame is not burning correctly, shut off the gas supply and inspect the burner assembly for any obstructions.
Troubleshooting Common Issues: Several common issues may arise during the testing phase. One common issue is the pilot light going out. This can be caused by a faulty thermocouple, a blocked pilot light orifice, or insufficient gas pressure. Another common issue is a yellow or orange flame, which can be caused by incomplete combustion due to insufficient air supply or a dirty burner assembly. If you encounter any issues that you are unable to resolve, consult with a qualified gas technician.
Carbon Monoxide Detection: It is strongly recommended to have a working carbon monoxide detector installed in the vicinity of the fireplace. Carbon monoxide is a colorless, odorless gas that can be deadly. A carbon monoxide detector will provide an early warning of any potential carbon monoxide leaks. Test the carbon monoxide detector regularly to ensure it is functioning properly.
Final Inspection: After completing the installation and testing, perform a final inspection of the fireplace and surrounding area. Ensure that there are no flammable materials located near the fireplace. Verify that the fireplace is properly ventilated. Double-check all gas connections for leaks. If everything appears to be in order, the gas fireplace is ready for use.
Proper connection of gas fireplace logs is paramount to ensuring safe and efficient operation. Adhering to these guidelines minimizes risk and ensures the long-term performance of the gas fireplace. Always consult with a qualified professional if any doubt arises during the installation or troubleshooting process.

How To Install Gas Logs 13 Steps With S Wikihow

How To Put In A Gas Log Set For Fireplace

How To Install Gas Logs 13 Steps With S Wikihow

How To Select And Install A Gas Fireplace Log Set Fireplaces Direct Learning Center

How To Install Gas Logs 13 Steps With S Wikihow

Installing Vent Free Gas Log Set

How To Put In A Gas Log Set For Fireplace
.png?strip=all "How To Install A Log Lighter Fireplace Gas Starter Pipe")
How To Install A Log Lighter Fireplace Gas Starter Pipe

Vented Gas Logs Heater Or Decorative Bart Fireside

How To Install A Log Lighter Fireplace Gas Starter Pipe