Lennox Fireplace Blower Installation: A Comprehensive Guide
Installing a Lennox fireplace blower can significantly improve the efficiency and heating capacity of a fireplace. These blowers circulate warm air from the firebox into the room, distributing heat more evenly and reducing reliance on central heating systems. While the installation process may vary slightly depending on the specific Lennox fireplace model and the blower kit chosen, the fundamental steps remain consistent. This article provides a detailed guide to installing a Lennox fireplace blower, outlining the necessary preparations, the installation procedure itself, and essential safety considerations.
Before beginning any installation, it is crucial to gather all the required materials and tools. This typically includes the Lennox fireplace blower kit, which will contain the blower unit, wiring harness, mounting hardware, and installation instructions specific to that model. Beyond the kit, installers will need a screwdriver set (both Phillips head and flathead), a wire stripper/cutter, electrical tape, a voltage tester, and potentially a drill with appropriate drill bits if modifications to the fireplace structure are necessary. Safety gear, such as gloves and safety glasses, are also imperative to prevent injury during the installation process.
The first step is to identify the specific Lennox fireplace model and obtain the correct blower kit designed for that model. Using the wrong kit can lead to compatibility issues, reduced performance, or even damage to the fireplace. The model number is usually located on a label affixed to the fireplace, often inside the firebox or on the unit's exterior. Once the correct kit is acquired, carefully review the manufacturer's installation instructions included with the kit. These instructions provide precise details and diagrams specific to the Lennox fireplace model in question.
Preparing the Fireplace for Blower Installation
Before starting any physical work, safety is paramount. The fireplace should be completely cool to the touch. Ensure that the fireplace is turned off and disconnected from the main electrical supply. This usually involves switching off the circuit breaker that controls the fireplace. Use a voltage tester to confirm that the power is indeed off before proceeding with any wiring. Clear the area around the fireplace to provide ample workspace and protect the surrounding floor with a drop cloth or similar covering.
Next, the fireplace needs to be prepared for the blower installation. This often involves removing the lower access panel or grate located beneath the firebox. This panel provides access to the area where the blower will be installed. The method of removal varies depending on the fireplace model. Some panels may be held in place by screws, while others may simply slide out. Consult the fireplace's owner's manual or the blower kit instructions for the specific removal procedure.
Once the access panel is removed, inspect the area for any obstructions, such as accumulated dust, debris, or loose wires. Clean the area thoroughly with a vacuum cleaner or brush to ensure a clean and safe working environment. Identify the location of the electrical receptacle or wiring connection point within the fireplace compartment. This is where the blower's power cord or wiring harness will be connected. If no receptacle exists, the installer may need to run a new electrical line to the fireplace, which should be done by a qualified electrician.
Installing the Lennox Fireplace Blower
With the fireplace prepared, the blower can be installed. The blower unit will typically have mounting brackets or flanges that allow it to be secured to the fireplace's frame or base. Align the blower with the designated mounting points and secure it using the provided screws or hardware. Ensure that the blower is positioned correctly, allowing for proper airflow and clearance from any obstructions. The blower should not be touching any components that get extremely hot during operation.
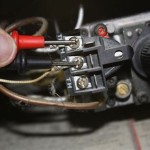
Connect the blower's wiring harness to the electrical receptacle or wiring connection point within the fireplace compartment. If the blower has a standard power cord, simply plug it into the receptacle. If the blower requires hardwiring, carefully connect the wires according to the wiring diagram provided in the installation instructions. Typically, this involves connecting the black (hot) wire, the white (neutral) wire, and the green (ground) wire. Use wire strippers to expose the ends of the wires and secure them with wire connectors or electrical tape. Ensure that all connections are tight and secure to prevent loose wiring or short circuits.
After connecting the wiring, tuck the wires neatly into the fireplace compartment, ensuring that they are not exposed to excessive heat or sharp edges. Replace the lower access panel or grate that was removed earlier. Secure it tightly to ensure that no dust or debris can enter the compartment. Double-check all connections and ensure that the blower is securely mounted before proceeding to the next step.
Testing and Final Adjustments
Once the blower is installed and all connections are verified, it is time to test the unit. Restore power to the fireplace by switching on the circuit breaker. Turn on the fireplace and allow it to heat up. Observe the blower to ensure that it is functioning correctly. The blower should start automatically once the fireplace reaches a certain temperature. Listen for any unusual noises, such as rattling or grinding, which may indicate a problem with the installation or the blower unit itself.
Adjust the blower's speed control, if applicable, to achieve the desired airflow. Most Lennox fireplace blowers have a variable speed control that allows the user to adjust the amount of airflow from the blower. Experiment with different speed settings to find the optimal balance between heat distribution and noise level. Ensure that the blower is effectively circulating warm air throughout the room.
Finally, monitor the fireplace and blower for any signs of overheating or malfunction. If any issues arise, such as sparking, smoke, or unusual odors, immediately turn off the fireplace and disconnect the power supply. Re-examine the installation and wiring to identify and correct any potential problems. If the issue persists, consult a qualified technician or electrician for assistance. Properly installed, a Lennox fireplace blower can significantly improve the effectiveness and efficiency of the fireplace, creating a warmer and more comfortable living space.

Fbk 250 Fireplace Blower Kit Installation

Fbk 100 Fireplace Blower Fan Kit Installation For Lennox And Superior

Fbk 100 Fireplace Blower Fan Kit Installation For Lennox And Superior

Noisy Gas Fireplace Blower Here S How To Replace It Diy

Replacement Fireplace Blower Fan Kit For Superior Lennox Astria Fireplaces

Fbk 250 Fireplace Blower Kit Installation

Lennox Oem Blower Kit For Fbk 250 Fireplace 80l86

Ac Infinity Airblaze T12 Universal Fireplace Blower Fan Kit With Temperature For

Lennox Fireplace Blower Fan Kit Magnet Mounted Fbk250 Hearth Trends

Dual Blower Kit For Security Continental Lennox Fireplaces Uzy5
Related Posts