Tile Over Fireplace Insert: A Comprehensive Guide
Fireplace inserts offer an efficient and aesthetic solution for upgrading existing fireplaces. Replacing an outdated or inefficient fireplace with an insert can significantly improve heating performance and enhance the visual appeal of a living space. The customization options for surrounding the insert are diverse, and tiling is a popular choice known for its durability, design versatility, and ease of maintenance. This article provides a comprehensive overview of tiling over a fireplace insert, covering key considerations, materials, installation processes, and maintenance requirements.
Key Considerations Before Tiling
Before commencing a tiling project around a fireplace insert, several crucial factors must be considered. These considerations directly impact the project's success, longevity, and safety. Overlooking these preliminary steps can lead to costly repairs, aesthetic disappointments, or even hazardous situations.
Heat Resistance: The primary concern when tiling over a fireplace insert is heat. Fireplace inserts generate significant heat, and the surrounding materials must be capable of withstanding high temperatures without cracking, warping, or emitting harmful fumes. Selecting the appropriate tile and setting materials is paramount. For example, certain natural stones like slate and granite are naturally heat-resistant. Porcelain and ceramic tiles are also common choices due to their durability and heat tolerance. However, it’s important to verify the specific temperature rating of the chosen tile with the manufacturer. Mortar and grout must also be specifically designed for high-temperature applications. Refractory mortar, which is formulated to withstand extreme heat without degrading, is often recommended for this purpose.
Surface Preparation: Proper surface preparation is another critical aspect. The substrate onto which the tiles will be installed must be clean, level, and structurally sound. Existing brick or concrete surfaces should be thoroughly cleaned to remove any soot, dust, or debris. Any loose or crumbling material must be removed and repaired before tiling can begin. A cement board, also known as backer board, is a common substrate used for tiling around fireplace inserts. Cement board provides a stable, moisture-resistant, and heat-resistant surface for the tiles. It is typically screwed or nailed to the existing structure, ensuring a secure and level base. Proper installation of the cement board is crucial to prevent cracking or shifting of the tiles over time.
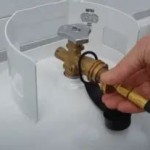
Clearances and Regulations: Adhering to local building codes and manufacturer specifications is essential. Fireplace inserts have specific clearance requirements to combustible materials, such as wood framing or drywall. These clearances are designed to prevent fires and ensure safe operation of the appliance. Consult the insert's installation manual and local building codes to determine the required clearances and ensure that the tiling project complies with these regulations. Failure to adhere to clearance requirements can result in fines, insurance complications, and, most importantly, a significant fire hazard. In some cases, non-combustible framing materials may be necessary to meet code requirements. Additionally, consider the placement of electrical outlets or other utilities near the fireplace insert. Ensure that these are properly protected and accessible after the tiling project is complete.
Material Selection and Installation
Choosing the right materials and following proper installation techniques are crucial for achieving a durable, aesthetically pleasing, and safe tiled fireplace surround.
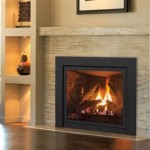
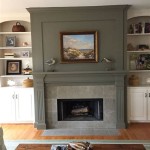
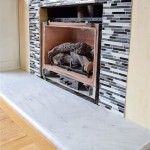
Tile Selection: As mentioned earlier, heat resistance is a primary factor in tile selection. Porcelain and ceramic tiles are popular choices due to their durability, affordability, and wide range of styles. Natural stone tiles, such as slate, granite, and travertine, can also be used, but it's essential to verify their suitability for high-temperature applications. Glass tiles can be visually appealing, but they may not be the best choice for areas directly exposed to intense heat. Consider the overall aesthetic of the room and select tiles that complement the existing décor. Size, shape, and color all play a role in the final appearance. Larger tiles can create a more modern look, while smaller tiles can add texture and detail. Grout color also plays a significant role in the overall appearance. A contrasting grout color can highlight the shape of the tiles, while a matching grout color can create a more seamless look. Purchasing extra tiles is always recommended to account for cuts, breakage, and future repairs.
Mortar and Grout: Selecting the appropriate mortar and grout is as important as choosing the right tiles. Use a high-temperature mortar specifically designed for fireplace applications. These mortars are formulated to withstand extreme heat without cracking or crumbling. Read the manufacturer's instructions carefully and follow them precisely. Mix the mortar according to the instructions, ensuring a consistent and workable consistency. Apply the mortar evenly to the back of the tiles using a notched trowel. The size of the notches will depend on the size and type of tile being used. Ensure that the tiles are firmly pressed into the mortar, creating a strong bond. Use tile spacers to maintain consistent grout lines. Once the mortar has cured, apply the grout. Use a grout float to work the grout into the joints, ensuring that they are completely filled. Wipe away excess grout with a damp sponge. Allow the grout to cure according to the manufacturer's instructions before sealing. Sealing the grout helps to protect it from stains and moisture.
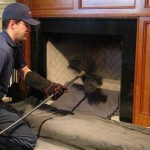
Installation Process: The installation process should be meticulous and precise. Start by laying out the tiles in a dry run to determine the best layout and identify any necessary cuts. Use a wet saw to make accurate cuts. Apply the mortar to the back of the tiles and firmly press them into place, using tile spacers to maintain consistent grout lines. Regularly check the level and alignment of the tiles to ensure a professional finish. Allow the mortar to cure completely before applying the grout. After the grout has cured, seal it to protect it from stains and moisture. Inspect the finished tiling for any cracks, chips, or imperfections. Address any issues promptly to prevent further damage. Consider hiring a professional tile installer if you are not comfortable performing the work yourself. A professional installer will have the necessary skills, tools, and experience to ensure a high-quality and long-lasting result.
Maintenance and Longevity
Proper maintenance is essential for preserving the appearance and extending the lifespan of a tiled fireplace surround. Regular cleaning and occasional repairs can help prevent damage and maintain the aesthetic appeal of the tiled surface.
Cleaning: Regular cleaning is essential to remove soot, dust, and other debris that can accumulate on the tiled surface. Use a mild detergent and warm water to clean the tiles. Avoid using harsh chemicals or abrasive cleaners, as these can damage the tile and grout. A soft cloth or sponge is recommended for cleaning. For stubborn stains, a grout brush can be used to gently scrub the grout lines. Rinse the tiles thoroughly with clean water after cleaning to remove any soap residue. Wipe the tiles dry with a clean cloth to prevent water spots. Regular dusting can help prevent the buildup of dust and soot. A vacuum cleaner with a soft brush attachment can be used to remove dust from the tiles and grout lines. Consider using a grout cleaner specifically designed for removing stains and discoloration from grout.
Inspection and Repair: Regularly inspect the tiled surface for any cracks, chips, or loose tiles. Address any issues promptly to prevent further damage. Small cracks can be repaired with grout caulk or epoxy. Use a color-matched caulk or epoxy to blend seamlessly with the surrounding grout. Loose tiles should be removed and re-installed using fresh mortar. Before re-installing the tile, clean the back of the tile and the substrate to ensure a strong bond. If the damage is extensive, it may be necessary to replace the affected tiles. Use the extra tiles purchased during the initial installation for replacements. If the original tiles are no longer available, try to find tiles that closely match the existing ones. Monitor the grout lines for any signs of crumbling or deterioration. Re-grout as needed to maintain a watertight seal and prevent moisture from penetrating the substrate.
Preventative Measures: Taking preventative measures can help extend the life of the tiled fireplace surround. Use a fireplace screen to protect the tiles from sparks and embers. Avoid placing flammable materials too close to the fireplace insert. Regularly inspect the fireplace insert and chimney for any signs of damage or malfunction. Have the chimney professionally cleaned at least once a year to remove creosote buildup. Consider applying a sealant to the tiles and grout to protect them from stains and moisture. Re-apply the sealant periodically as needed. By following these maintenance tips and preventative measures, you can ensure that your tiled fireplace surround remains beautiful and functional for many years to come. Remember to consult with a professional if you are unsure about any aspect of the maintenance or repair process.

How To Tile A Fireplace Even If It S Brick The Handyman Daughter

How To Personalise Your Cast Iron Fire With Tile Inserts Direct Fireplaces

How To Tile A Fireplace My Uncommon Slice Of Suburbia

How To Paint Tile Easy Fireplace Makeover Setting For Four Interiors

Trend Watch Tile Fireplace Surrounds

Pin By Linda Dorage On Fireplace Ideas Home Remodel Living Room With
/102661017-6a23c040b71843379188b96b21ac1a08.jpg?strip=all "How To Tile A Fireplace")
How To Tile A Fireplace

Diy Fireplace Makeover With Vinyl Tiles Sew Much Ado

Diy Fireplace Makeover With High Heat Paint Jessica Welling Interiors

How To Tile A Brick Fireplace Jenna Kate At Home
Related Posts