Faux Paint Fireplace Tile: Achieving a Tile Look Without the Tile Work
Fireplaces serve as focal points within many homes, providing warmth and visual appeal. However, the aesthetic of a fireplace can become dated or simply not align with evolving design preferences. Replacing existing fireplace tile can be a costly and labor-intensive endeavor. An alternative solution gaining popularity is the application of faux paint techniques to mimic the appearance of tile. This approach offers a cost-effective and customizable way to rejuvenate a fireplace surround without the complexities of demolition and tile installation.
Faux painting, in this context, involves using various painting techniques to create the illusion of texture, depth, and grout lines, effectively replicating the look of real tile. The technique can be adapted to resemble a variety of tile styles, from classic subway tile to intricate mosaic patterns. The final result is a durable and visually convincing imitation of tile, transforming the fireplace into a refreshed and updated feature of the home.
This article will explore the process of faux painting fireplace tile, highlighting the necessary materials, preparation steps, painting techniques, and sealing procedures involved. It will also address the advantages and disadvantages of this approach compared to traditional tiling, enabling informed decision-making regarding fireplace renovation.
Understanding the Benefits of Faux Painting Fireplace Tile
The appeal of faux painting fireplace tile stems from a number of key advantages over traditional tile installation. Cost is a significant factor, as the materials required for faux painting are generally far less expensive than purchasing tile, grout, and related installation supplies. Furthermore, the labor costs associated with professional tile installation are avoided, making faux painting a budget-friendly option for homeowners.
Another benefit lies in the relative ease and speed of the process. Faux painting can typically be completed within a weekend, whereas tiling can take several days, especially for intricate designs. The disruption to the household is therefore minimized, allowing for a quicker return to normalcy.
Customization is also a major advantage. Faux painting allows for complete control over the color, pattern, and texture of the simulated tile. This flexibility enables homeowners to create a truly unique and personalized fireplace surround that perfectly complements their existing décor. It’s possible to mimic the look of rare or expensive tiles without incurring the high cost.
Finally, faux painting is a less permanent solution than tiling. If the homeowner's style preferences change in the future, the faux painted tile can be easily repainted or altered to reflect new trends, offering a greater degree of adaptability than permanent tile installation.
Essential Materials and Preparation Steps
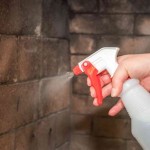
Successful faux painting of fireplace tile hinges on proper preparation and the use of appropriate materials. The first step involves thoroughly cleaning the existing fireplace surround. This may involve removing soot, dust, grease, and any loose paint or debris. A degreasing cleaner is recommended for removing grease deposits, particularly around the firebox opening. After cleaning, the surface should be rinsed with clean water and allowed to dry completely.
Once the surface is clean, it’s crucial to apply a primer specifically designed for the existing material (e.g., brick, drywall, or stone). The primer creates a uniform surface for the paint to adhere to, improving the durability and longevity of the faux finish. A stain-blocking primer is particularly important if the existing surface has any stains or discoloration that could bleed through the paint. Allow the primer to dry completely according to the manufacturer’s instructions.
The selection of appropriate paints is also critical. Acrylic paints are generally recommended for faux painting fireplace tile due to their durability, water resistance, and ease of application. A base coat in a color that closely resembles the desired grout color should be applied first. This base coat will serve as the foundation for the faux tile pattern. It's important to use heat-resistant paint near the firebox to prevent discoloration or peeling. Following the base coat, select paint colors for the tile itself. Multiple colors can be used to create variations and depth within the faux tile design.
Other essential materials include: painter's tape for creating clean lines, various sizes of paintbrushes (including a small detail brush), a sea sponge or rag for creating texture, a ruler and pencil for measuring and marking the tile pattern, a level to ensure straight lines, and a clear sealant to protect the finished faux tile from heat and moisture.
It is also important to consider the safety precautions when working with paint and sealants. Adequate ventilation is essential to avoid inhaling fumes. Wear appropriate protective gear, such as gloves and a mask, to prevent skin and respiratory irritation.
Faux Painting Techniques for Creating a Realistic Tile Effect
The heart of faux painting fireplace tile lies in the application of various techniques to create a convincing tile illusion. The first step is to carefully measure and mark out the desired tile pattern on the primed surface. Use a ruler, level, and pencil to create a grid representing the size and layout of the individual tiles. Painter's tape should be applied along the marked lines to create crisp, clean edges for the faux grout lines.
Once the grid is taped off, begin applying the paint for the faux tiles. Experiment with different painting techniques to achieve the desired texture and depth. A sea sponge can be used to create a mottled or textured effect, while a rag can be used to create a distressed or aged look. Multiple layers of paint in slightly different shades can add dimension and realism to the faux tiles.
For a more sophisticated look, consider using stencils to create intricate patterns or designs on the faux tiles. Stencils can be purchased or created from scratch to match the desired aesthetic. Apply the paint through the stencil using a stencil brush or a sponge, being careful not to overload the brush with paint to prevent bleeding under the edges. After the paint has dried, carefully remove the stencil to reveal the design.
Once the paint on the faux tiles is completely dry, carefully remove the painter's tape to reveal the faux grout lines. If any paint has bled under the tape, use a small detail brush to touch up the grout lines and create a clean, crisp edge. The color of the original base coat will now serve as the grout color.
To enhance the realism of the faux tile, consider applying a thin layer of tinted glaze or antiquing medium to the surface. This can add depth and dimension to the tile, as well as highlight any textured areas. Apply the glaze with a brush or rag, and then wipe away the excess with a clean cloth. The glaze will settle into the crevices and add a subtle aged look to the tile.
Finally, after all the painting and glazing is complete, apply several coats of a clear sealant to protect the faux tile from heat, moisture, and wear. Choose a sealant that is specifically designed for use on painted surfaces and that can withstand high temperatures. Apply the sealant according to the manufacturer’s instructions, allowing each coat to dry completely before applying the next. The sealant will provide a durable and long-lasting finish that will protect the faux tile for years to come.
Addressing Specific Tile Styles Through Faux Painting
Different tile styles require adapted faux painting techniques to convincingly replicate their appearance. For example, creating a faux subway tile look involves a simple rectangular grid and a clean, minimalist aesthetic. The focus here is on achieving perfectly straight lines and a smooth, even paint finish. A roller can be used to apply the paint to the faux tiles, ensuring a uniform and consistent look.
To mimic the appearance of mosaic tile, a more intricate and detailed approach is required. This involves creating a grid of small, irregular shapes and using multiple colors of paint to represent the individual mosaic pieces. Stencils or freehand painting can be used to create the mosaic pattern. The key is to vary the colors and textures of the faux tiles to create a sense of randomness and authenticity.
Simulating natural stone tile, such as slate or travertine, requires a focus on texture and depth. This can be achieved using a variety of techniques, such as sponging, rag rolling, and stippling. Multiple layers of paint in different shades should be applied to create a sense of depth and dimension. The goal is to replicate the natural variations and imperfections that are characteristic of natural stone.
For creating the look of Mexican tile, a vibrant color palette and bold geometric patterns are essential. Stencils can be used to create the intricate designs that are typical of Mexican tile. The colors should be bright and saturated, and the patterns should be symmetrical and balanced.
Regardless of the desired tile style, careful planning, attention to detail, and experimentation with different techniques are key to achieving a successful and convincing faux tile finish.
Durability, Maintenance, and Considerations
While faux painted fireplace tile offers numerous advantages, it is essential to consider its durability and maintenance requirements compared to traditional tile. While the layers of primer, paint, and sealant provide a protective barrier, faux painted surfaces are generally less resistant to scratches, chips, and impact damage than real tile.
Proper maintenance is crucial to prolong the life of the faux painted finish. Regular cleaning with a mild soap and water solution is recommended to remove dust, dirt, and soot. Avoid using harsh chemicals or abrasive cleaners, as these can damage the paint and sealant. Promptly address any spills or stains to prevent them from penetrating the protective coating.
The proximity of the faux painted surface to the firebox is a critical consideration. The heat generated by the fire can cause the paint and sealant to deteriorate over time. It is essential to use heat-resistant paints and sealants in areas that are exposed to direct heat. Periodic touch-ups may be necessary to maintain the appearance of the faux tile.
Homeowners considering faux painting fireplace tile should carefully assess their lifestyle and usage patterns. If the fireplace is frequently used and subject to heavy wear and tear, traditional tile may be a more durable and long-lasting option. However, for homeowners seeking a cost-effective and customizable way to update their fireplace surround, faux painting offers a viable and attractive alternative.

110 Diy Fireplace Makeover How To Paint Tile Jessica Welling Interiors

How To Paint Faux Tile Fireplace Make Over Diy Tiles

Stenciled Faux Tile Fireplace Tutorial East Coast Creative

How To Paint Faux Subway Tile A Diy Fireplace Makeover

Diy Fireplace Makeover How To Paint Faux Subway Tile

Painting Fireplace Tile The Ultimate Guide Jessica Welling Interiors

How To Paint Fireplace Tile Look Like Marble Lantern Lane Designs

How To Paint Faux Subway Tile A Diy Fireplace Makeover

Faux Marble Fireplace Savvy Apron

Painting Fireplace Tile Ridiculously Easy Diy Makeover Tiny Hands Tidy Home
Related Posts