DIY Stone Fireplace Transformation: A Comprehensive Guide
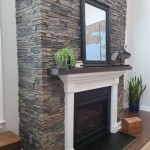
A fireplace serves as a focal point in many homes, providing warmth and aesthetic appeal. Over time, the existing fireplace facade may become dated or simply no longer align with evolving design preferences. Incorporating stone veneer or natural stone represents a viable option for upgrading a fireplace, imbuing it with texture, visual interest, and a sense of permanence. This article provides a detailed guide on undertaking a DIY stone fireplace transformation, covering planning, material selection, preparation, installation, and finishing.
Planning and Design Considerations
Before commencing any physical work, a comprehensive plan is essential. This involves assessing the existing fireplace structure, determining the desired aesthetic, and calculating material requirements. Careful planning minimizes errors, reduces waste, and ensures a satisfactory final result.
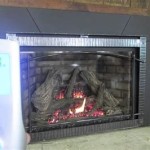
The existing fireplace should be thoroughly inspected for structural integrity. Cracks, loose bricks, or any signs of deterioration need to be addressed before proceeding. A unstable or damaged fireplace represents a safety hazard and compromises the longevity of the stone veneer. Remedial work, such as repointing mortar joints or reinforcing the firebox, may be necessary. Consult with a qualified professional for structural issues that require specialized expertise.
The scope of the project needs to be defined. Will the stone veneer cover the entire fireplace facade, or only a portion? Will the hearth be replaced or resurfaced? A detailed sketch or rendering of the envisioned final product helps to visualize the design and identify potential challenges.
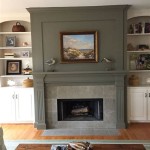
Aesthetic considerations play a crucial role. Numerous styles of stone veneer and natural stone are available, ranging from rustic fieldstone to sleek ledgestone. The color, texture, and size of the stone influence the overall ambiance of the room. Selecting a stone that complements the existing decor and architectural style contributes to a cohesive and visually appealing design. Consider the scale of the fireplace in relation to the room. Large, imposing stones might overwhelm a small space, while smaller, more refined stones may be better suited. Sample stones should be viewed in the actual lighting conditions of the room to accurately assess their appearance.
Accurate measurements are critical for calculating the quantity of materials required. Measure the height and width of the area to be covered with stone veneer. Account for any openings, such as the firebox opening. Add a waste factor of approximately 10% to the total square footage to accommodate cuts and potential errors. Also, calculate the amount of mortar, adhesive, and grout needed based on the manufacturer's recommendations.
Local building codes and regulations should be reviewed to ensure compliance. Some jurisdictions may have specific requirements regarding fireplace modifications, particularly concerning clearances from combustible materials. Obtaining any necessary permits before starting work avoids potential delays and legal issues.
Material Selection and Preparation
Choosing the right materials is paramount for the success of the project. This includes selecting the appropriate stone veneer or natural stone, mortar, adhesive, grout, and sealing products. Proper preparation of the substrate – the existing fireplace surface – is equally important for ensuring a strong and durable bond.
Stone veneer offers a cost-effective and lightweight alternative to natural stone. It is typically manufactured from concrete or other composite materials and replicates the appearance of natural stone. Natural stone, on the other hand, provides authentic texture and inherent variation. The choice between stone veneer and natural stone depends on budget, aesthetic preferences, and structural considerations. Natural stone can be significantly heavier than stone veneer, potentially requiring additional structural support.
Consider the type of stone veneer. Manufactured stone veneers provide consistent color and texture and are readily available in various styles. Faux stone is another type made to resemble natural materials. Natural stone offers unique variations and often costs more. For a fireplace, it is crucial to use materials rated for high heat, especially around the firebox.
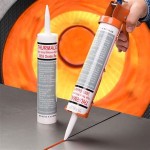
Mortar serves as the bonding agent for adhering the stone veneer or natural stone to the substrate. Type S mortar, a high-strength mortar, is generally recommended for this application. It offers excellent adhesion and resistance to cracking. Premixed mortars are available, but mixing mortar from scratch provides greater control over the consistency and water content. Adhesives, specifically designed for stone veneer, can also be used, particularly for lightweight veneer products. Always follow the manufacturer's instructions regarding mixing ratios and application techniques.
Grout fills the spaces between the stones, providing a finished appearance and preventing water penetration. Choose a grout color that complements the stone veneer. Sanded grout is typically used for wider joints, while unsanded grout is suitable for narrow joints. Sealers protect the stone and grout from staining and moisture damage. Apply a sealant specifically designed for stone and masonry after the grout has cured completely.
The substrate must be clean, sound, and free of any loose paint, debris, or contaminants. Wire brushing, scraping, and pressure washing can effectively remove loose materials. If the existing fireplace surface is painted or sealed, it may be necessary to remove the coating to ensure proper adhesion. Etching primers or bonding agents can be applied to improve adhesion on smooth or non-porous surfaces.
A scratch coat, a thin layer of mortar, is typically applied to the substrate to provide a textured surface for the stone veneer to adhere to. The scratch coat should be allowed to cure for at least 24 hours before installing the stone veneer. A waterproof membrane might be considered, especially if the fireplace is located on an exterior wall.
Installation and Finishing Techniques
The installation process requires patience, precision, and attention to detail. Proper installation techniques are essential for achieving a visually appealing and structurally sound result. Finishing touches, such as grouting and sealing, enhance the appearance and protect the stone veneer.
Prior to installation, dry-lay the stone veneer to determine the desired arrangement. This involves placing the stones on the floor or a flat surface in the intended pattern. Experiment with different layouts to achieve a balanced and aesthetically pleasing design. Pay attention to the size, shape, and color variations of the stones. This dry-fitting process allows for adjustments and ensures that the final layout is satisfactory.
Mortar should be applied to the back of each stone veneer with a trowel. The mortar should be thick enough to create a strong bond but not so thick that it oozes out excessively when the stone is pressed against the substrate. Apply enough mortar to completely cover the back of the stone, avoiding gaps that can weaken the bond.
Starting at the bottom and working upwards, press each stone veneer firmly against the substrate, ensuring proper alignment and spacing. Use a level to ensure that the stones are installed straight and plumb. Maintain consistent joint widths between the stones. Shims can be used to temporarily hold the stones in place while the mortar sets. It is advisable to work in small sections, allowing the mortar to partially cure before adding more stones. Clean up any excess mortar with a damp sponge or brush before it hardens completely.
Corners require special attention. Corner stones, specifically designed for creating realistic corners, are available for most stone veneer styles. Alternatively, stones can be mitered to create a seamless corner. Ensure that the corners are properly aligned and secured with mortar. For natural stone, careful cuts are required to create tight-fitting corners.
After the mortar has cured for at least 24 hours, the joints can be grouted. Apply grout to the joints using a grout bag or a mortar gun. Force the grout into the joints, ensuring that they are completely filled. Use a damp sponge to remove any excess grout from the surface of the stones. Allow the grout to cure according to the manufacturer's instructions. Tooling the joints, shaping the grout with a specialized tool, provides a consistent and professional finish. Different joint profiles can be created, such as concave, flush, or raked.
Once the grout has fully cured, typically after several days, the stone veneer should be sealed. Applying a sealant protects the stone and grout from staining, moisture damage, and efflorescence (the appearance of white salt deposits on the surface). Choose a sealant specifically designed for stone and masonry. Apply the sealant according to the manufacturer's instructions, ensuring that all surfaces are thoroughly coated. Regular cleaning and maintenance of the stone veneer will help to preserve its appearance and extend its lifespan. Mild soap and water are typically sufficient for cleaning. Avoid harsh chemicals or abrasive cleaners that can damage the stone or grout.

Easy L And Stick Stone Fireplace Surround Sondra Lyn At Home

How To Build An Outdoor Stacked Stone Fireplace

Diy Overgrouted Stone Fireplace Shoe Makes New

Diy Painted Stone Fireplace Refresh Live Edge Mantle Lemon Thistle

Faux Stone Fireplace Entertainment Center Genstone

How To Build And Hang A Mantel On Stone Fireplace Shanty 2 Chic

How To Install A Stone Veneer Fireplace Shoe Makes New

Diy Stacked Stone Fireplaces On A Budget Msi Blog

Thin Stone Veneers Make A Fireplace Update Easy Swenson Granite 100 Natural Stones

Diy Faux Cast Stone Fireplace Part 1 Demo And Tiling The Hearth Top Shelf
Related Posts