Painting a Fireplace Surround White: A Comprehensive Guide
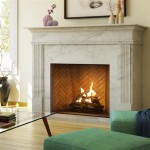
A fireplace serves as a focal point in many homes, contributing significantly to the room's ambiance. Over time, the style or condition of a fireplace surround may no longer complement the desired aesthetic. Painting a fireplace surround white is a popular choice for updating its look, brightening the space, and creating a cleaner, more modern feel. This article provides a detailed guide on how to properly prepare and paint a fireplace surround white, ensuring a professional and lasting finish.
Before embarking on this project, it's crucial to assess the existing condition of the fireplace surround. Consider the material of the surround (brick, wood, stone, or metal), its age, and any existing paint or coatings. This assessment will determine the necessary preparation steps and the appropriate materials to use. A thorough cleaning is required prior to any painting.
Key Point 1: Preparation is Paramount
The success of any painting project hinges on meticulous preparation. Neglecting this step can lead to poor adhesion, uneven coverage, and ultimately, a less than satisfactory result. Proper preparation involves cleaning, sanding, priming, and protecting the surrounding areas.
The first step is to thoroughly clean the fireplace surround. Remove any loose debris, dust, soot, or grease. A solution of warm water and mild detergent is usually sufficient for most surfaces. For stubborn stains or soot, a specialized cleaner designed for fireplace surrounds may be required. Rinse the surface with clean water and allow it to dry completely before proceeding. For greasy surfaces, a degreaser is necessary to remove any residue that could prevent proper paint adhesion. Ensure the chosen cleaner is compatible with the surround's material.
Sanding is crucial for creating a smooth surface and ensuring proper paint adhesion. The degree of sanding required depends on the existing finish and the material of the surround. For previously painted surfaces, lightly sanding with fine-grit sandpaper (220-grit or higher) will help to roughen the surface and create a better bond for the new paint. For glossy surfaces, a slightly coarser grit sandpaper (120-grit to 180-grit) may be needed to dull the shine. If the surround has imperfections or imperfections, use a coarse sandpaper(80-100 grit) to remove the imperfections. For bare wood, sanding will help to smooth the surface and remove any splinters or rough edges. Always sand in the direction of the grain of the wood, if applicable. After sanding, wipe away all sanding dust with a tack cloth or a damp cloth.
Priming is an essential step, especially when painting over dark colors or porous surfaces. A primer creates a uniform surface, blocks stains, and improves paint adhesion. Choose a primer that is compatible with the material of the surround and the topcoat paint. For example, use a specific primer for brick if painting a brick surround. Apply the primer in thin, even coats, following the manufacturer's instructions. Allow the primer to dry completely before applying the paint. A tinted primer is preferred when painting with white over a darker color. This reduces the number of coats of white paint needed.
Protection of the surrounding areas is also critical. Use painter's tape to mask off any surfaces that should not be painted, such as the wall, the hearth, and the fireplace opening. Cover the floor with drop cloths to protect it from paint splatters. Taking the time to properly mask and protect the surrounding areas will save time and effort in the long run by preventing unwanted paint marks and spills.
Key Point 2: Selecting the Right Paint and Tools
Choosing the right paint and tools is crucial for achieving a professional-looking finish. The type of paint, the sheen, and the application tools all play a role in the final outcome. Consider the heat resistance requirements of the paint to ensure the longevity of the finish.
When painting a fireplace surround white, consider the type of paint carefully. Latex-based paints are generally a good choice for interior surfaces due to their durability, ease of application, and low odor. Acrylic paints are also a viable option, offering excellent adhesion and resistance to cracking and peeling. For fireplace surrounds, a heat-resistant paint may be necessary, especially for areas close to the firebox. Research heat resistant paints and their recommended applications. Oil-based paints offer excellent durability and a smooth finish, but they are more difficult to clean up and have a stronger odor. They are also less environmentally friendly than latex or acrylic paints. Check local regulations regarding the use of oil-based paints. Consider the material of the surround. Porous materials like brick may require a paint specifically designed for masonry.
The sheen of the paint also affects the appearance and durability of the finish. Matte or eggshell finishes are good choices for hiding imperfections, but they are less durable and harder to clean. Semi-gloss or gloss finishes are more durable and easier to clean, but they tend to highlight imperfections. A satin finish offers a good balance between durability and hiding imperfections. High gloss is less common but can be used to highlight architectural details. For a fireplace surround, a satin or semi-gloss finish is generally recommended due to its durability and ease of cleaning.
The right tools are essential for achieving a smooth and even finish. Use high-quality brushes for cutting in around edges and corners. A roller with a smooth nap is ideal for painting large, flat surfaces. For detailed areas or intricate designs, consider using a small brush or a foam applicator. Use painter's tape to create clean lines and protect surrounding surfaces. A paint tray is essential for holding the paint and loading the brush or roller. Ensure the brushes and rollers are compatible with the type of paint being used. For example, use synthetic brushes for latex paints and natural bristle brushes for oil-based paints. Always clean brushes and rollers thoroughly after each use to prolong their lifespan.
Safety is always a priority when painting. Ensure adequate ventilation in the workspace by opening windows and doors. Wear appropriate protective gear, such as gloves and a respirator, to protect skin and lungs from paint fumes and dust. Follow the manufacturer's instructions for the safe handling and disposal of paint and other materials.
Key Point 3: Painting Techniques for a Professional Finish
Applying the paint correctly is crucial for achieving a professional-looking finish. Proper techniques involve applying thin, even coats, avoiding drips and runs, and allowing adequate drying time between coats. Attention to detail and patience are key.
Start by "cutting in" around the edges of the fireplace surround with a brush. This involves painting a narrow strip along the edges where the surround meets the wall, the hearth, or the fireplace opening. Use a steady hand and a good-quality brush to create a clean, crisp line. Feather the edges of the painted strip to blend it seamlessly with the rest of the surface. Cutting in helps to define the edges and creates a professional-looking border.
Next, apply the paint to the remaining surface using a roller or brush. Apply the paint in thin, even coats, working in small sections at a time. Avoid applying too much paint at once, as this can lead to drips and runs. Overlap each stroke slightly to ensure even coverage. Maintain a wet edge to prevent lap marks, especially when using fast-drying paints. If using a roller, roll the paint in a "W" pattern to distribute the paint evenly and then smooth it out with overlapping strokes. If using a brush, apply the paint in long, smooth strokes, following the grain of the wood, if applicable.
Allow each coat to dry completely before applying the next coat. Refer to the paint manufacturer's instructions for the recommended drying time. Sand lightly between coats with fine-grit sandpaper to remove any imperfections and create a smooth surface for the next coat. Wipe away all sanding dust with a tack cloth or a damp cloth before applying the next coat. Multiple thin coats are always better than one thick coat, as they provide better coverage, adhesion, and durability.
Pay attention to details, such as corners, crevices, and intricate designs. Use a small brush or a foam applicator to reach these areas and ensure complete coverage. Remove any drips or runs immediately with a clean brush or a damp cloth. Inspect the painted surface carefully for any imperfections or missed spots and touch them up as needed. Maintain a consistent technique throughout the project to ensure a uniform finish.
Once the final coat of paint has dried completely, carefully remove the painter's tape at a 45-degree angle to avoid pulling off any paint. Touch up any areas where the paint has bled under the tape. Clean up any paint splatters or spills immediately with a damp cloth. Dispose of used paint and materials properly, following local regulations. Allow the painted surface to cure for the recommended time before placing any objects on it or using the fireplace. Curing allows the paint to fully harden and develop its maximum durability.
By following these steps and paying attention to detail, it is possible to achieve a professional-looking finish when painting a fireplace surround white. A freshly painted fireplace surround can transform the look of a room and create a more inviting and stylish space. Consistent maintenance will maintain the integrity of the paint job.

Painting Your Oak Mantel White Fireplace Wood Surrounds

My Fireplace Mantel Reveal A Makeover With Paint Setting For Four Interiors

Dawlish Fireplace Surround Painted White

Guide To Fireplace Painting Part 2 Colors And Techniques

Pin On Home Decor Decorating Organizing

How To Paint A Wooden Fireplace Surround

How To Paint Your Fireplace Brick Surround

Two Tone Fireplace Makeover Love Grows Wild

White Brick Fireplace Remodel Painted Fireplaces

How To Paint A Fireplace Interior Design Diy Tips Direct Fireplaces
Related Posts

