How To Build An Outdoor Fireplace And Grill
An outdoor fireplace and grill can transform a backyard into a focal point for relaxation and entertainment. It provides a comfortable gathering space during cooler evenings and offers a convenient cooking area for barbecues and outdoor meals. Constructing such a structure requires careful planning, adherence to safety codes, and a solid understanding of masonry techniques. This article outlines the essential steps involved in building a durable and aesthetically pleasing outdoor fireplace and grill.
The initial phase involves diligently planning the design and scope of the project. Consider the available space, desired aesthetics, and functionalities to be incorporated. A sketch or detailed blueprint, including dimensions, materials lists, and construction sequences, is crucial for a successful build. It is also essential to verify local building codes and regulations beforehand, as permits may be required, and specific structural requirements must be met.
Selecting the correct materials is paramount to the longevity and safety of the fireplace and grill. Fire-resistant bricks or concrete blocks are the primary building materials for the firebox and chimney. Mortar, specifically designed for high-temperature applications, is necessary for bonding the bricks. Natural stone or manufactured stone veneer can be used to clad the exterior, providing a decorative and weather-resistant finish. The grill component may consist of a metal grate and support structure, typically made of stainless steel or cast iron, which can withstand high heat. Ensure all materials are sourced from a reputable supplier and conform to industry standards.
1. Laying the Foundation and Base
The foundation serves as the critical support for the entire fireplace and grill structure. It must be structurally sound to withstand the weight of the masonry and prevent settling or cracking over time. Start by excavating the ground to a depth that extends below the frost line in the geographical region to prevent heaving due to freezing and thawing cycles. Typically, a depth of 12 to 24 inches is sufficient, but local building codes should be consulted for confirmation.
Pour a concrete footing into the excavated area, ensuring it is level and adequately reinforced with rebar. The footing should be wider than the planned base of the fireplace to provide sufficient support. Allow the concrete to cure for at least seven days before proceeding to the next step. Curing time varies based on ambient temperature and humidity.
Once the footing has cured, begin laying the base of the fireplace and grill using concrete blocks or bricks. Ensure the base is level and squared. Mortar each block or brick securely, maintaining consistent joint thickness. The base should elevate the firebox and grill to a comfortable working height. Consider incorporating storage areas for firewood or grilling accessories within the base structure. Accurate leveling is critical at each stage to ensure the structural integrity of the subsequent tiers.
It is recommended to add a concrete slab on top of the base structure. This creates a level and stable platform upon which to construct the firebox and grill. This slab should also be reinforced with wire mesh or rebar and allowed to cure properly before proceeding.
2. Constructing the Firebox and Grill Area
The firebox is the heart of the fireplace and must be built with fire-resistant materials. Use firebricks for the interior lining of the firebox, as they are designed to withstand extremely high temperatures without cracking or deteriorating. Choose a fire-rated mortar specifically designed to withstand the intense conditions within the firebox. Regular mortar will not suffice and will quickly degrade.
Lay the firebricks in a pattern that maximizes heat retention and reflects heat outwards. Common patterns include herringbone or running bond. Ensure that the joints between the firebricks are tightly packed with mortar to prevent air leaks, which can affect the efficiency of the fire. Precise bricklaying is crucial for the longevity and efficiency of the firebox. Use a level frequently to ensure accuracy.
The grill area should be integrated seamlessly into the firebox design. Consider the size of the grill grate and ensure adequate support structures are in place. The grill grate can either rest on brick ledges built into the firebox or be supported by metal brackets. Stainless steel is the preferred material for support brackets given its heat resistance and durability. The placement of the grill grate should allow for adjustable height to control cooking temperatures.
Construct the firebox walls to the desired height, sloping the back wall slightly inward to help direct heat outwards. Install a lintel made of steel or reinforced concrete across the top of the firebox opening to support the weight of the chimney above. Ensure the lintel is properly sized to handle the anticipated load. The lintel should be embedded securely in the surrounding masonry.
3. Building the Chimney and Finishing Touches
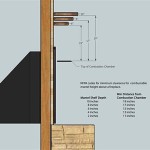
The chimney is responsible for venting smoke and exhaust gases away from the fireplace. It must be constructed to provide adequate draft and prevent smoke from entering the surrounding area. The chimney should narrow slightly as it rises to accelerate the flow of smoke. A too-wide chimney can be just as problematic as a too-narrow one.
Build the chimney using fire-resistant bricks or concrete blocks, continuing the same pattern used for the firebox. Line the interior of the chimney with flue liners to protect the masonry from the corrosive effects of smoke and exhaust gases. Flue liners should be appropriately sized for the fireplace opening and installed according to the manufacturer's instructions. Mortar each flue liner section securely, ensuring a tight seal. Proper flue liners are critical for safety and chimney performance.
As the chimney rises, ensure it meets the minimum height requirements specified by local building codes. Generally, the chimney should extend at least two feet above the highest point of the roof within a 10-foot radius. This prevents downdrafts and ensures proper smoke ventilation.
Once the chimney is complete, add a chimney cap to prevent rain, snow, and debris from entering. A chimney cap also can include a spark arrestor to prevent embers from escaping and potentially causing a fire. Select a chimney cap made of durable materials such as stainless steel or copper to withstand the elements.
Apply the chosen exterior finish to the fireplace and grill. This may involve applying a stone veneer, stucco, or simply painting the exposed masonry. Ensure the finish is weather-resistant and complements the surrounding landscape. Pay particular attention to the joints between stones or bricks, ensuring they are properly mortared and sealed.
Install the grill grate and any other desired features, such as side burners or storage compartments. Test the fireplace and grill thoroughly before using it for cooking or entertaining. Start with small fires to gradually cure the masonry and ensure proper ventilation. Monitor the chimney for any signs of smoke leakage or draft issues. Addressing any problems early on is crucial for ensuring the safety and functionality of the outdoor fireplace and grill.
Landscaping around the fireplace and grill can enhance its aesthetic appeal and create a more inviting outdoor space. Consider adding seating areas, planters, and outdoor lighting to create a relaxing and functional environment. Choose plants that are fire-resistant and low-maintenance to minimize upkeep. Ensure that any landscaping elements comply with local fire safety regulations.
Finally, regularly inspect and maintain the outdoor fireplace and grill to ensure its longevity and safety. Clean the chimney regularly to remove creosote buildup, which can be a fire hazard. Inspect the masonry for cracks or damage and repair them promptly. Keep the grill grate clean to prevent flare-ups and ensure even cooking. With proper care and maintenance, an outdoor fireplace and grill can provide years of enjoyment and enhance the value of any home.

Diy Building Outdoor Fireplace With Smoker And Grill Bbq

How To Build An Outdoor Fireplace Step By Guide Buildwithroman

How To Build An Outdoor Stacked Stone Fireplace

30 Ideas For Outdoor Fireplace And Grill Backyard

37 Diy Outdoor Fireplace And Fire Pit Ideas Godiygo Com Oven Backyard

Easy Diy Fire Pit Kit With Grill Redhead Can Decorate

How To Build An Outdoor Fireplace Step By Guide Buildwithroman

Diy Building An Outdoor Fireplace

How To Plan For Building An Outdoor Fireplace

How To Build An Outdoor Brick Fireplace Construction Repair Wonderhowto