How To Install a Gas Line for Fireplace Logs
Installing a gas line for fireplace logs is a project that requires careful planning, adherence to safety regulations, and a thorough understanding of plumbing principles. It is strongly recommended to hire a qualified and licensed professional for this type of work. Improper installation can lead to dangerous gas leaks, fire hazards, and potential health risks. This article provides a general overview of the process involved, but it should not be considered a substitute for professional advice and service.
Before beginning any work, it is crucial to obtain all necessary permits and inspections required by local building codes. These regulations vary by location, and failure to comply can result in fines and legal consequences. Contacting the local building department or a qualified contractor will provide the information needed to navigate the permitting process.
The first step involves planning the location of the gas line and the type of gas logs to be installed. Consider the size and configuration of the fireplace, as well as the aesthetics of the room. Determine the BTU (British Thermal Units) requirements of the gas logs to ensure the gas line is adequately sized to provide sufficient gas flow. Overestimating the BTU requirement is safer than underestimating.
The materials needed for the installation will vary depending on the specific configuration of the gas line, but generally include black iron pipe, pipe fittings (elbows, tees, couplings), pipe sealant, a shut-off valve, a gas connector kit, a pipe wrench, a leak detector (soap solution), and appropriate safety gear. It is essential to use materials that are specifically designed and approved for gas lines. Avoid using materials that are not rated for gas, as this can lead to deterioration and leaks over time.
Key Point 1: Preparing the Gas Supply and Shut-Off Valve
The gas supply must be shut off at the main gas meter before any work begins. This is a critical safety precaution to prevent gas leaks and potential explosions. Locate the main gas shut-off valve, typically near the gas meter, and turn it off using a wrench. Confirm that the gas is shut off by checking other gas appliances in the house, such as the stove or water heater. If these appliances do not operate, the gas supply is successfully shut off. It is recommended to have a second person confirm this as well.
Next, a tee fitting needs to be installed into the existing gas line where the new line will branch off. Clean and prepare the threaded end of the existing pipe, then apply pipe sealant to the threads. Carefully thread the tee fitting onto the pipe, tightening it securely with a pipe wrench. Ensure the tee is oriented in the direction of the new gas line. Any excess sealant that is visible should be wiped clean.
A shut-off valve must be installed in the new gas line near the fireplace. This valve allows the gas supply to the fireplace to be turned off independently for maintenance or repairs. The shut-off valve should be located in an easily accessible location. Apply pipe sealant to the threads of the shut-off valve and the pipe leading to the fireplace, and then connect them together securely. The valve should be installed in the "off" position during the installation process.
The pipe must be supported properly with pipe straps or hangers every few feet to prevent sagging and stress on the joints. This is particularly important for longer runs of pipe. The supports should be securely fastened to the wall or floor using appropriate fasteners. Avoid using nails or screws that are too short, as they may not provide adequate support. The pipes should also be installed away from areas where they may be bumped or damaged.
It is also important to consider the location of other utilities when planning and installing the gas line. Avoid running the gas line near electrical wiring, water pipes, or other potential hazards. If the gas line must cross paths with another utility, ensure there is adequate separation and protection to prevent damage or interference.
Key Point 2: Running the Gas Line to the Fireplace
Once the shut-off valve is installed, measure and cut the black iron pipe to the desired length to reach the fireplace. Use a pipe cutter to ensure a clean, square cut. Deburr the inside of the pipe to remove any sharp edges that could obstruct gas flow. Clean the outside of the pipe and the inside end of the pipe connection to ensure a tight and safe gas connection.
Apply pipe sealant to the threads of the pipe and the fittings that will connect it to the shut-off valve and the gas log connection at the fireplace. Thread the pipe into the fittings, tightening them securely with a pipe wrench. Ensure the pipe joints are tight and properly sealed to prevent gas leaks. Over-tightening can damage the threads, so use a steady, controlled force when tightening the fittings.
Running the gas line through walls or floors requires careful planning and execution. Drill holes that are large enough to accommodate the pipe, but not so large that they weaken the structure. Seal the gaps around the pipe with fire-resistant caulk to prevent the spread of fire. Follow all local building codes regarding the penetration of walls and floors with gas lines.
Underground gas lines require additional protection. The pipe should be buried below the frost line to prevent damage from freezing and thawing. The pipe should also be coated with a protective coating to prevent corrosion. Mark the location of the underground gas line with warning tape to prevent accidental damage during future excavation. Any underground lines must have been inspected and rated for underground use.
Key Point 3: Connecting the Gas Logs and Leak Testing
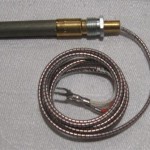
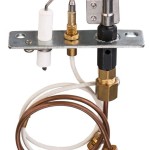
A gas connector kit is used to connect the gas line to the gas logs. This kit typically includes a flexible gas line and fittings that are designed to connect to the specific type of gas logs being installed. Follow the manufacturer's instructions for connecting the gas connector kit to the gas logs and the gas line. Ensure the connections are tight and secure.
Before turning on the gas, perform a leak test to ensure there are no gas leaks in the newly installed gas line. Mix a solution of soap and water in a spray bottle. Spray the soapy solution on all the pipe joints, fittings, and connections. Turn the gas on slowly at the main gas meter.
Observe the soapy solution for bubbles. If bubbles appear, this indicates a gas leak. Turn off the gas immediately and tighten the leaking connection. Repeat the leak test until no bubbles appear. If the leak persists, disassemble the connection, reapply pipe sealant, and reassemble the connection. If you are unable to stop the leak after multiple attempts, contact a qualified gas fitter for assistance.
Once the leak test is complete and no leaks are detected, the gas fireplace logs can be tested. Follow the manufacturer's instructions for lighting and operating the gas logs. Observe the flame pattern to ensure the gas logs are burning properly. If the flame is too high, too low, or uneven, adjust the gas pressure or the gas log settings according to the manufacturer's instructions.
After the gas logs have been burning for a few minutes, check for any unusual odors or signs of gas leaks. If you smell gas, turn off the gas immediately and contact a qualified gas fitter. Do not attempt to repair a gas leak yourself.
Finally, ensure the fireplace area is properly ventilated. Open a window or door to allow fresh air to circulate. Carbon monoxide detectors should be installed near the fireplace to provide an early warning of carbon monoxide buildup. Test the carbon monoxide detectors regularly to ensure they are working properly.
Properly disposing of waste materials incurred from this project is important. Excess pipe, leftover sealant and other materials should be disposed of according to local and federal regulations. Do not bury the waste or burn the waste.
Regular maintenance of the gas line and fireplace is essential for safe and efficient operation. The gas line should be inspected annually for leaks and corrosion. The gas logs should be cleaned regularly to remove dust and debris. A qualified gas fitter should perform these inspections and maintenance tasks. It is also important to educate all household members on how to operate the gas fireplace safely and what to do in case of a gas leak.

How To Install A Log Lighter Fireplace Gas Starter Pipe

How To Put In A Gas Log Set For Fireplace
.png?strip=all "How To Install A Log Lighter Fireplace Gas Starter Pipe")
How To Install A Log Lighter Fireplace Gas Starter Pipe
.png?strip=all "How To Install A Log Lighter Fireplace Gas Starter Pipe")
How To Install A Log Lighter Fireplace Gas Starter Pipe

How To Install Gas Logs Woodlanddirect Com

How To Select And Install A Gas Fireplace Log Set Fireplaces Direct Learning Center

Lp Gas Line Clearance Plumbing Inspections Internachi Forum

We Install Gas Logs Amarillo Tx West Chimney

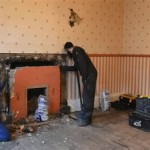
Fireplace Install Gasline Http Www Calgarygasinspections Com Joshthegasfitter Gmail

Flexible Appliance Connector In Fireplace Plumbing Inspections Internachi Forum
Related Posts