DIY Stone Veneer Over Brick Fireplace Transformation
Transforming a brick fireplace into a stone veneer fireplace is a popular home improvement project that can significantly enhance the aesthetic appeal of a living space. This undertaking, while requiring some effort and patience, can be accomplished by determined homeowners without extensive professional assistance. This article provides a detailed guide on how to execute a DIY stone veneer over brick fireplace renovation successfully.
Before embarking on this project, a clear understanding of the necessary tools, materials, and techniques is crucial. Improper preparation or execution can lead to unsatisfactory results, including aesthetic flaws, structural instability, or even safety hazards. Careful planning, meticulous execution, and adherence to safety guidelines are paramount to achieving a visually appealing and structurally sound stone veneer fireplace.
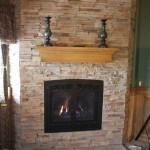
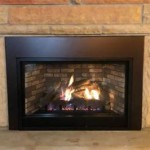
The principal appeal of using stone veneer lies in its lightweight nature compared to natural stone. This lightweight property allows it to be applied over existing brick surfaces without requiring extensive structural reinforcement. Additionally, stone veneer offers a wider range of aesthetic options, with various colors, textures, and shapes available to complement different interior design styles. Furthermore, the cost of stone veneer is generally lower than that of natural stone, making it a more accessible option for many homeowners.
Assessing the Existing Brick Fireplace
The first step in this DIY project involves a thorough inspection of the existing brick fireplace. The condition of the brick surface is critical to the success of the renovation. Any loose, cracked, or damaged bricks need to be repaired or replaced before applying the stone veneer. If the brick surface is excessively deteriorated, the underlying structure may need to be addressed, potentially requiring professional consultation.
The presence of soot, grease, or other contaminants on the brick surface can impede the adhesion of the mortar used to secure the stone veneer. Therefore, a comprehensive cleaning of the brick is essential. A wire brush and a strong cleaning solution, such as trisodium phosphate (TSP), can effectively remove these contaminants. After cleaning, the brick surface should be thoroughly rinsed with clean water and allowed to dry completely before proceeding to the next step.
Leveling and preparation of the brick surface are also fundamental. Uneven brick surfaces can result in an uneven stone veneer installation. A leveling compound can be used to create a smooth and uniform substrate for the stone veneer. This step is particularly important if the brick surface has significant irregularities or indentations. The leveling compound should be applied according to the manufacturer's instructions and allowed to cure fully before continuing.
Gathering Necessary Tools and Materials
A successful DIY stone veneer installation requires a specific set of tools and materials. Having these readily available before starting the project will ensure a smoother and more efficient workflow. The selection of stone veneer itself is a crucial decision, as it directly impacts the final aesthetic of the fireplace. Consider the size, shape, color, and texture of the stone veneer to ensure it aligns with the desired design. Be sure to order slightly more stone veneer than you estimate needing to account for cuts and potential breakage.
Essential tools for the project include a mortar mixer, a masonry saw with a diamond blade, a notched trowel, a grout bag, a sponge, a level, a measuring tape, a hammer, a chisel, safety glasses, and work gloves. The mortar mixer is used to create a consistent and workable mortar mixture. The masonry saw is necessary for cutting the stone veneer to fit specific areas around the fireplace. The notched trowel is used to apply the mortar to the back of the stone veneer. The grout bag is used to apply grout between the stones after the veneer is installed. The sponge is used to clean excess mortar and grout during and after the installation. The level ensures that the stone veneer is installed straight and plumb. Safety glasses and work gloves are essential for protecting the eyes and hands during the project.
Necessary materials include the stone veneer itself, mortar, grout, cement board (if needed for additional support), metal lath (for increased mortar adhesion), fasteners (screws or nails), and a sealant. The mortar should be specifically formulated for stone veneer installation. The grout should complement the color of the stone veneer and the overall design aesthetic. Cement board can be applied to the brick surface to provide additional support and a smoother substrate for the stone veneer. Metal lath, when attached to the brick, provides a textured surface for the mortar to grip, enhancing adhesion. The sealant is used to protect the stone veneer and grout from moisture and weathering, particularly if the fireplace is exposed to the elements.
Step-by-Step Stone Veneer Installation
The installation process begins with preparing the mortar. Following the manufacturer's instructions, mix the mortar with water in the mortar mixer until it reaches a thick, paste-like consistency. Avoid adding too much water, as this can weaken the mortar and compromise its adhesive properties. The mortar should be workable enough to be applied easily but not so runny that it drips or sags.
Apply the mortar to the back of the stone veneer using the notched trowel. Ensure that the entire back surface of the stone is covered with a layer of mortar, typically about ½ inch thick. The notched trowel creates ridges in the mortar, which increase the surface area for adhesion to the brick wall. Press the stone veneer firmly onto the brick surface, applying even pressure to ensure a secure bond. Use a level to check that the stone is aligned properly. Repeat this process for each stone, working from the bottom up.
Maintaining consistent joint spacing between the stones is crucial for achieving a visually appealing and structurally sound installation. Use spacers, such as small pieces of wood or plastic, to maintain uniform gaps between the stones. These spacers can be removed after the mortar has partially set, typically after a few hours. The joint spacing also allows for expansion and contraction of the materials due to temperature changes or other environmental factors. The recommended joint spacing will vary depending on the type of stone veneer being used, so consult the manufacturer's instructions.
Cutting the stone veneer to fit specific areas is often necessary, particularly around the edges of the fireplace or around any architectural features. Use the masonry saw with a diamond blade to make accurate and clean cuts. Always wear safety glasses and work gloves when operating the saw. Measure the area carefully and mark the stone before cutting. Score the stone lightly before making a full cut to prevent chipping. The cut edges of the stone can be smoothed with a rubbing stone to remove any sharp edges.
Once all the stone veneer is installed and the mortar has cured for the recommended time (typically 24-48 hours), the grouting process can begin. Mix the grout according to the manufacturer's instructions. Fill the grout bag with the grout mixture and carefully apply the grout into the joints between the stones. Ensure that the joints are completely filled with grout, leaving no air pockets. After the grout has partially set, use a damp sponge to wipe away any excess grout from the surface of the stone veneer. Be careful not to remove too much grout from the joints. Allow the grout to cure completely before applying a sealant.
Finally, apply a sealant to the stone veneer and grout to protect it from moisture and weathering. Choose a sealant that is specifically designed for use on stone veneer and grout. Apply the sealant according to the manufacturer's instructions. This step is particularly important if the fireplace is located in an area that is exposed to the elements, such as an outdoor patio or a sunroom. The sealant will help to prevent staining, cracking, and other damage caused by moisture and UV exposure.
Throughout the entire project, consistent attention to detail is essential. This includes ensuring proper surface preparation, accurate measurements, careful cutting, precise installation, and thorough cleaning. By prioritizing these elements, homeowners can achieve a professional-looking stone veneer fireplace that enhances the beauty and value of their home.

Thin Stone Veneers Make A Fireplace Update Easy Swenson Granite 100 Natural Stones

Brick Fireplace Makeover Pine And Prospect Home

How To Cover A Brick Fireplace With Stone

Building A Stone Veneer Fireplace Over The Brick

Transform Your Home Stone Veneer Over Brick Fireplace Guide

Diy Painted Stone Fireplace Refresh Live Edge Mantle Lemon Thistle

How To Cover A Brick Fireplace With Wood Stone Nina Hendrick Home

Read This Before Your Stone Fireplace Makeover Understanding Undertones

Install Stone Veneers Over Old Brick Fireplace Diy

Diy Concrete Fireplace Makeover Before After Cherished Bliss