DIY Built-In Bookcase Around Fireplace: A Comprehensive Guide
Creating a focal point in a living room often involves incorporating a fireplace. Adding bookshelves around a fireplace not only enhances the aesthetic appeal but also provides practical storage and display space. This article presents a detailed guide to constructing a DIY built-in bookcase around a fireplace, covering planning, material selection, construction, and finishing.
Planning and Design
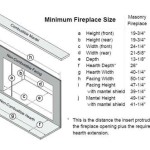
Before commencing the build, meticulous planning is crucial. The first step is to assess the existing space surrounding the fireplace. Measure the height, width, and depth available on either side of the fireplace. Consider the architectural style of the room and the fireplace itself to ensure the bookcase design complements the existing décor.
Sketching the bookcase design is an essential part of the planning phase. The design should incorporate both open shelving and potentially closed storage cabinets at the base. Consider the types of items that will be stored on the shelves. Books require standard shelf depths, while larger decorative items may necessitate deeper shelves. The overall height should be proportional to the fireplace and the ceiling height of the room.
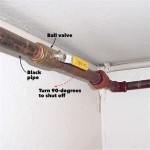
The placement of electrical outlets and light switches needs to be carefully considered. Avoid obstructing access to these utilities. If necessary, relocate them before starting the construction process. Additionally, determine if any wiring will need to be run through the bookcase for lighting or other electronic devices.
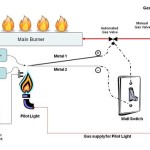
The chosen design should account for the fireplace’s heat output. Ensure that the bookcase materials are heat-resistant and that there is sufficient clearance between the fireplace and the bookcase to prevent damage from excessive heat. Heat shields or insulation may be necessary depending on the fireplace type and usage.
Finally, create a detailed materials list and a cut list based on the finalized design. This will streamline the purchasing process and minimize material waste. Double-check all measurements and calculations to ensure accuracy.
Material Selection and Tools
Selecting the appropriate materials is paramount for the durability and aesthetic appeal of the built-in bookcase. Common materials for bookcase construction include plywood, MDF (Medium Density Fiberboard), and solid wood. Each material offers different properties in terms of cost, strength, and workability.
Plywood is a versatile and cost-effective option. It provides good structural strength and is available in various thicknesses and grades. Consider using hardwood plywood for a more refined appearance. MDF is a smooth, stable material that is ideal for painting. It does not have a wood grain and is less prone to warping than solid wood. Solid wood offers a classic, high-end look but tends to be more expensive and requires more expertise in woodworking.
For the face frame of the bookcase, solid wood is often preferred. Options include poplar, maple, or oak, depending on the desired aesthetic and budget. The face frame adds structural integrity and provides a surface for attaching trim and molding.
Hardware selection is also important. Choose high-quality screws, nails, and shelf supports. Adjustable shelf supports allow for flexible shelf placement. Consider using soft-close hinges for cabinet doors to prevent slamming. Knobs or pulls should complement the overall design and provide a comfortable grip.
A comprehensive set of tools is essential for this project. A table saw is indispensable for making precise cuts of plywood and solid wood. A circular saw can be used for rough cuts. A miter saw is ideal for cutting angles for trim and molding. A drill/driver is needed for assembling the bookcase and attaching hardware. A sander, clamps, level, measuring tape, and safety glasses are also necessary components of the toolset.
Construction Process
The construction process begins with building the bookcase frames. These frames will form the sides and support the shelves. Cut the plywood or MDF according to the cut list. Use a table saw or circular saw to ensure accurate and straight cuts. Assemble the side panels using screws and wood glue. Clamps will help to hold the pieces in place while the glue dries.
Next, construct the base cabinets, if the design includes them. The base cabinets will sit on the floor and provide a solid foundation for the bookcase. Assemble the cabinet boxes using screws and wood glue. Ensure that the cabinets are level and square before proceeding.
Install the face frame to the bookcase frames and base cabinets. The face frame will conceal the edges of the plywood or MDF and provide a finished look. Attach the face frame using wood glue and brad nails. Ensure that the face frame is flush with the surface of the bookcase frames and base cabinets.
Cut the shelves according to the cut list. Install shelf supports on the inside of the bookcase frames at the desired shelf locations. Adjustable shelf supports offer greater flexibility. Place the shelves on the supports and ensure that they are level.
If the design includes cabinet doors, install them using hinges. Ensure that the doors are aligned properly and that they open and close smoothly. Attach knobs or pulls to the cabinet doors. Install any additional trim or molding to enhance the aesthetic appeal of the bookcase. This could include crown molding at the top, base molding at the bottom, and decorative trim around the fireplace.
Once the bookcase is assembled, attach it to the wall using screws or nails. This will prevent the bookcase from tipping over. Ensure that the bookcase is securely attached to the wall studs for maximum stability. Use shims to level the bookcase if necessary.
Finishing and Installation
The finishing process is crucial for achieving a professional-looking result. Begin by sanding all surfaces of the bookcase to create a smooth, even surface. Use progressively finer grits of sandpaper, starting with 120-grit and finishing with 220-grit. Remove all dust and debris before proceeding.
Apply a primer to the bookcase. Primer will help to seal the wood and provide a smooth surface for the paint or stain. Choose a primer that is compatible with the chosen paint or stain. Apply the primer evenly using a brush or roller. Allow the primer to dry completely before proceeding.
Paint or stain the bookcase according to the desired color scheme. Apply multiple coats of paint or stain, allowing each coat to dry completely before applying the next. Use a high-quality paint or stain for a durable and long-lasting finish. Consider using a clear coat to protect the finish from scratches and wear.
Install the bookcase around the fireplace. Ensure that there is sufficient clearance between the fireplace and the bookcase to prevent damage from heat. Install heat shields or insulation if necessary. Secure the bookcase to the wall studs using screws or nails. Use shims to level the bookcase if necessary.
Finally, install any electrical wiring or lighting that was planned for the bookcase. Ensure that all wiring is installed according to local electrical codes. Test the lighting and electrical outlets to ensure that they are functioning properly. Arrange books and decorative items on the shelves to complete the project.

Diy Fireplace Surround And Built Ins Our Blessed Life

How To Design And Build Gorgeous Diy Fireplace Built Ins The Sweetest Digs

How To Build Easy Custom Built In Shelving Basic

White Built In Bookshelves Around The Fireplace Green With Decor

Diy Fireplace Surround And Built Ins Our Blessed Life

Diy Fireplace Surround And Built Ins Our Blessed Life

S Built In Bookshelves Fireplace Around Ins

Diy Fireplace Built Ins With Billy Bookcase

Diy Built In Cabinets Around The Fireplace Part 2 Honeybear Lane

How To Design And Build Gorgeous Diy Fireplace Built Ins The Sweetest Digs