How To Build A Raised Brick Fireplace Hearth
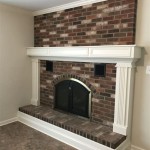
A raised brick fireplace hearth serves as a focal point in a living space, providing both aesthetic appeal and functional benefits. Not only does it elevate the fireplace opening for better visibility and heat radiation, but it also creates a distinct separation between the fireplace and the surrounding floor. Constructing a raised brick hearth is a manageable undertaking for individuals with intermediate DIY skills, and this article provides a detailed guide on the process.
Before commencing any construction, it is crucial to adhere to local building codes and regulations. These codes often specify minimum clearances from combustible materials, hearth size requirements, and necessary permits. Contacting the local building department ensures compliance and avoids potential issues later on.
Planning and Preparation
The initial stage involves meticulous planning and preparation. This includes defining the desired dimensions of the hearth, selecting the appropriate brick and mortar, and gathering the necessary tools and materials. Consider the overall style of the room and the fireplace itself when determining the hearth's size and shape. A larger hearth provides a more substantial presence, while a smaller hearth might be more suitable for a smaller room. The height of the raised hearth is also a factor; typically, it ranges from one to three brick courses high but can vary based on design preference. Secure accurate measurements to ensure the hearth is proportionate to the fireplace and the available space.
Brick selection is crucial for both aesthetics and durability. Firebricks are specifically designed to withstand high temperatures and are recommended for the inner layers of the hearth that will be exposed to direct heat. Common bricks or pavers can be used for the outer layers and the visible surfaces. The choice of brick color and texture should complement the existing fireplace and room décor. Mortar selection is equally important. Type N mortar is a suitable general-purpose mortar for fireplace construction, offering a good balance of strength and flexibility. Having a clear design specifying dimensions with a detail materials list ahead of time streamlines the building process.
Next, gather all necessary tools and materials. The list typically includes: bricks, mortar, a mortar mixing pan, a margin trowel, a brick trowel, a level, a measuring tape, a brick hammer or masonry saw (for cutting bricks), safety glasses, work gloves, a chisel, a wire brush, and a sponge. Having all these items readily available will minimize interruptions during construction.
Constructing the Foundation
The foundation is the crucial base that supports the entire hearth structure. If the existing floor is concrete, it usually provides a stable base. However, if the floor is wood or another combustible material, it needs to be adequately protected with a layer of non-combustible material, such as cement board or a concrete slab. The thickness of this protective layer should comply with local building codes.
Begin by marking the outline of the hearth on the floor as per the pre-determined dimensions. If a non-combustible base is required, cut the cement board or prepare a concrete slab to the marked size. Apply a layer of thin-set mortar to the floor and carefully position the non-combustible base on top, ensuring it is level. Allow the thin-set mortar to cure completely before proceeding to the next step.
Once the foundation is prepared, start laying the first course of bricks. Mix the mortar according to the manufacturer's instructions, ensuring a consistent, workable consistency. Apply a generous layer of mortar to the foundation, slightly wider than the width of the brick. Place the first brick onto the mortar bed, pressing down firmly and ensuring it is level. Continue laying the remaining bricks for the first course, maintaining a consistent mortar joint width (typically around 3/8 inch). Use a level frequently to ensure the bricks are aligned both horizontally and vertically. Remove any excess mortar with a trowel and smooth the joints.
Laying the Brick Courses
After completing the first course, proceed to lay the subsequent courses. Apply a layer of mortar to the top of the first course, ensuring it covers the entire surface. Stagger the joints in each course to create a stronger and more visually appealing structure. This is typically achieved by offsetting each brick by half its length in relation to the bricks in the course below.
Continue laying the bricks, meticulously checking for level and alignment with each course. Use a level both horizontally and vertically to ensure the hearth remains square and even. As you build, use a brick hammer or masonry saw to cut bricks as needed to fit corners or create specific design elements. Wear safety glasses when cutting bricks to protect your eyes from flying debris.
Pay particular attention to the corners of the hearth. Ensure they are square and plumb. Using a corner block or a set square can help maintain accuracy. Regularly check the overall dimensions of the hearth to ensure it is conforming to the planned size. Any deviations should be corrected immediately to prevent compounding errors.
Finishing and Detailing
Once all the brick courses are laid, the finishing and detailing stage begins. This involves cleaning the mortar joints, applying a sealant (if desired), and adding any decorative elements. Begin by raking out the mortar joints with a joint raker or a small trowel. This creates a recessed joint that provides a clean and uniform appearance. It also enhances the contrast between the bricks and the mortar.
Next, use a damp sponge to clean any excess mortar from the brick surfaces. Rinse the sponge frequently to avoid smearing the mortar. A wire brush can be used to remove stubborn mortar residue, but be careful not to scratch the bricks. Allow the mortar to cure completely before applying any sealant. The curing time typically ranges from 24 to 72 hours, depending on the mortar type and environmental conditions.
Applying a sealant to the brick surface can help protect it from stains and moisture. Choose a sealant specifically designed for brick and follow the manufacturer's instructions for application. Decorative elements, such as brick borders or inlays, can be added to the hearth to enhance its visual appeal. These elements can be incorporated during the laying process or added after the mortar has cured, depending on the design.
After cleaning and sealing, conduct a thorough inspection of the hearth to ensure all the bricks are securely in place and the mortar joints are properly finished. Allow the hearth to fully cure before using the fireplace. This curing process typically takes several days, during which the mortar gains strength and hardness. Adhering to these steps ensures a structurally sound and aesthetically pleasing raised brick fireplace hearth, enhancing the ambiance and functionality of the living space.

Diy Fireplace Makeover At Home With The Barkers

Updating Fireplace Hearth No Demolition Required Single Girl S Diy

Mantle Surround For Brick Fireplace With Raised Hearth Wall

How To Build A Fireplace Red Cottage Chronicles

How To Build A Concrete Fireplace Hearth

How To Build A Brick Hearth Ehow

Ways To Update A Brick Fireplace With Raised Hearth Built In 1979 Hometalk

How To Tile Over A Brick Hearth Shine Your Light

How To Build A Raised Hearth Fireplace Home Fireplaces Firepits Stone Stacked

Brick Fireplace Project Advice Ceramic Tile Forums John Bridge
Related Posts