How to Update a Fireplace Hearth
A fireplace hearth is a key element in a room’s design and function. A tired or outdated hearth can detract from the overall aesthetic and the enjoyment of your fireplace. Updating your fireplace hearth is a relatively simple and cost-effective way to transform the look of your space. This guide provides a step-by-step process for updating your fireplace hearth, covering considerations for material choices, installation methods, and decorative enhancements.
Choose Your Material
The first step in updating your fireplace hearth is selecting the right material. There are numerous options available, each with unique properties and aesthetics. Consider the following popular choices:
- Stone: Natural stone, like granite, limestone, and marble, offers durability, elegance, and a timeless appeal. They are available in various textures and colors to suit different design styles.
- Brick: Brick is a classic and versatile material, providing a rustic or industrial feel. It is generally less expensive than stone and can be easily customized with various colors and patterns.
- Tile: Ceramic, porcelain, or natural stone tile offers a wide range of styles and patterns, allowing for personalization. Tile is relatively easy to install and maintain, making it a popular option for updating hearths.
- Concrete: Concrete is a budget-friendly material that can be customized with various finishes, including staining, painting, or texturing. It offers a modern and industrial aesthetic.
- Wood: Wood can add warmth and character to a fireplace hearth. However, it is important to choose fire-resistant wood species and ensure proper sealing and finishing for safety.
When selecting your material, consider the existing style of your fireplace, the overall design of the room, and your budget. It is also essential to research the material's maintenance requirements and fire safety guidelines.
Prepare the Surface
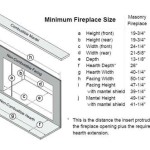
Once you have chosen your material, prepare the existing hearth surface for installation. This step is crucial for ensuring a smooth and secure installation of the new hearth.
- Remove the old hearth: If you are replacing an existing hearth, carefully remove it. This may involve using a chisel, hammer, or a combination of tools, depending on the material and installation method. Ensure you wear appropriate safety gear, including eye protection and gloves.
- Clean the surface: After removing the old hearth, thoroughly clean the surface with a wire brush, scraper, or cleaning solution to remove debris and dust.
- Level the surface: Use a level and a trowel to ensure the surface is level. This is crucial for achieving a smooth and visually appealing installation.
- Apply a bonding agent: Depending on the chosen material, you may need to apply a bonding agent to the surface to create a strong adhesion between the new material and the existing structure.
Thorough preparation is essential for a successful and long-lasting hearth update. It is advisable to consult with a professional if you are unsure about any step of the preparation process.
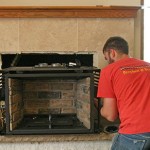
Install the New Hearth
The installation process will vary depending on the chosen material. Here is a general overview of the steps for installing a new hearth:
- Lay out the material: Before beginning the installation, lay out the chosen material to ensure it fits correctly and create the desired pattern. For tile or brick, it is advisable to use spacers to ensure uniform spacing between the pieces.
- Apply adhesive: Apply a layer of adhesive to the prepared surface, spreading it evenly with a notched trowel. The type of adhesive will depend on the material you are using.
- Install the material: Carefully place the material onto the adhesive, ensuring it is properly aligned and level. Press firmly to ensure good adhesion.
- Grout (if applicable): For tiled or brick hearths, apply grout between the individual pieces to fill in the gaps and create a clean, finished look.
- Seal (if applicable): Depending on the chosen material, apply a sealer to protect the hearth from stains, moisture, and heat damage.
During the installation process, prioritize safety and follow the manufacturer’s instructions for your chosen material. Consider consulting with a professional installer for complex installations or if you lack experience.

Updating Fireplace Hearth No Demolition Required Single Girl S Diy

How To Update The Look Of Your Fireplace

How To Update A Fireplace Hearth And Mantel Pasha Is Home

Fireplace Update Ideas Stoll Industries Made In The Usa

5 Amazing Inexpensive Easy Fireplace Remodel Transformations Designed

Fireplace Makeover Update Hearth Frame And Blue Gray Boards The Lettered Cottage

How To Update A Brick Fireplace Homemade Ginger

Modern Fireplace Makeover Remodel Brick

Fireplace Update Before Afters Luce S Chimney Stove

How To Update The Look Of Your Fireplace
Related Posts