Installing a Stone Fireplace Surround: A Step-by-Step Guide
A stone fireplace surround can dramatically enhance the aesthetic appeal of your living room, adding a touch of rustic elegance and warmth. However, installing a stone surround requires careful planning and execution. This article provides a comprehensive guide on installing a stone fireplace surround, covering essential steps and considerations, ensuring a successful and beautiful outcome.
Planning and Preparation
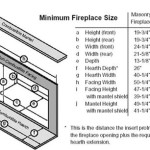
Before embarking on the installation, meticulous planning and preparation are crucial. Start by measuring the existing fireplace opening and determining the desired dimensions of the surround. Consider the style and size of the stones, ensuring they complement your overall décor.
Next, gather the necessary tools and materials. These include mortar mix, a trowel, a level, a tape measure, a hammer, a chisel, safety glasses, and work gloves. Ensure you have adequate ventilation to prevent dust accumulation during installation.
Prepare the fireplace area for installation by removing any existing surround or decorative elements. Clean the surface thoroughly, removing any dirt, debris, or loose materials. If you are installing the surround on drywall, consider using a moisture-resistant material like cement board for added protection.
Installing the Stone Surround
Once the preparation is complete, you can begin installing the stone surround. Start by laying out the stones on the floor, dry fitting them to create the desired pattern and ensuring a snug fit around the fireplace opening. Mark the location of each stone for accurate placement during installation.
Apply a layer of mortar to the back of each stone, ensuring a smooth and even application. Carefully position the stone onto the fireplace opening, using a level to ensure it is plumb and level. Tap the stone gently with a rubber mallet to secure it in place.
Continue installing the stones in rows, working your way from the bottom up, ensuring each stone is properly aligned and tightly bonded to the mortar. Allow sufficient time for the mortar to cure before proceeding to the next row.
Finishing Touches
After the stone surround is installed, allow the mortar to cure completely. This typically takes 24-48 hours, depending on the ambient temperature and humidity. Once the mortar has cured, you can apply grout to fill any gaps between the stones.
Use a grout float to apply the grout, ensuring it fills all the gaps and adheres to the stone surfaces. Allow the grout to dry, and then clean the surrounding area with a damp sponge to remove excess grout.
Once the grout has dried, seal the stone surround with a sealant designed for stone surfaces. This will protect the stone from moisture and stains, ensuring its longevity and beauty.
Important Considerations
When installing a stone fireplace surround, there are several important considerations to keep in mind. Firstly, ensure the stone you choose is suitable for use around a fireplace, as some materials may not withstand high temperatures.
Secondly, consider the weight of the stone surround and ensure the fireplace structure can support the added load. If necessary, consult with a structural engineer to assess the structural integrity of the fireplace.
Finally, remember to wear appropriate safety gear, such as gloves and safety glasses, during the installation process.
Installing a stone fireplace surround requires patience and attention to detail. By following these steps and taking necessary precautions, you can create a stunning focal point in your living room that will enhance your home's beauty and warmth for years to come.

Diy Faux Cast Stone Fireplace Part 1 Demo And Tiling The Hearth Top Shelf

How To Build And Hang A Mantel On Stone Fireplace Shanty 2 Chic

Diy Fireplace Mantel Surround Faux Cast Stone European Style Tidbits

How To Install A Stone Veneer Fireplace Shoe Makes New

Important Information On Fitting Stone Fireplaces From The Federation Of Great Britain Hot Co

Fireplace Mantel Installation Before And After

Custom Built Fireplace Surround Install A New Mantel Hearth

Diy Overgrouted Stone Fireplace Shoe Makes New

Thin Stone Veneers Make A Fireplace Update Easy Swenson Granite 100 Natural Stones

Hirondelle Rustique Diy Stacked Stone Fireplace First Remodeling Project Part 2 Fireplaces Brick Makeover Remodel
Related Posts