Covering A Fireplace With Wood: A Comprehensive Guide
A fireplace, once a central heating source, can sometimes become a visual anachronism in a modern home. Homeowners seeking to update their interiors often consider covering or repurposing these features. One popular method involves using wood to create a more contemporary or aesthetically pleasing focal point. This approach offers several advantages, including cost-effectiveness, design flexibility, and relative ease of implementation for experienced DIY enthusiasts or professional contractors. A carefully executed wood covering can transform a dated fireplace into a stylish architectural detail.
The decision to cover a fireplace with wood involves several considerations. First, assessing the functionality of the fireplace is crucial. If the fireplace is never used, the covering process is significantly simplified. However, if the homeowner intends to occasionally use the fireplace, the materials chosen must be fire-resistant and the design must incorporate necessary safety measures. Building codes related to fireplace modifications also vary regionally and must be adhered to. Furthermore, the aesthetic goals for the finished product require careful planning. The type of wood, stain or paint finish, and overall design style should complement the existing decor of the room.
Planning and Preparation
Before commencing any work, a thorough inspection of the existing fireplace and surrounding area is essential. This includes checking for structural integrity, water damage, and any existing hazards such as asbestos. If asbestos is suspected, professional testing and remediation are required. Measurements of the fireplace opening, mantel (if present), and surrounding wall space will dictate the amount of material needed and ensure a proper fit for the wooden covering. A detailed plan or sketch should be created, outlining the dimensions, design, and materials required. This plan serves as a roadmap for the project and minimizes the risk of errors during construction.
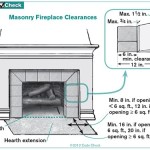
Material selection is a critical step. For a purely decorative fireplace covering, a wider range of wood types can be considered, including softwoods like pine or fir, or hardwoods such as oak or maple. If the fireplace will be used, fire-resistant materials must be incorporated. This can include using a non-combustible backing material like cement board, and ensuring that the wood covering is installed with appropriate clearances from the firebox opening. Specific clearances are dictated by local building codes and should be carefully researched. Treatments that enhance fire resistance can also be applied to the wood. The type of wood chosen will also influence the aesthetic appearance and cost of the project.
The tools required for this project typically include a measuring tape, level, pencil, saw (circular saw or miter saw), drill, screwdriver, sander, and potentially a nail gun. Safety equipment such as safety glasses, gloves, and a dust mask are also essential. Depending on the complexity of the design, additional tools like a router or jigsaw may be needed. Having all necessary tools on hand before starting the project will streamline the process and prevent delays.
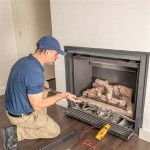
Installation Process
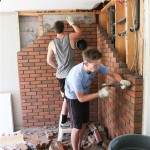
The installation process begins with preparing the existing fireplace surface. This typically involves cleaning the surface thoroughly to remove any dirt, dust, or loose debris. If the existing surface is uneven, it may need to be leveled with shims or a leveling compound. If the fireplace has a mantel, it may be necessary to remove it temporarily to facilitate the installation of the wood covering. Any exposed brick or stone may need to be covered with a layer of cement board or another non-combustible material to provide a stable and fire-resistant base for the wood.
Next, the wooden frame or structure is built. This frame serves as the foundation for the wood covering. The frame should be constructed from sturdy materials, such as 2x4 lumber, and securely attached to the wall around the fireplace opening. The dimensions of the frame should correspond to the measurements taken during the planning phase. The frame should also be level and plumb to ensure that the wood covering is installed straight and evenly. Proper anchoring of the frame to the wall is crucial for stability and safety.
Once the frame is in place, the wood covering can be installed. The wood panels or planks are cut to size and attached to the frame using nails, screws, or construction adhesive. The method of attachment will depend on the type of wood used and the desired aesthetic. Gaps between the wood panels should be minimized and filled with wood filler to create a seamless finish. For a more rustic look, intentional gaps or variations in the wood grain can be incorporated. Accurate cutting and precise alignment of the wood panels are essential for a professional-looking result.
Finishing and Detailing
After the wood covering is installed, the finishing process begins. This typically involves sanding the surface to smooth out any imperfections and prepare it for staining or painting. The choice of stain or paint will depend on the desired aesthetic and the type of wood used. Multiple coats of stain or paint may be necessary to achieve the desired color and depth. A clear coat of sealant can be applied to protect the wood and enhance its durability.
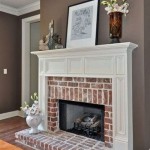
The final step involves adding any decorative details, such as trim, molding, or a new mantel. These details can enhance the visual appeal of the fireplace covering and integrate it more seamlessly with the surrounding decor. The trim and molding should be carefully selected to complement the style of the wood covering and the overall design of the room. The mantel can be custom-built from wood or purchased pre-made from a home improvement store. Secure attachment of these details is crucial for safety and longevity.
After the finishing touches are complete, a thorough inspection of the entire installation is necessary to ensure that all components are securely attached and that the finished product meets the desired aesthetic standards. Any minor imperfections or adjustments can be addressed at this stage. Finally, the surrounding area should be cleaned up, removing any debris or tools. The completed fireplace covering should be a visually appealing and functional addition to the home.

How I Created An Insulated Fireplace Cover With Pallet Wood Diy Doors

Wooden Fireplace Cover Diy And Mantel Bless This Nest

Fireplace Cover Screen Insert Split Wood

Wooden Fireplace Cover Diy And Mantel Bless This Nest

Diy Fireplace Makeover Wood Slat

Coastal Coverup How To Make A Driftwood Diy Fireplace Cover Table And Hearth

Fireplace Cover Screen Insert
:max_bytes(150000):strip_icc()/MadetobeaMommaBefore-5bb2476446e0fb002607ad4f.jpg?strip=all "Before And After Fireplace Makeovers")
Before And After Fireplace Makeovers

How To Cover A Brick Fireplace With Wood Stone Nina Hendrick Home Remodel Diy

Diy Birch Wood Fireplace Cover For A Faux Insert
Related Posts