Installing a Stacked Stone Fireplace Surround: A Comprehensive Guide
A fireplace serves as a focal point in many homes, radiating warmth and creating an inviting atmosphere. Enhancing its aesthetic appeal can be achieved through various means, with a stacked stone surround being a popular and impactful choice. Installing stacked stone requires careful planning, preparation, and execution to ensure a visually stunning and structurally sound result. This article provides a detailed, step-by-step guide to installing a stacked stone fireplace surround, covering essential aspects from material selection to finishing touches.
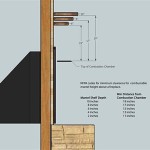
Before commencing any work, it's crucial to understand the existing fireplace structure and any applicable building codes or regulations. Consult local authorities or qualified professionals to ensure compliance. Inspect the existing fireplace surround for any signs of damage, such as cracks or loose mortar. Addressing these issues before installing the stacked stone is paramount for a successful installation.
Choosing the appropriate type of stacked stone is a significant decision. Natural stone offers a unique, organic appearance, while manufactured stone provides a more consistent look and often comes at a lower cost. Both options are available in various colors, sizes, and textures, allowing homeowners to customize their fireplace according to their preferences and the overall design of the room. Consider the weight of the stone, as heavier stones may require additional structural support. Review product specifications and manufacturer recommendations before making a selection.
Key Point 1: Preparation and Planning
Thorough preparation is essential for a successful stacked stone installation. This phase involves gathering the necessary tools and materials, preparing the existing fireplace surround, and planning the layout of the stone.
The required tools typically include a level, measuring tape, pencil, notched trowel, wet saw (for cutting stone), safety glasses, work gloves, a margin trowel, buckets, sponges, and a rubber mallet. Mortar, thin-set adhesive, and sealant are the primary materials. In addition, consider purchasing a stone adhesive specifically designed for vertical applications to provide extra holding power during installation.
Preparing the existing fireplace surround involves cleaning the surface thoroughly to remove any dust, debris, or loose paint. A wire brush or scraper can be used to remove stubborn residues. If the existing surface is smooth, such as painted drywall or glossy tile, roughening it with sandpaper or a grinder may be necessary to improve adhesion. Applying a bonding agent can further enhance the bond between the existing surface and the thin-set adhesive.
Planning the layout of the stone is crucial for achieving a visually appealing and balanced result. Dry-laying the stones on the floor or a flat surface allows for experimentation with different patterns and arrangements. This process also helps to determine the quantity of stone needed and identify any areas that require cutting or modification. Consider the overall symmetry of the fireplace and the desired aesthetic when planning the layout.
Mark the boundaries of the intended stacked stone surround on the wall using a level and pencil. These lines will serve as a guide during the installation process. Ensuring these lines are straight and level is crucial for achieving a professional-looking finish.
Key Point 2: Installation Process
The installation process involves applying the thin-set adhesive, adhering the stones to the fireplace surround, and ensuring proper alignment and spacing.
Begin by mixing the thin-set adhesive according to the manufacturer's instructions. Consistency is key; the adhesive should be thick enough to hold the stone in place but also easily workable. Apply the thin-set adhesive to the back of each stone using a notched trowel, ensuring complete coverage. The notches create ridges in the adhesive, which helps to improve adhesion and prevent air pockets.
Press the stone firmly onto the prepared fireplace surround, starting from the bottom and working upwards. Use a level to ensure the stone is aligned properly. Apply even pressure to ensure a strong bond between the stone and the adhesive. Use spacers, if necessary, to maintain consistent spacing between the stones. The spacing will depend on the desired aesthetic and the type of stacked stone being used.
For stones that require cutting, use a wet saw to achieve clean and precise cuts. Wear safety glasses and gloves to protect yourself from debris and sharp edges. When cutting stones, consider the overall pattern and ensure the cut edges are positioned in a way that minimizes their visibility.
Continue the installation process, row by row, until the entire fireplace surround is covered. Periodically check the alignment and spacing of the stones to ensure a consistent and uniform appearance. Use a rubber mallet to gently tap the stones into place, if necessary. Do not over-tighten or force the stones, as this could damage them or compromise the bond.
After installing each row of stones, remove any excess thin-set adhesive with a damp sponge. This will prevent the adhesive from hardening on the surface of the stone and making it difficult to remove later. Pay particular attention to the joints between the stones, ensuring they are clean and free of debris.
Allow the thin-set adhesive to cure completely according to the manufacturer's instructions. This typically takes 24 to 48 hours. Avoid disturbing the stones during this time, as this could compromise the bond and affect the stability of the installation.
Key Point 3: Grouting and Finishing
Grouting is optional, depending on the desired aesthetic. If grouting is desired, select a grout color that complements the stone. Applying sealant is crucial for protecting the stone and preventing water damage.
If grouting, apply the grout to the joints between the stones using a grout float. Ensure the grout fills all the joints completely. Remove any excess grout with a damp sponge, being careful not to smear the grout on the surface of the stone. Allow the grout to cure completely according to the manufacturer's instructions.
Once the grout is cured, apply a sealant to the entire stacked stone surround. The sealant will protect the stone from moisture, stains, and other damage. Choose a sealant that is specifically designed for stone and follow the manufacturer's instructions carefully. Apply the sealant evenly, ensuring all surfaces are covered. Allow the sealant to dry completely before using the fireplace.
Inspect the finished stacked stone surround for any imperfections or areas that require touch-up. Address any issues promptly to ensure a long-lasting and visually appealing result. Clean the surface of the stone with a mild soap and water solution to remove any dust or debris. Avoid using harsh chemicals or abrasive cleaners, as these could damage the stone.
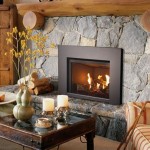
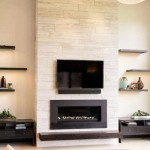
Consider adding decorative elements to enhance the overall aesthetic of the fireplace. Options include installing a mantel, placing decorative items on the mantel, or adding lighting to highlight the stacked stone surround. The specific decorative elements will depend on individual preferences and the overall design of the room.
Regular maintenance is essential for preserving the beauty and integrity of the stacked stone fireplace surround. Clean the stone regularly with a mild soap and water solution. Inspect the surround periodically for any signs of damage, such as cracks or loose stones. Address any issues promptly to prevent further damage. Reapply sealant as needed to maintain the protection of the stone.
Installing a stacked stone fireplace surround can transform the look and feel of a room, adding warmth, character, and visual interest. By following these steps and taking appropriate precautions, homeowners can achieve a professional-looking result that enhances the beauty and value of their homes.

B S Diy Stacked Stone Fireplace Surround Genstone

Stacked Stone Fireplace How To Diy

Diy Stone Wall Fireplace Entertainment Center By Scott Genstone

How To Install A Stacked Stone Fireplace Practical Whimsy Designs

Diy Fireplace Surround With Stacked Stone Panels Barron Designs

How To Install Stacked Stone Tile On A Fireplace Thrifty Decor Diy And Organizing

Diy How To Install Stone On Your Fireplace Easily

How To Diy A Stacked Stone Feature Over Existing Brick

12 Stacked Stone Fireplace Ideas For Optimal Coziness

How To Install A Stacked Stone Fireplace Practical Whimsy Designs
Related Posts