Brick Fireplace Makeover With Tile: A Comprehensive Guide
A brick fireplace can be a charming focal point in a home, evoking warmth and character. However, outdated brick, mismatched color schemes, or simply a desire for a fresh aesthetic can necessitate a makeover. Tiling over brick is a popular and effective method for transforming the look of a fireplace, offering a wide range of design possibilities and durability.
This article provides a comprehensive guide to undertaking a brick fireplace makeover with tile. The process encompasses careful planning, proper surface preparation, tile selection, precise installation, and meticulous finishing. Successfully navigating each stage ensures a visually appealing and long-lasting result.
Planning and Preparation: Laying the Foundation for Success
The initial phase of a brick fireplace makeover involves thorough planning and preparation. This step is crucial for ensuring a smooth installation process and a satisfying final outcome. Neglecting this stage can lead to complications and potentially compromise the integrity of the finished project.
The first consideration is the desired aesthetic. Researching different tile types, styles, and layouts is essential. Online platforms like Pinterest and Houzz offer a plethora of inspiration. Consider the overall style of the room and choose tile that complements the existing décor and color palette. Factors like the size and shape of the fireplace, the height of the mantel, and the surrounding walls should all influence tile selection. Options range from classic subway tile to modern geometric patterns, rustic natural stone, and sleek porcelain slabs.
Once a general aesthetic is determined, it's necessary to measure the fireplace accurately. Determine the total area that will be tiled, accounting for any recesses or protrusions. This measurement will be used to calculate the amount of tile needed, plus an additional 10-15% for cuts and breakage. It is also crucial to measure the depth of the firebox opening to ensure the new tile doesn’t extend beyond the existing firebox.
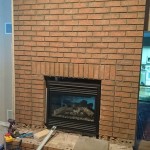
After measurements are taken, inspect the existing brick fireplace for any structural issues. Cracks, loose bricks, or crumbling mortar must be addressed before tiling. Consider hiring a professional mason for significant repairs. For minor cracks, masonry patching compound can be used to fill the voids. Ensure the repair compound is fully cured before proceeding.
Thorough cleaning of the brick surface is paramount. Use a stiff brush and a solution of trisodium phosphate (TSP) to remove dirt, soot, grease, and any other contaminants. Rinse the brick thoroughly with clean water and allow it to dry completely. This step is crucial for ensuring proper adhesion of the tile adhesive.
Depending on the type of brick and the chosen tile, it may be necessary to apply a bonding agent to the brick surface. A bonding agent, such as a latex-modified thin-set mortar, improves the adhesion between the brick and the tile. Follow the manufacturer's instructions for application and drying time. In some cases, especially with very smooth or non-porous brick, a mechanical bond might be preferable, involving scoring the brick surface with a chisel or grinder to create a rougher texture for better adhesion.
Tile Selection and Material Gathering: Choosing the Right Elements
Selecting the appropriate tile is a critical step in the brick fireplace makeover process. The choice of tile will significantly impact the overall look and feel of the finished fireplace. Beyond aesthetics, factors like durability, heat resistance, and ease of maintenance should also be considered.
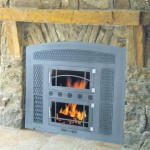
Tile materials commonly used for fireplace surrounds include ceramic, porcelain, natural stone (such as marble, granite, and slate), and glass. Ceramic tile is a popular and affordable option, available in a wide range of colors, styles, and sizes. Porcelain tile is denser and more durable than ceramic tile, making it a good choice for high-traffic areas or fireplaces that are frequently used. Natural stone offers a unique and luxurious look, but it can be more expensive and require more maintenance. Glass tile can add a touch of elegance and sophistication, but it may not be as durable as other options.
When selecting tile for a fireplace surround, it's crucial to ensure it is rated for use around fireplaces. Look for tiles with a high heat resistance rating. Some tiles may be susceptible to cracking or discoloration when exposed to high temperatures. Consult with a tile specialist or manufacturer to confirm the suitability of the chosen tile for fireplace applications.
Once the tile is selected, gather all the necessary materials and tools. This includes the chosen tile, thin-set mortar, grout, tile spacers, a notched trowel, a wet saw or tile cutter, a level, a rubber mallet, a grout float, sponges, and clean water. Also, acquire safety glasses and gloves to protect yourself during the installation process.
Choose a thin-set mortar specifically designed for tile installation over masonry surfaces. Latex-modified thin-set mortars offer improved adhesion and flexibility, which are essential for accommodating the movement that can occur in a brick fireplace. Select grout that complements the color of the tile and is suitable for the intended application. Epoxy grout is a durable and stain-resistant option, but it can be more difficult to work with than cement-based grout.
Before starting the installation, dry-fit the tile to ensure proper spacing and alignment. This allows for adjustments to be made before the tile is permanently adhered to the brick surface. It also provides an opportunity to visualize the final layout and make any necessary modifications to the design. Consider the placement of full tiles and cuts to minimize waste and maintain a consistent aesthetic.
Tile Installation and Finishing: Achieving a Professional Result
The tile installation process requires patience, precision, and attention to detail. Proper technique is essential for achieving a professional-looking and durable finish. Rushing this stage can lead to uneven surfaces, misaligned tiles, and ultimately, a less-than-satisfactory outcome.
Begin by mixing the thin-set mortar according to the manufacturer's instructions. Use a mixing drill with a paddle attachment to ensure a smooth and consistent consistency. Apply the thin-set mortar to the brick surface using the notched trowel, holding the trowel at a 45-degree angle. Create ridges in the mortar to provide a better bond with the tile. Work in small sections to prevent the mortar from drying out before the tiles are installed.
Press each tile firmly into the mortar, using a slight twisting motion to ensure good contact. Use tile spacers to maintain consistent grout lines between the tiles. Periodically check the alignment of the tiles with a level. Use a rubber mallet to gently tap the tiles into place, ensuring they are flush with the surrounding tiles. Remove any excess mortar from the tile surfaces with a damp sponge.
When cutting tiles to fit around obstacles or edges, use a wet saw or tile cutter. A wet saw provides clean and precise cuts, minimizing the risk of chipping or cracking the tile. Always wear safety glasses when operating a wet saw. After cutting, smooth the edges of the tiles with a rubbing stone or sandpaper to remove any sharp burrs.
Allow the thin-set mortar to cure completely according to the manufacturer's instructions. This typically takes 24-48 hours. Once the mortar is cured, remove the tile spacers and prepare to grout the tile. Mix the grout according to the manufacturer's instructions, creating a smooth and consistent paste.
Apply the grout to the tile surface using a grout float, working the grout into the grout lines. Hold the grout float at a 45-degree angle and apply even pressure to ensure the grout fills the gaps completely. Remove excess grout from the tile surfaces with the grout float.
After the grout has had a chance to set for approximately 15-30 minutes, use a damp sponge to clean the tile surfaces. Rinse the sponge frequently in clean water. Be careful not to remove too much grout from the grout lines. Repeat this process several times until the tile surfaces are clean and free of grout residue. Allow the grout to cure completely according to the manufacturer's instructions.
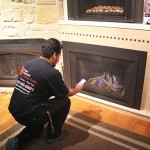
Once the grout is fully cured, apply a grout sealer to protect the grout from stains and moisture. Follow the manufacturer's instructions for application and drying time. Inspect the finished fireplace for any imperfections and make any necessary touch-ups. Finally, thoroughly clean the entire fireplace surround to remove any remaining debris.

How To Tile A Brick Fireplace Jenna Kate At Home

How To Tile A Fireplace Even If It S Brick The Handyman Daughter

How To Build A Fireplace Mantel Young House Love

Er Friendly Fireplace Makeover With L Stick Tiles The Homes I Have Made

Er Friendly Fireplace Makeover With L Stick Tiles The Homes I Have Made

Our Diy Faux Brick Fireplace Re Decor More

How To Tile Over A Brick Hearth Shine Your Light

A Step By Guide To Fireplace Refacing Diy Family Handyman

How To Tile Over Brick Fireplace Surround

Er Friendly Fireplace Makeover With L Stick Tiles The Homes I Have Made
Related Posts