How To Install A Vented Gas Fireplace Insert
Installing a vented gas fireplace insert can noticeably improve the heating efficiency and aesthetic appeal of an existing fireplace. This project, however, requires a thorough understanding of gas line connections, venting systems, and local building codes. Incorrect installation can lead to hazardous conditions, including gas leaks and carbon monoxide poisoning. For individuals unfamiliar with gas appliance installation, hiring a qualified professional is strongly advised. This article provides a detailed overview of the installation process for those with the necessary experience and expertise.
Before commencing the installation, several preliminary steps are crucial. These steps focus on ensuring compatibility, safety, and adherence to regulatory requirements. This process includes assessing the existing fireplace, selecting a suitable insert, and obtaining the necessary permits.
Preparing for Installation: Assessment and Planning
The first step involves thoroughly assessing the existing fireplace and chimney. The dimensions of the firebox must be accurately measured to ensure that the chosen gas fireplace insert will fit appropriately. Pay close attention to the width, height, and depth of the firebox opening, as well as the condition of the surrounding masonry. Any cracks or deterioration in the firebox or chimney structure should be addressed before proceeding with the installation. A professional inspection of the chimney is highly recommended to identify any potential issues, such as blockages or structural weaknesses that may affect the venting system's performance.
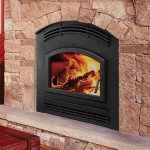
Next, select a vented gas fireplace insert that is compatible with the existing fireplace and meets heating requirements. Ensure the BTU (British Thermal Unit) output is appropriate for the space intended to be heated. Carefully review the manufacturer's specifications for the chosen insert, paying particular attention to the venting requirements, gas line connections, and clearances to combustible materials. Verify that the insert is certified by a recognized testing laboratory, such as CSA or UL, to ensure it meets safety standards. The BTU output should be chosen based on the square footage of the room and climate zone where it will be used.
Obtaining the necessary permits and approvals from local building authorities is a mandatory step. Contact the local building department to inquire about specific regulations and requirements for gas fireplace insert installations. This may include submitting detailed plans, providing product specifications, and scheduling inspections. Failure to obtain the required permits can result in fines, delays, and potential safety hazards. This process ensures compliance with all applicable codes and regulations, which are designed to protect property and occupants.
Gather all the necessary tools and materials before starting the installation. This typically includes: pipe wrench, adjustable wrench, gas pipe sealant approved for natural gas or propane, pipe cutter, level, drill with appropriate drill bits, screwdriver set, measuring tape, work gloves, safety glasses, carbon monoxide detector, and any specific tools recommended by the insert manufacturer. Double-check the insert's installation manual for any additional tools or materials required.
Step-by-Step Installation Process
The installation process typically involves several stages, starting with preparing the fireplace opening and continuing through venting, gas line connection, and final testing. Adhering to the manufacturer's instructions and local codes is paramount throughout the process.
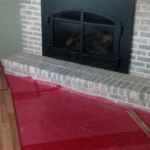
Begin by thoroughly cleaning the existing fireplace. Remove any debris, ash, or soot from the firebox and chimney flue. If the chimney has not been cleaned recently, consider hiring a professional chimney sweep to ensure it is free of obstructions and creosote buildup. A clean chimney will promote proper venting and reduce the risk of chimney fires. This also allows for a clear and obstruction-free space to work within.
Prepare the venting system. Most vented gas fireplace inserts require a specific type of venting, such as a flexible aluminum liner or a rigid stainless steel pipe. The venting system must be installed according to the manufacturer's instructions and local building codes. Ensure that the venting is properly sealed and connected to the chimney flue. Poorly installed venting can lead to dangerous exhaust gases entering the home. Proper venting is crucial for the safe and efficient operation of the gas fireplace insert.
Carefully position the gas fireplace insert into the prepared fireplace opening. Ensure that it is level and properly aligned. Follow the manufacturer's instructions for securing the insert to the fireplace structure. Some inserts may require specific mounting brackets or hardware. Take care to avoid damaging the insert or the surrounding masonry during installation. It's recommended to have assistance when moving the insert, as they can often be heavy.
Connect the gas line to the insert. This step requires utmost caution and should only be performed by individuals with experience in gas line connections. Ensure that the gas supply is shut off before making any connections. Use a pipe wrench and gas pipe sealant approved for natural gas or propane to connect the gas line to the insert's gas valve. Tighten the connections securely, but avoid over-tightening, which can damage the fittings. After making the connections, perform a leak test using a gas leak detector or a soap and water solution. If any leaks are detected, immediately shut off the gas supply and correct the problem before proceeding. If unsure, contact a qualified plumber or gas technician.
Install any remaining components, such as decorative fronts, trim pieces, or blowers, according to the manufacturer's instructions. Ensure that all components are securely attached and properly aligned. Double-check all connections and clearances to combustible materials. Proper installation of these components will enhance the appearance and functionality of the gas fireplace insert.
Post-Installation Testing and Safety Checks
After the installation is complete, thorough testing and safety checks are essential to ensure the insert is functioning correctly and safely. This includes checking for gas leaks, verifying proper venting, and testing the ignition system.
Perform a final leak test on all gas line connections. Use a gas leak detector or a soap and water solution to check for any leaks. If any leaks are detected, immediately shut off the gas supply and correct the problem. Do not operate the insert until all leaks are repaired. Gas leaks can pose a serious fire and explosion hazard.
Verify proper venting. Ensure that the exhaust gases are venting properly through the chimney and that there are no obstructions in the venting system. Observe the flame pattern of the insert to ensure it is burning cleanly and efficiently. A smoky or distorted flame may indicate a venting problem. A visual smoke test through the chimney can also indicate a venting issue.
Test the ignition system. Turn on the gas fireplace insert and verify that the ignition system is working correctly. The insert should light quickly and smoothly. Check the safety features, such as the flame sensor and automatic shut-off, to ensure they are functioning properly. These systems are designed to prevent gas leaks and carbon monoxide poisoning.
Install a carbon monoxide detector near the gas fireplace insert. Carbon monoxide is a colorless, odorless gas that can be deadly. A carbon monoxide detector will alert occupants to the presence of carbon monoxide in the home. Regularly test the carbon monoxide detector to ensure it is functioning properly. Replace the batteries as needed.
Carefully review the manufacturer's operating instructions and safety precautions. Familiarize yourself with the proper operation of the gas fireplace insert and the potential hazards associated with its use. Keep the operating instructions in a safe place for future reference. Ensure that all occupants of the home are aware of the safety precautions.
Schedule a professional inspection. After completing the installation and performing the initial testing, it is recommended to schedule a professional inspection of the gas fireplace insert. A qualified technician can verify that the installation was performed correctly and that the insert is operating safely and efficiently. This inspection can also identify any potential problems that may have been overlooked during the initial installation. This step provides an extra layer of assurance that the installation meets all safety standards.
By following these detailed instructions and taking appropriate safety precautions, individuals with the requisite skills can successfully install a vented gas fireplace insert. However, it is crucial to remember that working with gas appliances involves inherent risks, and professional assistance should be sought when necessary to ensure a safe and reliable installation.

Gas Fireplace Venting Explained Heat Glo

How To Select And Install A Gas Fireplace Log Set Fireplaces Direct Learning Center

What Are The Best Ways To Vent A Gas Fireplace Zoroast

Gas Fireplace Venting Explained Heat Glo

How To Install A Direct Vent Pipe

If You Have A Gas Fireplace It May Or Not Chimney Flue

How To Install A Fireplace Insert Diy Save Money

Fireplace Insert Venting Demystified Gas Direct Vent Inserts

What Is A Direct Vent Fireplace Fireplaces Learning Center

How To Buy A Gas Fireplace Insert Buyer S Guide From Regency
Related Posts