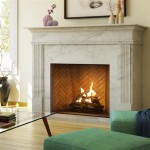
How To Paint a Gold Fireplace Insert
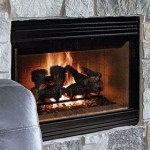
Painting a gold fireplace insert can revitalize a room, updating its aesthetic and providing a fresh focal point. Over time, the existing gold finish can become tarnished, scratched, or simply out of sync with evolving home decor. A well-executed paint job can offer a cost-effective alternative to replacing the entire unit, allowing homeowners to customize the color and finish to their preferences. However, this project necessitates careful planning, proper material selection, and meticulous execution to ensure durability, safety, and a professional-looking result.
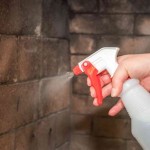
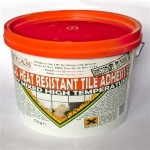
The primary concern when painting a fireplace insert is heat resistance. Standard paints are unlikely to withstand the high temperatures generated by a working fireplace and could result in cracking, peeling, or the release of hazardous fumes. Selecting a specialized high-heat paint formulated for stoves, grills, and other heat-generating appliances is critical. Furthermore, surface preparation is crucial for adhesion and longevity. Thorough cleaning, degreasing, and potentially sanding are necessary to create a suitable base for the new paint layer.
This article will provide a comprehensive guide on painting a gold fireplace insert, covering everything from material selection and surface preparation to painting techniques and safety precautions. Following these instructions will help ensure a successful and aesthetically pleasing transformation of the fireplace insert.
Key Point 1: Material Selection and Preparation
Selecting the correct materials is paramount for the success and safety of this project. The most important element is the paint itself. High-heat paint, also known as stove paint, is specifically formulated to withstand temperatures up to 1200°F (650°C) or higher. These paints are typically available in spray cans for easy application, though brush-on versions also exist. Examine the paint's specifications to confirm its suitability for the anticipated operating temperature of the fireplace insert.
Apart from the paint, other essential materials include:
- Cleaning Supplies: A strong degreaser, such as trisodium phosphate (TSP) or a similar heavy-duty cleaner, is crucial for removing grease, soot, and other contaminants from the surface. Clean rags or paper towels are also necessary.
- Abrasive Materials: Sandpaper is used to create a slightly roughened surface, promoting better paint adhesion. Different grit levels might be required, starting with a coarser grit (e.g., 120-grit) for removing rust or significant imperfections and finishing with a finer grit (e.g., 220-grit) for smoothing. Steel wool can also be used for delicate areas.
- Primer (Optional): While some high-heat paints claim to be self-priming, applying a high-heat primer can improve adhesion, especially on surfaces with existing rust or imperfections. Ensure the primer is compatible with the chosen paint.
- Masking Supplies: Painter's tape is essential for protecting surrounding surfaces from overspray. Plastic sheeting or drop cloths should be used to cover the hearth, walls, and floor around the fireplace.
- Safety Gear: A respirator or dust mask is vital to prevent inhalation of paint fumes and dust particles during sanding. Eye protection, such as safety glasses, is crucial for preventing debris from entering the eyes. Gloves should be worn to protect the skin from chemicals and paint.
Once all the necessary materials are gathered, the preparation phase can begin. The first step is to thoroughly clean the fireplace insert. Using the degreaser and clean rags, scrub the entire surface to remove all traces of grease, soot, and other contaminants. Rinse thoroughly with clean water and allow the surface to dry completely.
Next, inspect the surface for any rust, loose paint, or imperfections. Use sandpaper or steel wool to remove rust and smooth out any rough areas. Feather the edges of any remaining paint to create a smooth transition. After sanding, wipe the surface clean with a tack cloth to remove any dust particles. A clean and properly prepared surface is the foundation for a long-lasting and aesthetically pleasing paint job.
Finally, mask off all areas that should not be painted, such as the surrounding brickwork, glass doors (if applicable), and any hardware that cannot be removed. Use painter's tape to create clean, crisp lines. Cover the surrounding areas with plastic sheeting or drop cloths to protect them from overspray.
Key Point 2: Painting Techniques and Application
With the fireplace insert properly prepared, the painting process can begin. Before applying any paint, it's crucial to read and follow the manufacturer's instructions on the paint can. These instructions will provide guidance on application techniques, drying times, and safety precautions specific to the chosen product.
When using spray paint, shake the can vigorously for at least two minutes to ensure the paint is thoroughly mixed. Hold the can approximately 10-12 inches from the surface and apply a light, even coat. Avoid spraying too much paint in one area, as this can lead to runs and drips. Instead, use a series of thin coats, allowing each coat to dry according to the manufacturer's instructions before applying the next.
If using a brush-on paint, use a high-quality brush designed for use with high-heat paints. Apply the paint in thin, even strokes, following the grain of the metal. Avoid applying too much paint at once, as this can also lead to drips and runs. Apply several thin coats, allowing each coat to dry completely before applying the next.
Whether using spray paint or brush-on paint, maintain a consistent speed and distance to ensure even coverage. Overlap each stroke or pass slightly to prevent gaps or streaks. Pay particular attention to edges and corners, ensuring they are fully covered.
After applying the first coat, inspect the surface for any imperfections, such as runs, drips, or uneven coverage. If necessary, lightly sand down any imperfections with fine-grit sandpaper and apply another coat of paint. Repeat this process until the desired level of coverage and smoothness is achieved. Typically, two to three coats are sufficient for most surfaces.
Allow the paint to dry completely according to the manufacturer's instructions. This may take several hours or even overnight. Avoid touching or handling the painted surface until it is fully dry. Once the paint is dry, carefully remove the masking tape and plastic sheeting.
Key Point 3: Safety Precautions and Curing Process
Working with paints, especially high-heat paints, requires adherence to strict safety precautions. Always work in a well-ventilated area to minimize inhalation of fumes. Wear a respirator or dust mask to protect your lungs from paint particles and fumes. Eye protection, such as safety glasses, is crucial for preventing debris from entering the eyes. Wear gloves to protect the skin from chemicals and paint.
Avoid smoking, eating, or drinking while painting. Keep paint and other chemicals away from children and pets. Dispose of used paint cans and rags properly, following local regulations.
After the paint has dried to the touch, it is crucial to cure the paint properly. Curing involves gradually heating the painted surface to allow the paint to fully harden and bond to the metal. This process helps to prevent cracking, peeling, and other forms of damage that can occur when the fireplace is exposed to high temperatures.
The curing process typically involves gradually increasing the temperature of the fireplace over several hours. Consult the paint manufacturer's instructions for specific curing recommendations. A common method involves starting with a low heat setting for the first hour, gradually increasing the heat setting over the next two to three hours, and then allowing the fireplace to cool down completely.
During the curing process, it is normal for the paint to emit some fumes. Ensure the area is well-ventilated during this time. Avoid using the fireplace at full heat until the curing process is complete. Properly curing the paint will ensure a long-lasting and durable finish that can withstand the high temperatures of a working fireplace.
Following these guidelines will enable the successful painting of a gold fireplace insert, resulting in an updated, aesthetically pleasing, and safe focal point for the living space. Remember that patience and attention to detail are key to achieving a professional finish.

How To Spray Paint A Brass Fireplace Insert Erfly House

How To Spray Paint A Brass Fireplace Insert Erfly House

How To Paint Metal Fireplace Surround Four Generations One Roof

Fireplace Makeover Spray Paint Magic

How To Spray Paint A Brass Fireplace Insert Erfly House

How To Make An Outdated Fireplace Insert Look Like A Million Bucks Chris Loves Julia

Brass Fireplace Update East Coast Creative

Diy Fireplace Makeover With High Heat Paint Jessica Welling Interiors

How To Spray Paint A Brass Fireplace Bright Green Door

Fireplace Makeover Spray Paint Magic