How to Install a Pellet Fireplace Insert
A pellet fireplace insert is a great way to add warmth and ambiance to your home. These inserts are relatively easy to install, and they can be a great DIY project for homeowners with some basic construction experience. However, it's crucial to follow proper safety procedures and obtain any necessary permits before beginning installation. This article will guide you through the steps involved in installing a pellet fireplace insert.
1. Preparation and Planning
Before starting the installation process, it's essential to gather the necessary tools and materials, plan the installation, and ensure the fireplace is suitable for an insert. Here's a checklist of preparation steps:
- Obtain necessary permits: Contact your local building department to determine if you need any permits to install a pellet fireplace insert. This may vary by location and the specific requirements of your fireplace.
- Gather tools and materials: Ensure you have all the necessary tools and materials, including a level, tape measure, drill, safety glasses, gloves, and a dust mask. You'll also need the appropriate screws, sealant, and any other specialized tools for the specific insert model.
- Plan the installation: Decide on the location of the insert and ensure it's a suitable spot. Consider the size and weight of the insert, the vent location, and the necessary electrical connection.
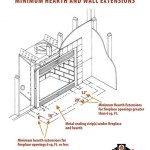
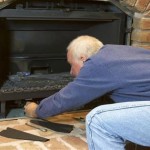
- Prepare the fireplace: Clean the fireplace thoroughly and remove any existing firebox or grate. Ensure the fireplace is structurally sound and ready for the insert installation.
2. Installing the Insert
Once the preparations are complete, you can proceed with the installation of the pellet fireplace insert. This step involves carefully positioning the insert, securing it, and connecting the necessary components. Here are the steps involved:
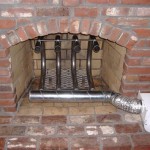
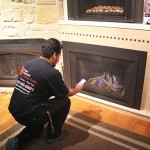
- Position the insert: Carefully place the insert into the fireplace opening, ensuring it sits level and stable. Use shims if necessary to adjust the level.
- Secure the insert: Secure the insert to the fireplace using the provided mounting brackets and fasteners. Ensure the insert is firmly fixed and won't shift or move during operation.
- Connect the vent pipe: Install the vent pipe according to the manufacturer's instructions. Ensure the pipe is securely connected to the insert and the chimney, allowing for proper ventilation and draft.
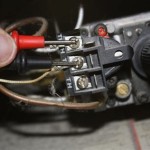
- Connect the power: Connect the insert to a dedicated electrical outlet. Ensure the wiring meets the manufacturer's specifications and local electrical codes.
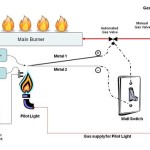
- Install the thermostat: Install the included thermostat in a convenient location, allowing you to control the fireplace's temperature.
3. Final Adjustments and Testing
After completing the installation, it's crucial to perform final adjustments and thorough testing to ensure the pellet fireplace insert is working safely and efficiently. Here are the final steps:
- Check for leaks: Carefully inspect the vent pipe connections for any leaks. Seal any gaps or cracks with appropriate sealant.
- Test the operation: Turn on the insert and check that it's working properly. Ensure the fire ignites correctly, the heat output is adequate, and all controls are functioning as expected.
- Adjust the settings: Experiment with different settings to find the optimal temperature and airflow for your needs.
- Clean the insert: After the initial test run, clean the insert thoroughly to remove any dust or debris. Follow the manufacturer's cleaning guidelines for optimal performance and safety.
Installing a pellet fireplace insert requires careful planning, proper tools, and a good understanding of the installation process. By following these steps and the manufacturer's instructions, you can successfully install a pellet fireplace insert and enjoy the warmth and ambiance it brings to your home. Remember to prioritize safety throughout the process and consult with a professional if you encounter any difficulties or aren't comfortable performing certain aspects of the installation.

How To Install A Pellet Vent Pipe

Pellet Stove Insert Installation Self Install Diy

Fireplace Insert Installation Wood Inserts Gas Pellet And Electric

Wood Stoves And Fireplaces How To Install A Burning Fireplace Insert Hearth Com Forums Home

Sawmill Creek Woodworking Community

Custom Installation Of Fireplace Inserts Insert Installations Sierra Hearth And Home

How To Install A Pellet Stove This Old House

Modify Existing Fireplace Zero Clearance To Install Pellet Insert Hearth Com Forums Home

Pellet Fireplace Inserts We Install In Nh

Wood Stoves Pellet Gas Fireplace Inserts
Related Posts