DIY Faux Fireplace Mantel and Surround: A Comprehensive Guide
A fireplace, even a non-functional one, serves as a significant focal point in any living space. Its presence evokes a sense of warmth, comfort, and architectural interest. However, not every home is equipped with a traditional working fireplace, or perhaps the existing structure is aesthetically outdated. The creation of a faux fireplace mantel and surround offers an accessible and cost-effective solution to introduce this desirable feature without the complexities and expenses associated with installing a real fireplace.
This comprehensive guide details the step-by-step process of constructing a DIY faux fireplace mantel and surround, covering design considerations, material selection, construction techniques, and finishing touches. This project caters to individuals with basic carpentry skills and access to common tools, transforming an ordinary wall into a captivating architectural element.
Planning and Design Considerations
The initial stage of any DIY project is meticulous planning. For a faux fireplace, several design considerations must be addressed to ensure a successful and aesthetically pleasing outcome. The style, size, and placement of the fireplace must complement the existing décor and architectural style of the room. Consider the overall aesthetic: Are you aiming for a rustic farmhouse look, a sleek modern design, or a classic traditional style? The answer to this question will dictate the material choices and design details.
Size is another crucial factor. The fireplace surround and mantel should be proportional to the wall it occupies and the room's dimensions. A fireplace that is too large can overwhelm the space, while one that is too small might appear insignificant. Use masking tape on the wall to visualize different size options before committing to specific measurements. Measure the wall height and width, and consider the height of existing furniture to determine appropriate proportions.
Placement options should be carefully evaluated. Ideally, the faux fireplace should be positioned on a prominent wall, acting as a natural focal point. Avoid placing it in areas that are already visually cluttered or where it might obstruct walkways. Consider the proximity of electrical outlets if you plan to incorporate electric candles or decorative lighting within the fireplace opening.
Once the style, size, and placement are determined, sketch out a detailed design of the mantel and surround. This sketch should include precise measurements, material specifications, and details of any decorative elements, such as corbels, moldings, or tile accents. Online resources and home décor magazines offer a wealth of inspiration for various fireplace designs, assisting in developing a personalized plan.
Material Selection and Tool Requirements
The choice of materials significantly impacts the overall look and feel of the faux fireplace. Several options exist, each offering unique aesthetic qualities and varying levels of cost and ease of construction. Common materials include:
- Wood: Wood is a versatile and readily available material suitable for various fireplace styles. Pine is a cost-effective option, while hardwoods like oak or maple offer greater durability and a more refined appearance. Consider using reclaimed wood for a rustic, environmentally conscious design.
- MDF (Medium-Density Fiberboard): MDF is a manufactured wood product known for its smooth surface and stability. It is easy to cut, shape, and paint, making it an excellent choice for intricate designs. However, MDF is susceptible to moisture damage and should be properly sealed and painted, especially in humid environments.
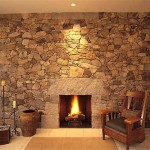
- Brick or Stone Veneer: Brick or stone veneer adds a realistic touch to the fireplace surround. These materials are available in various styles, colors, and textures, allowing for customization to match the desired aesthetic. Veneer is typically adhered to a plywood or cement board substrate using mortar.
- Faux Stone Panels: Faux stone panels offer a lightweight and easy-to-install alternative to traditional stone veneer. These panels are made from polyurethane or other synthetic materials and mimic the appearance of natural stone. They are available in various styles and colors and can be easily cut to size with a saw.
In addition to the primary construction materials, other supplies are needed, including wood glue, nails or screws, sandpaper, paint or stain, primer (if using paint), and sealant. Safety gear, such as safety glasses and a dust mask, are essential for protection during the construction process.
The following tools are generally required for this project:
- Measuring tape
- Pencil
- Level
- Stud finder
- Circular saw or miter saw
- Jigsaw (for curved cuts)
- Drill/driver
- Nail gun (optional)
- Sander
- Paintbrushes or rollers
Construction Techniques and Finishing Touches
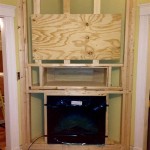
With the design finalized and materials gathered, the construction phase can begin. Start by building the base of the fireplace surround. This typically involves constructing a box-like frame from wood or MDF. Ensure the frame is sturdy and level, as it will support the mantel and any decorative elements.
Attach the surround to the wall using screws that are anchored into the wall studs. Use a stud finder to locate the studs and mark their positions. Ensure the surround is securely fastened to the wall, providing a stable foundation for the rest of the fireplace assembly.
Next, construct the mantel. The mantel can be a simple shelf or a more elaborate structure with a decorative front. Cut the mantel components to the required dimensions and assemble them using wood glue and screws. Fill any gaps or imperfections with wood filler and sand the surface smooth.
Attach the mantel to the surround using construction adhesive and screws. Ensure the mantel is level and properly aligned with the surround. Consider adding corbels or other decorative elements to the mantel for added visual interest. These can be purchased pre-made or crafted from wood.
If incorporating brick or stone veneer, apply it to the surround according to the manufacturer's instructions. This typically involves applying mortar to the back of the veneer and pressing it onto the substrate. Use spacers to maintain consistent gaps between the individual pieces of veneer. Allow the mortar to cure completely before proceeding to the next step.
Once the structure is assembled, focus on the finishing touches. Sand all surfaces smooth and apply primer if using paint. Paint or stain the fireplace to the desired color and finish. Consider using multiple coats of paint or stain for enhanced durability and a richer appearance.
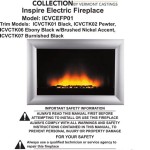
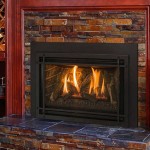
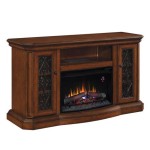
To create the illusion of a fireplace opening, paint the interior of the surround a dark color, such as black or charcoal gray. Alternatively, install a faux fireplace insert, such as an electric fireplace or a set of decorative logs. These inserts add a realistic touch and can provide supplemental heat.
Finally, decorate the mantel with candles, vases, artwork, or other decorative items. A well-decorated mantel enhances the overall aesthetic of the fireplace and adds personality to the room.
Building a DIY faux fireplace mantel and surround is a rewarding project that can transform the look and feel of a room. By carefully planning the design, selecting the appropriate materials, and following the construction techniques outlined in this guide, individuals can create a stunning focal point that evokes warmth, comfort, and architectural interest.

Faux Fireplace Mantel Surround

Faux Fireplace Mantel Surround Rogue Engineer

Easy Diy Faux Fireplace And Mantel Zucchini Sisters

Diy Faux Fireplace Mantel Rebecca Propes Design

How To Build A Faux Fireplace Mantel And Surround The Home Depot

Faux Fireplace Mantel Surround Rogue Engineer

5 Diy Faux Mantel Ideas Stow Tellu Fireplace Mantels

Diy Faux Fireplace Mantel Tutorial Grace In My Space

Diy Faux Fireplace Mantel With Tile And Brick

Diy Faux Fireplace And Mantel Complete Tutorial Twelve On Main
Related Posts