How to Install a Superior Fireplace Blower Kit
A fireplace blower kit enhances the efficiency of a wood-burning fireplace by circulating heated air into the room rather than allowing it to escape up the chimney. Installing a Superior fireplace blower kit can be a straightforward project for a homeowner with basic mechanical skills and a commitment to safety. This article provides a detailed, step-by-step guide to installing a Superior fireplace blower kit, ensuring optimal performance and safety.
Before beginning the installation process, it's crucial to understand the components of the kit and the specific requirements of your fireplace model. Superior fireplace blower kits are designed for compatibility with specific fireplace models, so verifying model compatibility is paramount. Furthermore, appropriate safety precautions must be taken to avoid electrical shock and physical injury.
Preparing for Installation
The initial stage involves gathering the necessary tools and materials. A Superior fireplace blower kit typically includes the blower assembly, wiring harness, thermostat (if applicable), mounting hardware, and an installation manual. Essential tools include a screwdriver set (both Phillips head and flathead), pliers, a wire stripper, a wire crimper, electrical tape, and a multimeter. Safety glasses and work gloves are also crucial for personal protection.
Prior to any physical interaction with the fireplace or its components, disconnect the power supply to the fireplace circuit at the circuit breaker. This is a non-negotiable safety precaution. Confirm the power is off using a multimeter to test the voltage at the electrical receptacle within the fireplace cavity, if applicable. A “no voltage” reading is necessary before proceeding.
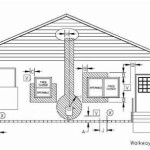
Carefully examine the installation manual provided with the Superior fireplace blower kit. The manual will outline the specific steps and any modifications required for your particular fireplace model. Pay close attention to any diagrams or illustrations, which offer visual guidance throughout the installation process. Understanding the manual before beginning minimizes the risk of errors and ensures a smooth installation.
Prepare the fireplace by cleaning the area surrounding the installation site. Remove any debris, ash, or obstructions that could hinder access to the blower compartment. A clean workspace promotes efficiency and reduces the likelihood of contamination of the blower motor or other components.
Installing the Blower Assembly
The next step involves accessing the designated area for the blower installation within the fireplace cavity. This may require removing a lower panel, decorative trim, or an access door. Refer to the installation manual for the specific location and removal procedure for your fireplace model. Exercise caution during this step to avoid damaging any fragile or decorative components.
Position the blower assembly within the designated compartment. The installation manual will provide specific instructions regarding the orientation and placement of the blower unit. Ensure the blower assembly is securely seated and aligned properly according to the manufacturer's specifications. Misalignment can result in inefficient airflow and premature wear and tear on the blower motor.
Secure the blower assembly to the fireplace using the provided mounting hardware. This may involve screws, brackets, or clips. Tighten the fasteners securely, but avoid over-tightening, which could damage the fireplace structure or the blower assembly itself. Double-check the stability of the blower unit after the mounting hardware has been installed.
Connect the wiring harness to the blower motor. The wiring harness typically includes color-coded wires with connectors designed for easy and secure attachment. Match the wire colors and connector types carefully to ensure proper electrical connections. If unsure, consult the wiring diagram in the installation manual. A reverse polarity connection can damage the blower motor or other electrical components.
Locate the thermostat sensor, if included in the kit. The thermostat sensor is responsible for activating the blower when the fireplace reaches a certain temperature. Position the thermostat sensor according to the installation manual's instructions. This typically involves attaching the sensor to a specific location on the firebox or within the blower compartment. The thermostat sensor must be placed in a location where it can accurately sense the temperature of the firebox.
Wiring and Electrical Connections
Route the wiring harness from the blower assembly to the existing electrical receptacle within the fireplace cavity. If the fireplace does not have a dedicated electrical receptacle, an electrician will need to install one according to local electrical codes. Do not attempt to bypass this step or create makeshift electrical connections, as this is a serious fire hazard.
Connect the wiring harness to the electrical receptacle. This may involve plugging the harness into a standard outlet or hardwiring the connections according to the electrical code. If hardwiring is required, ensure the wire gauge is appropriate for the circuit's amperage. Use wire connectors or wire nuts to create secure and insulated connections. Never leave bare wires exposed.
Secure the wiring harness to the fireplace structure using wire ties or clips to prevent it from dangling or coming into contact with hot surfaces. Proper wire management is crucial for safety and to prevent the wiring harness from being damaged by heat or vibration. Keep the wiring harness away from moving parts of the fireplace.
Test the continuity of the wiring connections using a multimeter. This ensures that there are no shorts or open circuits in the wiring. Continuity testing involves disconnecting the power supply and using the multimeter to check the resistance between different points in the circuit. A low resistance reading indicates continuity, while a high resistance reading indicates an open circuit.
Re-establish the power supply to the fireplace by turning on the circuit breaker. Carefully monitor the blower assembly for any signs of malfunction or overheating. Listen for unusual noises, such as grinding or squealing, which could indicate a mechanical problem. If any issues are detected, immediately disconnect the power supply and troubleshoot the problem.
Testing and Final Adjustments
Light a small fire in the fireplace and allow the firebox to heat up. Monitor the thermostat (if included) to ensure it activates the blower at the appropriate temperature. The installation manual will specify the expected activation temperature. If the thermostat is not functioning correctly, adjust the thermostat settings or consult the troubleshooting section of the manual.
Verify that the blower is circulating heated air into the room. Place your hand near the fireplace vents to feel the flow of warm air. A properly functioning blower will significantly increase the amount of heat distributed into the living space. If the airflow is weak or non-existent, check the blower's fan blades for obstructions or consult the troubleshooting section of the manual.
Adjust the blower speed, if the kit includes a speed control. Experiment with different speed settings to find the optimal balance between airflow and noise level. A faster blower speed will provide more airflow but may also produce more noise. Adjust the speed to a comfortable level that maximizes heat distribution without being overly disruptive.
Reinstall any panels, trim, or access doors that were removed during the installation process. Ensure all components are securely fastened and properly aligned. A clean and finished installation enhances the appearance of the fireplace and prevents any potential hazards.
Thoroughly clean the work area and dispose of any waste materials properly. Remove any tools, debris, or packaging materials from the fireplace area. A clean workspace is essential for safety and to prevent fire hazards.
Monitor the blower assembly during several fire cycles to ensure it continues to function properly. Pay attention to any changes in performance, such as reduced airflow, increased noise, or unusual vibrations. If any issues arise, consult the troubleshooting section of the installation manual or contact the manufacturer for assistance.
It is highly recommended to review all installation steps after completion to ensure that all connections are secure and that the blower assembly is functioning according to the manufacturer's specifications. A final inspection helps to identify any potential issues that may have been overlooked during the installation process.
Regular maintenance of the Superior fireplace blower kit is essential for prolonging its lifespan and maintaining its efficiency. This includes cleaning the blower fan blades, inspecting the wiring connections, and lubricating the motor bearings (if applicable). Refer to the maintenance section of the installation manual for specific instructions.

Fbk 100 Fireplace Blower Fan Kit Installation For Lennox And Superior

Fbk 250 Fireplace Blower Kit Installation

Fbk 100 Fireplace Blower Fan Kit Installation For Lennox And Superior

Installing A Fireplace Blower Gfk4 Gfk4a In Heatilator Natural Gas

Gfk4 Gfk4a Fireplace Blower Kit Installation

How To Choose And Install A Gas Fireplace Blower Kit

Noisy Gas Fireplace Blower Here S How To Replace It Diy

Superior 3 Blade Fan Blower Kit For Wrt 2036 2042 3036 3042 Wct

Bk Bkt Blower Kit Installation
Related Posts