Fixing a Thermocouple in a Gas Fireplace: A Comprehensive Guide
A gas fireplace offers warmth and ambiance without the hassle of traditional wood-burning fireplaces. Central to its operation is the thermocouple, a safety device that ensures gas flows only when the pilot light is lit. When the thermocouple fails, the pilot light may extinguish repeatedly, or the fireplace may not ignite at all. Addressing a malfunctioning thermocouple is crucial for safe and reliable fireplace operation. This article provides a detailed guide to identifying, troubleshooting, and replacing a thermocouple in a gas fireplace, empowering homeowners to address this common issue effectively.
Understanding the Thermocouple's Function
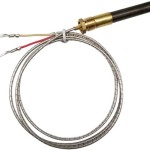
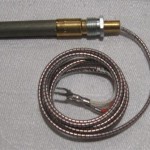
The thermocouple functions as a safety mechanism, preventing gas leakage in the event of a pilot light outage. It is a heat-sensitive device comprised of two dissimilar metal wires joined at one end, forming a "hot junction," which is positioned directly in the pilot flame. When heated by the flame, the thermocouple generates a small electrical current, measured in millivolts (mV). This current flows through the wires to the gas valve, energizing an electromagnet that holds the valve open, allowing gas to flow to the main burner.
If the pilot light extinguishes, the thermocouple cools, and the electrical current ceases. Consequently, the electromagnet de-energizes, causing the gas valve to close and shutting off the gas supply to prevent a potentially dangerous gas buildup. This safety feature makes the thermocouple a critical component of the gas fireplace system. Without a properly functioning thermocouple, the fireplace cannot operate safely and reliably.
Various factors can contribute to thermocouple failure. These include corrosion on the thermocouple tip, a loose connection at the gas valve, a bent or damaged thermocouple wire, or simply the natural degradation of the metal components over time. Regular inspection and maintenance can help prolong the lifespan of the thermocouple and ensure its continued reliable operation.
Diagnosing a Faulty Thermocouple
Identifying a faulty thermocouple often involves observing specific symptoms. The most common sign is a pilot light that ignites but fails to stay lit once the control knob is released. This indicates that the thermocouple is not generating sufficient voltage to keep the gas valve open. Another symptom is the complete inability to light the pilot light, even after repeated attempts.
Before concluding that the thermocouple is the problem, it's essential to rule out other potential causes. A blockage in the pilot light orifice, for example, can prevent the pilot flame from reaching the thermocouple sufficiently to generate the necessary voltage. Similarly, a malfunctioning gas valve or a low gas supply pressure can also mimic the symptoms of a faulty thermocouple.
A multimeter is a valuable tool for diagnosing thermocouple issues. To test the thermocouple, first, ensure the pilot light is lit and the control knob is in the "on" position. Then, set the multimeter to measure millivolts (mV) DC. Disconnect the thermocouple wire from the gas valve and connect the multimeter probes to the thermocouple wire and the gas valve connection point. The multimeter should display a voltage reading within the manufacturer's specified range, typically between 20 and 30 mV DC. A reading significantly below this range indicates a weak or faulty thermocouple that needs replacement.
It is important to remember to always disconnect the gas supply during any appliance repair. Safety precaution should always be at the forefront of any repair considerations. If there is any doubt, contact a qualified professional.
Replacing a Thermocouple: A Step-by-Step Guide
Replacing a thermocouple is a relatively straightforward process that most homeowners with basic mechanical skills can perform. However, safety precautions must be taken before commencing any repairs. Before beginning, turn off the gas supply to the fireplace at the shut-off valve, usually located near the fireplace or in the gas supply line. Allow the fireplace to cool completely before proceeding.
The following steps outline the thermocouple replacement process:
- Access the Thermocouple: Remove the fireplace's front panel or access cover to expose the pilot light assembly and gas valve. The thermocouple is typically a thin, copper-colored wire connected to the pilot light assembly and the gas valve.
- Disconnect the Old Thermocouple: Carefully disconnect the thermocouple wire from the gas valve. This usually involves loosening a small compression fitting nut using a wrench. Note the orientation of the fitting to facilitate reassembly. Also, detach the thermocouple from the pilot light bracket. This may require loosening a screw or clip.
- Install the New Thermocouple: Insert the new thermocouple tip into the pilot light bracket, ensuring it is positioned directly in the path of the pilot flame. Secure it in place with the screw or clip. Connect the other end of the thermocouple wire to the gas valve, tightening the compression fitting nut securely. Do not overtighten, as this can damage the fitting.
- Reassemble and Test: Replace the fireplace's front panel or access cover. Turn the gas supply back on at the shut-off valve. Follow the manufacturer's instructions to light the pilot light. If the pilot light stays lit after releasing the control knob, the thermocouple replacement was successful. If the pilot light still fails to stay lit, double-check the connections and ensure the thermocouple is properly positioned in the pilot flame.
When selecting a replacement thermocouple, it is crucial to choose a part that is compatible with the specific gas fireplace model. Refer to the fireplace manufacturer's instructions or consult with a fireplace parts supplier to ensure the correct thermocouple type and length are purchased. Using an incompatible thermocouple can result in improper operation or even safety hazards.
After replacing the thermocouple, it is good practice to leak test the gas connections using a soap solution. Apply the solution to all gas connections and look for bubbles, which indicate a gas leak. If a leak is detected, immediately turn off the gas supply and tighten the connections or replace the fittings as needed.
Troubleshooting Common Thermocouple Issues
Even after replacing the thermocouple, certain issues may persist. One common problem is a pilot light that is weak or flickering, which can prevent the thermocouple from generating sufficient voltage. In such cases, cleaning the pilot light orifice may resolve the issue. Use a small wire or pin to carefully clear any obstructions from the orifice. Avoid using excessive force, as this can damage the orifice.
Another possible issue is a loose connection at the gas valve. Ensure the thermocouple wire is securely connected to the gas valve, and the compression fitting nut is tightened properly. A loose connection can cause intermittent or unreliable operation.
In some cases, the gas valve itself may be the problem. If the thermocouple tests good, the pilot light is clean and strong, and the connections are secure, but the pilot light still fails to stay lit, the gas valve may be malfunctioning. Replacing the gas valve is a more complex repair that requires specialized knowledge and tools and is usually best left to a qualified gas appliance technician.
Proper maintenance is essential for prolonging the lifespan of the thermocouple and preventing future problems. Regularly inspect the pilot light assembly and clean any debris or corrosion from the thermocouple tip. Ensure the pilot flame is properly adjusted and is consistently impinging on the thermocouple. By following these maintenance practices, homeowners can ensure their gas fireplace operates safely and reliably for years to come.
This guide provides a comprehensive overview of fixing a thermocouple in a gas fireplace. While the information provided is intended to be helpful, it is essential to prioritize safety and consult with a qualified gas appliance technician if you are uncomfortable performing any of the described tasks.

Fireplace Won T Stay Lit This Is How You Fix It

How To Test Your Thermopile Www Mygasfireplacerepair Com

Know How To Replace A Gas Fireplace Thermocouple

How A Pilot Light Works Www Mygasfireplacerepair Com

Diy Gas Fireplace Repair No Flame Problem Remodeling Cost Calculator

Gas Fireplace Won T Stay Lit R Fixit

Gas Fireplace Keeps Shutting Off Here S What You Can Do

5 Reasons Gas Fireplaces Won T Light How To Fix It Fireplace Tips

How To Replace A Thermocouple The Home Depot

How To Fix A Gas Fireplace That Keeps Turning Off Vertical Chimney Care
Related Posts