Natural Stone Veneer Fireplace Installation: A Comprehensive Guide
Natural stone veneer offers an attractive and durable option for enhancing the aesthetic appeal of fireplaces. Compared to full-depth stone, veneer provides a lighter, more cost-effective alternative while achieving a similar visual impact. This type of installation involves adhering thin layers of natural stone to an existing fireplace structure or a newly constructed framework. Careful planning, material selection, and precise execution are crucial for a successful and long-lasting installation.
This article provides a detailed overview of the natural stone veneer fireplace installation process, covering essential aspects ranging from preparation and material selection to installation techniques and post-installation considerations. Adhering to these guidelines will help ensure a structurally sound and visually pleasing result.
Planning and Preparation
Prior to any actual installation work, a thorough planning phase is essential. This phase involves assessing the existing fireplace structure, determining the desired aesthetic, and preparing the surface for veneer application. The success of the installation hinges on the quality of this initial preparation.
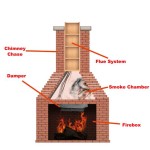
First, the existing fireplace structure must be inspected for structural integrity. Any signs of damage, such as cracks, crumbling mortar, or water damage, need to be addressed before proceeding. Addressing these issues ensures that the veneer will be applied to a stable and sound substrate. If the existing fireplace is not structurally sound, it will require repair or, in extreme cases, reconstruction.
Next, decide on the desired aesthetic. Consider the type of stone veneer, its color, texture, and pattern. Research different stone types, such as limestone, granite, slate, and fieldstone, and how they complement the existing décor of the room. Obtain samples of different veneer options and visualize how they will look on the fireplace. Factors such as the size of the fireplace, the style of the room, and the desired overall ambiance will influence the choice of stone veneer.
Prepare the surface by cleaning it thoroughly. Remove any loose paint, dirt, debris, or existing coverings. A pressure washer can be used for exterior surfaces, while a wire brush and scraper are suitable for interior surfaces. The goal is to create a clean, rough surface that will promote optimal adhesion of the mortar. If the existing surface is smooth, such as painted brick or concrete, it may be necessary to roughen it further by scoring it with a chisel or grinder.
Apply a scratch coat of mortar to the prepared surface. This coat serves as a bonding agent between the existing structure and the stone veneer. Use a notched trowel to apply a thin, even layer of mortar to the entire surface that will receive the veneer. Allow the scratch coat to cure for at least 24 hours before proceeding with the veneer installation. The scratch coat creates a textured surface that enhances the mechanical bond between the veneer and the substrate.
Finally, ensure that all necessary tools and materials are readily available. This includes the chosen stone veneer, mortar, a mixing bucket, a trowel, a level, a chisel, a hammer, safety glasses, gloves, and a wet saw for cutting the stone veneer. Having all the necessary materials on hand will streamline the installation process and prevent delays.
Stone Veneer Installation Techniques
The actual installation of the stone veneer requires precision and attention to detail. Proper mortar application, stone placement, and leveling are critical for achieving a professional-looking and structurally sound fireplace. Selecting a suitable mortar is crucial for both aesthetic and functional reasons. The mortar should be specifically designed for stone veneer applications and compatible with the chosen stone type. Premixed mortars are available, offering convenience and consistency, while dry-mix mortars allow for customization of the consistency and working time. Follow the manufacturer's instructions for mixing the mortar, ensuring a smooth, workable consistency. Avoid adding excessive water, which can weaken the mortar's bond strength.
Begin by applying mortar to the back of each stone veneer piece. Use a trowel to create a consistent layer of mortar, ensuring that the entire back surface is covered. The thickness of the mortar layer will vary depending on the size and weight of the stone. For larger stones, a thicker mortar bed may be necessary to provide adequate support. For smaller stones, a thinner mortar bed will suffice. Avoid applying excessive mortar, which can squeeze out from between the stones and create a messy appearance.
Carefully position each stone veneer piece onto the scratch coat, pressing firmly to ensure good contact with the mortar. Use a level to ensure that the stones are aligned horizontally and vertically. Maintain consistent spacing between the stones to create a uniform appearance. Shims can be used to maintain consistent spacing and alignment. Work from the bottom up, allowing the weight of the lower stones to support the upper stones. Periodically check the alignment and level of the stones to ensure that the installation is progressing correctly.
When cutting stone veneer to fit around openings or corners, use a wet saw. A wet saw provides a clean, precise cut and minimizes dust. Wear safety glasses and gloves when operating a wet saw. Measure the required cut carefully and mark the stone veneer before cutting. Make slow, steady cuts to avoid chipping or breaking the stone. After cutting, smooth any rough edges with a rubbing stone or sandpaper.
As the installation progresses, remove any excess mortar from the surface of the stones with a damp sponge. This will prevent the mortar from hardening on the stone and creating a difficult-to-remove residue. Be careful not to disturb the joints between the stones while removing the mortar. Rinse the sponge frequently to remove excess mortar. For stubborn mortar stains, use a diluted muriatic acid solution, following the manufacturer's instructions and taking appropriate safety precautions.
Allow the mortar to cure completely before exposing the fireplace to heat or moisture. The curing time will vary depending on the type of mortar and the ambient temperature and humidity. Refer to the manufacturer's instructions for the recommended curing time. During the curing period, protect the fireplace from rain, snow, and extreme temperatures. A well-cured mortar joint is essential for the long-term durability of the stone veneer installation.
Post-Installation Considerations
Once the stone veneer has been installed and the mortar has cured, several post-installation considerations are important to ensure the longevity and appearance of the fireplace. These considerations include cleaning, sealing, and ongoing maintenance.
Clean the stone veneer thoroughly to remove any remaining mortar residue, dust, or dirt. Use a soft brush and a mild detergent solution to clean the stone. Avoid using harsh chemicals or abrasive cleaners, which can damage the stone. Rinse the stone thoroughly with clean water to remove any soap residue. Allow the stone to dry completely before proceeding to the next step.
Consider applying a sealant to the stone veneer to protect it from water damage, staining, and efflorescence. Choose a sealant that is specifically designed for natural stone and compatible with the chosen stone type. Follow the manufacturer's instructions for applying the sealant. A sealant will help to maintain the appearance of the stone and prevent long-term damage. Reapply the sealant periodically as needed, typically every one to three years, depending on the type of sealant and the exposure conditions.
Perform regular maintenance to ensure the long-term beauty and functionality of the stone veneer fireplace. Inspect the fireplace periodically for cracks, loose stones, or damaged mortar joints. Repair any damage promptly to prevent further deterioration. Keep the stone veneer clean by regularly dusting or wiping it down with a damp cloth. Avoid placing heavy objects on the stone veneer, which can cause damage. Ensure proper ventilation around the fireplace to prevent moisture buildup. A well-maintained stone veneer fireplace will provide years of enjoyment and enhance the value of the home.
Additionally, consider the fire safety aspects of the installation. Ensure that the stone veneer is installed in accordance with local building codes and regulations. Maintain proper clearances between the fireplace and combustible materials. Have the fireplace inspected annually by a qualified professional to ensure that it is operating safely and efficiently. Install carbon monoxide detectors in the home to protect against carbon monoxide poisoning. Following these fire safety guidelines will help to ensure the safety of the occupants and prevent potential hazards.
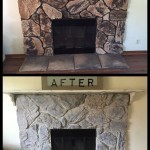
The successful installation of natural stone veneer on a fireplace requires meticulous planning, careful execution, and ongoing maintenance. By adhering to these guidelines, homeowners can achieve a visually stunning and durable fireplace that enhances the aesthetic appeal and value of their home. The choice of stone, the quality of the installation, and the diligence of the maintenance all contribute to the long-term success of the project.

Thin Stone Veneers Make A Fireplace Update Easy Swenson Granite 100 Natural Stones

Thin Natural Stone Veneer Installation Fireplace

Stone Veneer Fireplace Winchester Ma Concord Stoneworks

Updating Your Fireplace With Natural Thin Stone Veneer

Natural Stacked Stone Veneer Fireplace Ideas

Professional Stonework Stone Fireplace Surround Hearths

The Benefits Of Thin Stone Veneer For Your Fireplace

How To Install A Stone Veneer Fireplace Shoe Makes New

Mediterra Natural Stone Veneer Exterior Fireplace Installation Quarry Mill

Modern Rustic Fireplace Interior Stone Veneer Living Room Design Buechel
Related Posts