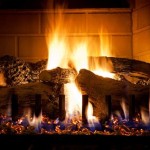
Installing a Heatilator Fireplace Fan: A Step-by-Step Guide
Installing a Heatilator fireplace fan can significantly improve the efficiency and effectiveness of your fireplace. These fans circulate warm air throughout the room, enhancing the heat distribution and making your fireplace a more practical heating source. However, installing a fan requires some technical expertise and careful planning. This guide outlines the essential steps for successfully installing a Heatilator fireplace fan.
Choosing the Right Fan
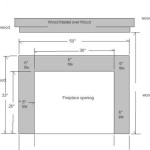
The first step is to select an appropriate Heatilator fireplace fan. Several factors determine the ideal choice, including the size and type of your fireplace, the desired heat output, and the fan's features. Some important considerations include:
Fireplace Size:
The fan's size and power should match your fireplace's dimensions. A small fan may not effectively circulate air in a large room, while an oversized fan could be too powerful for a smaller fireplace.Heat Output:
Consider the desired heat output and the size of the room you want to heat. Choose a fan with a suitable CFM (cubic feet per minute) rating to achieve the desired warmth.Features:
Some fans offer additional features like adjustable speed settings, remote controls, and timers. Select features that align with your preferences and needs.Compatibility:
Ensure the fan you choose is compatible with your fireplace model. Check the manufacturer's specifications for compatibility guidelines and installation instructions.
Installation Process
Once you have chosen the right fan, you can begin the installation process. Remember to prioritize safety and refer to the manufacturer's instructions for specific guidance.
Prepare the Area:
Clear the fireplace area of any obstacles or debris that could interfere with installation. Disconnect the power supply to the fireplace if necessary.Mount the Fan:
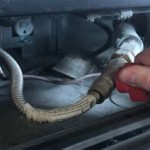
Locate the ideal position for the fan within the fireplace. Some models have designated mounting brackets or slots for secure attachment. Ensure the fan is positioned where it will not obstruct airflow or create a fire hazard.Connect the Power Supply:
If the fan requires a separate power source, connect it to an appropriate outlet. Make sure the wiring is secure and properly insulated.Test the Fan:
Once the installation is complete, test the fan to ensure it operates correctly. Check for any unusual noises, vibrations, or problems with the airflow.
Safety Considerations
Safety is paramount when installing a Heatilator fireplace fan. Observe these precautions to prevent accidents and ensure a smooth installation process:
Fire Safety:
Never install the fan near any flammable materials or obstruct the fireplace's flue. Ensure the fan is positioned at a safe distance from the firebox and other heat sources.Electrical Safety:
Use properly insulated wiring and ensure all connections are secure and tight. Avoid overloading the electrical circuits and follow all electrical safety guidelines.Professional Help:
If you are unsure about any step or encounter difficulties, seek professional guidance from a qualified electrician or fireplace installer.
Benefits of Heatilator Fireplace Fans
Installing a Heatilator fireplace fan provides numerous benefits that enhance the efficiency and enjoyment of your fireplace:
Increased Heat Output:
The fan effectively circulates warm air throughout the room, maximizing the heat generated by the fire.Even Heat Distribution:
The fan helps distribute heat evenly, ensuring all areas of the room are comfortably warm.Energy Savings:
By helping to distribute heat more effectively, the fan can reduce the need for other heating sources, potentially saving on energy costs.Enhanced Comfort:
The fan creates a more comfortable and inviting atmosphere by circulating warm air and reducing drafts.

Installing A Fireplace Blower Gfk4 Gfk4a In Heatilator Natural Gas

Gfk21 Fireplace Blower Fan Kit Installation

Gfk4 Gfk4a Fireplace Blower Kit Installation

Installing A Fireplace Blower Gfk4 Gfk4a In Heatilator Natural Gas

Heatilator Fireplaces Canadian Home Inspection Services

Fbk 250 Fireplace Blower Kit Installation

Installing A Fireplace Blower Gfk4 Gfk4a In Heatilator Natural Gas

Fk24 Fireplace Blower Kit Installation

Blower Kit For Heatilator Fireplaces Gfk4

Noisy Gas Fireplace Blower Here S How To Replace It Diy
Related Posts