Dimplex Fireplace Remote Instructions: A Comprehensive Guide
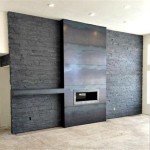
Dimplex fireplaces are a popular choice for adding ambiance and supplemental heat to homes. The convenience of a remote control enhances this experience, allowing users to adjust settings without needing to directly interact with the unit. However, understanding the functions and proper usage of the remote is crucial for optimal operation. This article provides comprehensive instructions on how to effectively use a Dimplex fireplace remote control.
The specific functions and button layouts can vary slightly depending on the Dimplex fireplace model. However, certain core features and operational principles remain consistent across many models. Therefore, this guide offers a general overview that will assist users in navigating the functionalities of their Dimplex fireplace remote.
Initial Setup and Synchronization
Before the remote can be used, it must be properly synchronized or paired with the fireplace unit. This process ensures that the remote's signals are correctly received by the fireplace. The synchronization procedure generally involves the following steps:
First, ensure that the fireplace is plugged into a functioning power outlet. Locate the control panel on the fireplace itself. This panel is typically found on the front of the unit, behind a door or panel, or on the side. The control panel will have a power button and potentially other function buttons.
Second, on the control panel, locate the "Learn" or "Sync" button. The specific label might differ based on the model. Press and hold this button for a few seconds. An indicator light on the fireplace, often near the control panel, will usually blink or change color to indicate that the unit is in learning mode.
Third, while the indicator light is blinking or the fireplace is in learning mode, press and hold the power button on the remote control. Continue holding the power button until the indicator light on the fireplace stops blinking or the fireplace confirms the synchronization, often with a beep or a change in the indicator light's status. This step completes the pairing process.
If the remote does not synchronize on the first attempt, repeat the process. Ensure that the batteries in the remote are fresh and properly installed. Interference from other electronic devices can sometimes disrupt the synchronization process. Moving the fireplace unit or the remote away from potential sources of interference might be necessary. If problems persist, consulting the specific user manual for the fireplace model is recommended.
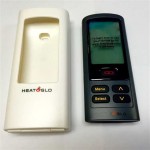
Understanding Common Remote Control Functions
Once the remote is synchronized, it can be used to control various functions of the Dimplex fireplace. Common functions and associated buttons include:
Power On/Off: This button, usually represented by a power symbol, turns the fireplace on and off. When the fireplace is turned off using the remote, it may remain in a standby mode, consuming minimal power. To completely power down the unit, it might be necessary to disconnect it from the power outlet.
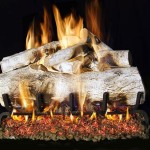
Flame Effect Control: These buttons adjust the intensity and appearance of the flame effect. Some remotes feature buttons to increase or decrease the flame height or speed. Others might offer different flame color options. Experimenting with these buttons will allow users to customize the flame effect to their preference.
Heater Control: These buttons control the fireplace's heating function. Typically, there are separate buttons to turn the heater on and off, and to adjust the heat settings. Some models feature multiple heat settings, such as low and high. Others might have a thermostat control, allowing users to set a desired room temperature. The heater function is designed to provide supplemental heat and is not intended to heat an entire house.
Thermostat Setting: If the fireplace features a thermostat, the remote will include buttons to adjust the desired room temperature. These buttons may be labeled with "+" and "-" symbols, or with temperature values. Setting a desired temperature allows the fireplace to automatically regulate its heat output to maintain a consistent room temperature. The thermostat feature helps conserve energy and maintain a comfortable environment.
Timer Function: Some Dimplex fireplace remotes include a timer function. This feature allows users to set a specific duration for the fireplace to operate. After the set time expires, the fireplace will automatically turn off. The timer function is useful for conserving energy and ensuring that the fireplace does not remain on unnecessarily. The timer settings are typically adjusted using dedicated timer buttons on the remote.
Brightness Control: Certain models offer brightness control for the flame effect and potentially for the log set or ember bed. These buttons allow users to adjust the overall illumination of the fireplace display, creating a more subdued or vibrant visual effect as desired.
Troubleshooting Common Remote Control Issues
Despite proper setup and understanding of the functions, issues can still arise with the remote control. Common problems and potential solutions include:
Remote Not Working: The first step is to check the batteries. Replace the batteries with fresh ones of the correct type. Ensure that the batteries are installed with the correct polarity (+ and -). If the batteries were recently replaced, try cleaning the battery contacts inside the remote with a cotton swab dampened with isopropyl alcohol. Corrosion can prevent the batteries from making proper contact.
Remote Not Synchronizing: If the remote fails to synchronize with the fireplace, repeat the synchronization process carefully, following the steps outlined previously. Ensure that the fireplace is in pairing mode and that the remote is within close proximity to the unit. Interference from other electronic devices can sometimes disrupt the synchronization process. Temporarily turning off other electronic devices might help. Consult the fireplace's user manual for specific synchronization instructions.
Inconsistent Performance: If the remote works intermittently or requires being held at a specific angle to function, this might indicate a weak battery signal or a problem with the remote's internal components. Try replacing the batteries again. If the problem persists, the remote might need to be replaced. Contact Dimplex customer support or an authorized dealer to purchase a replacement remote.
Button Malfunctions: If specific buttons on the remote are not functioning correctly, try cleaning the remote's surface with a soft, damp cloth. Dirt and debris can sometimes interfere with the button's contact points. If cleaning does not resolve the issue, the remote might need to be replaced.
In all troubleshooting scenarios, referring to the Dimplex fireplace's user manual is highly recommended. The manual contains detailed information about the specific model and its remote control, including troubleshooting tips and contact information for customer support. Understanding the specific features and functionalities of the Dimplex fireplace will ensure optimal performance and longevity.

Dimplex Optional Remote Control User Manual

Service Manual

Remote Control Dimplex Fire Ignite Xl Revillusion Pf3033hg 10 On See

Quality Dimplex Electric Fireplaces

Dimplex Ignitexl 60 Inch Built In Linear Electric Fireplace Black Appliance Guys

Dimplex Replacement Remote 6700520240rp Friendly Fires

Dimplex Multi Fire Remote Control Setup Part 1

Dimplex Ignite Xl 60 Optiflame Supreme Fireplaces

Dimplex Replacement Remote 6700520240rp Friendly Fires

Genuine Dimplex Remote Control Cdw16e Electricspares
Related Posts