How To Build An Outdoor Gas Fireplace With Cinder Blocks
An outdoor gas fireplace provides a functional and aesthetic focal point for any outdoor living space. Building one using cinder blocks offers a durable and customizable solution for creating a cozy and inviting atmosphere. This article details the process of constructing an outdoor gas fireplace using cinder blocks, emphasizing safety, proper planning, and accurate execution.
Before commencing construction, thorough planning and preparation are essential. This stage involves assessing the desired location, obtaining necessary permits, and gathering the required materials and tools. Neglecting this step can lead to structural instability, code violations, and project delays.
Planning and Preparation
The initial step in building an outdoor gas fireplace involves selecting an appropriate location. Consider factors such as proximity to the house, prevailing wind direction, available space, and existing landscaping. The fireplace should be situated a safe distance from flammable materials such as trees, fences, and overhanging structures. Check local building codes and ordinances regarding required setbacks from property lines and other structures. In many jurisdictions, permits are required for outdoor fireplace construction, particularly those involving gas lines. Contact the local building department to obtain the necessary permits and ensure compliance with all applicable regulations.
Once the location is determined and permits are secured, create a detailed design plan for the fireplace. This plan should include the dimensions of the fireplace, the type of gas burner unit to be used, and the layout of the cinder blocks. Consider the desired height, width, and depth of the fireplace, as well as the overall aesthetic. A scale drawing or computer-aided design (CAD) rendering can be helpful in visualizing the finished product and ensuring accurate material calculations.
A critical component of planning is selecting the appropriate gas burner unit. Choose a unit that is specifically designed for outdoor use and is appropriately sized for the intended fireplace dimensions. Consider the British Thermal Units (BTUs) output of the burner unit, as this will determine the amount of heat produced. Ensure that the burner unit is compatible with the type of gas service available (natural gas or propane). Obtain detailed installation instructions for the selected burner unit, as these instructions will be essential during the installation process.
Materials and tools necessary for this project include cinder blocks (also known as concrete masonry units or CMUs), mortar mix, a gas burner unit, gas piping and fittings, a concrete foundation, reinforcing steel (rebar), safety glasses, work gloves, a level, a trowel, a mixing tub or wheelbarrow, a shovel, a measuring tape, and a gas line tester. The quantity of cinder blocks required will depend on the size and design of the fireplace. Purchase approximately 10% more materials than calculated to account for cuts, breakage, and waste. Ensure that all gas piping and fittings are approved for use with the specific type of gas being used.
Before commencing construction, ensure that the work area is properly prepared. Clear the area of any vegetation, debris, and obstructions. Mark out the footprint of the fireplace foundation according to the design plan. Ensure that the marked area is level and square. Call 811 to locate any underground utilities before digging. This is a crucial step to prevent damage to gas lines, electrical cables, and other underground infrastructure.
Foundation Construction
A stable and level foundation is critical for the structural integrity of the outdoor gas fireplace. The foundation should be constructed of concrete and should extend below the frost line to prevent frost heave. The depth of the frost line varies depending on the geographical location, so consult local building codes for specific requirements.
Begin by excavating the area within the marked footprint to the required depth for the foundation. The excavation should be deep enough to accommodate a layer of compacted gravel base, the concrete footing, and the concrete slab. A typical foundation depth is 12-18 inches, but this may vary depending on local conditions.
After excavating, add a layer of compacted gravel to the bottom of the excavation. The gravel layer should be approximately 4-6 inches thick and should be compacted using a hand tamper or plate compactor. The gravel layer provides drainage and helps to prevent settling of the foundation. Install the required plumbing before pouring the concrete. This is a much easier process at this stage.
Next, construct a concrete form around the perimeter of the excavation. The form should be made of lumber and should be securely braced to prevent it from shifting during the concrete pour. Ensure that the form is level and square. Reinforcing steel (rebar) should be placed within the form to provide additional strength to the concrete. The rebar should be positioned at regular intervals and should be tied together with wire. The size and spacing of the rebar will depend on the size and weight of the fireplace.
Mix the concrete according to the manufacturer's instructions. Use a concrete mixer or a wheelbarrow to thoroughly combine the cement, sand, and gravel. Add water gradually until the concrete reaches a workable consistency. Pour the concrete into the form, ensuring that it fills all the spaces around the rebar. Use a shovel or trowel to distribute the concrete evenly and to remove any air pockets. Level the surface of the concrete with a screed board or a long, straight edge. Allow the concrete to cure for at least 7 days before removing the form. Keep the concrete moist during the curing process to prevent cracking.
Once the concrete has cured, remove the form and inspect the foundation. Ensure that the foundation is level, square, and free of cracks. Any imperfections should be repaired before proceeding with the construction of the fireplace walls.
Fireplace Wall Construction
With a solid foundation in place, the next step involves constructing the fireplace walls using cinder blocks. This process requires careful attention to detail to ensure the walls are plumb, level, and structurally sound.
Begin by laying the first course of cinder blocks on the foundation. Apply a layer of mortar to the foundation and carefully position each cinder block, ensuring that it is level and aligned with the design plan. Use a level to check the alignment of each block and make adjustments as needed. The mortar joints between the blocks should be approximately 3/8 inch thick. Stagger the joints between each course of blocks to increase the structural integrity of the wall. This technique, known as "running bond," creates a stronger and more stable wall.
As each course of blocks is laid, use a trowel to remove any excess mortar and to smooth the joints. The joints should be neatly finished to create a professional-looking appearance. Check the plumb of the walls frequently using a level or plumb bob. Any deviations from plumb should be corrected immediately to prevent the walls from leaning. Reinforce the walls with vertical rebar at regular intervals. The rebar should be inserted into the hollow cores of the cinder blocks and should be anchored to the foundation. Fill the cores of the cinder blocks with concrete to provide additional strength and stability. Ensure that the concrete is thoroughly compacted to eliminate any air pockets.
Construct the fireplace opening according to the design plan. Use a lintel (a horizontal beam) to support the blocks above the opening. The lintel can be made of steel, concrete, or wood. Ensure that the lintel is properly sized to support the weight of the blocks above it. As the walls are built, create any necessary openings for gas lines and ventilation. The gas line opening should be positioned according to the installation instructions for the gas burner unit. The ventilation openings should be located near the base of the fireplace to allow for proper air circulation. The specific size and number of ventilation openings will depend on the size of the fireplace and the type of gas burner unit being used.
Continue laying courses of cinder blocks until the desired height of the fireplace is reached. The top course of blocks should be capped with concrete or stone to create a finished look. The cap should be slightly wider than the walls to provide a small overhang. This overhang will help to protect the walls from rain and snow.
Allow the mortar to cure for at least 72 hours before proceeding with the installation of the gas burner unit. Keep the walls moist during the curing process to prevent cracking. Inspect the walls for any cracks or imperfections and repair them before installing the burner unit.
Gas Line Installation and Final Assembly
The final stage involves installing the gas line, connecting the gas burner unit, and performing a leak test. This stage requires extreme caution and should only be performed by a qualified gas technician.
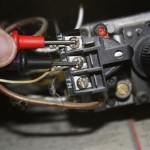
Before connecting the gas line, ensure that the gas supply is turned off at the main valve. Connect the gas line to the burner unit according to the manufacturer's instructions. Use approved gas piping and fittings and ensure that all connections are tight. Apply pipe joint compound to the threads of all fittings to prevent leaks. After connecting the gas line, perform a leak test using a gas leak detector or a soap and water solution. Apply the leak detector or soap and water solution to all gas line connections. If any bubbles appear, tighten the connections until the leak is stopped. Do not use an open flame to check for gas leaks.
Install the gas burner unit according to the manufacturer's instructions. Ensure that the burner unit is properly positioned within the fireplace opening and that all connections are secure. Connect the gas supply line to the burner unit and perform another leak test. Once the gas line is properly connected and there are no leaks, install any decorative features, such as fire glass, lava rock, or ceramic logs. Follow the manufacturer's instructions for the placement of these features. Ensure that the decorative features do not obstruct the burner or ventilation openings.
Finally, test the fireplace to ensure that it is operating properly. Turn on the gas supply and ignite the burner unit. Observe the flame pattern and adjust the gas flow as needed. Ensure that the flame is stable and that there are no unusual odors or noises. Supervise the initial uses of the fireplace to ensure safe operation and to identify any potential issues.

How To Build An Outdoor Fireplace Contractor Broomfield Part 2

How To Build An Outdoor Fireplace Step By Guide Buildwithroman

15 Outstanding Cinder Block Fire Pit Design Ideas For Outdoor Backyard Garden

30 Amazing Diy Fire Pit Ideas Cinder Block In Ground Patio

Diy Cinder Block Fire Pit Ideas Plans Pros And Cons

Diy Cinder Block Fire Pit Ideas Plans Pros And Cons

How To Build An Outdoor Fireplace Step By Guide Buildwithroman

Cinder Block Fire Pit Diy Ideas For Your Backyard

How To Make Cinder Block Fire Pits

Diy Cinder Block Fire Pit Ideas Plans Pros And Cons
Related Posts